1SYSTEM REQUIREMENTS – Back to top
SJ HealthMag is compatible with Joomla v2.5 and Joomla v3.x. Please make sure your system meets the following requirements:
1.1 System Requirements – Joomla version 2.5
Software
- Software: PHP 5.2.4+ (5.4+ recommended)
- MySQL: 5.0.4+
Web Sever
- Apache: 2.x+
- Microsoft: IIS 7
- Nginx: 1.0 (1.1 recommended)
1.2 System Requirements – Joomla version 3.x
Software
- Software: PHP 5.3.1+ (5.4+ recommended)
Databases
- MySQL(InnoDB support required): 5.1+
- MSSQL 10.50.1600.1+
- PostgreSQL 8.3.18+
Web Severs
- Apache 2.x+
- Microsoft IIS 7
- Nginx 1.0 (1.1 recommended)
1.3 Browser Requirements
The requirements are the same with both Joomla 2.5 and Joomla 3.x
- Firefox 4+
- IE (Internet Explorer) 9+
- Google Chrome 10+
- Opera 10+
- Safari 5+
1.4 Development Environment
The requirements are the same with both Joomla 2.5 and Joomla 3.x
During the development process, Localhost is preferred. You can use the following servers on your PC to develop your site.
Windows
- WAMPSEVER
- XAMPP for Windows
Linux
- LAMP Bubdle
- XAMPP for Linux
Mac OS
- MAMP & MAMP Pro
- XAMPP for Mac OS
1.5 Component Requirements
K2 component – V2.6.x
Acymailing component
2DOWNLOAD – Back to top
Download Packages from our store:
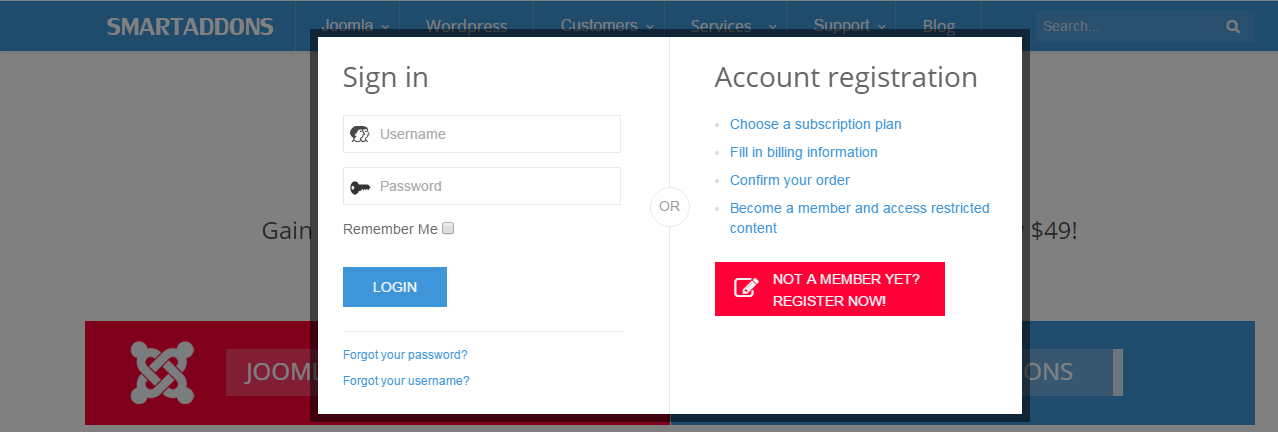
Step 1: Login your account
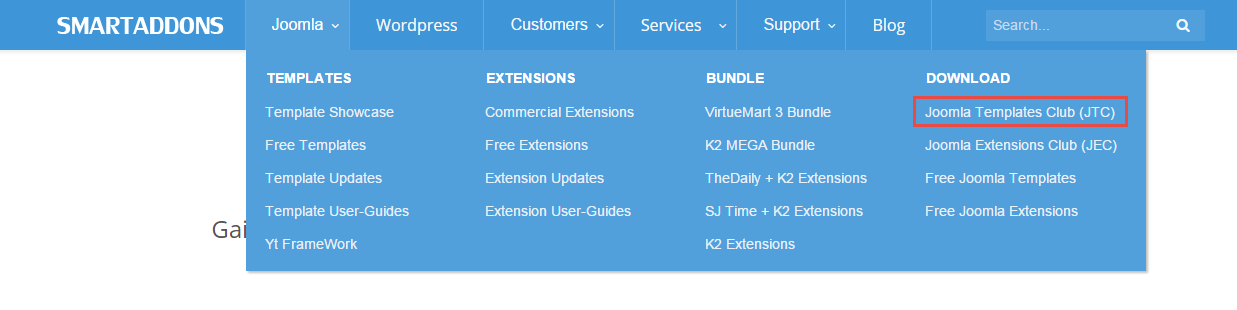
Step 2: Go to Joomla > Download > Joomla Templates Club
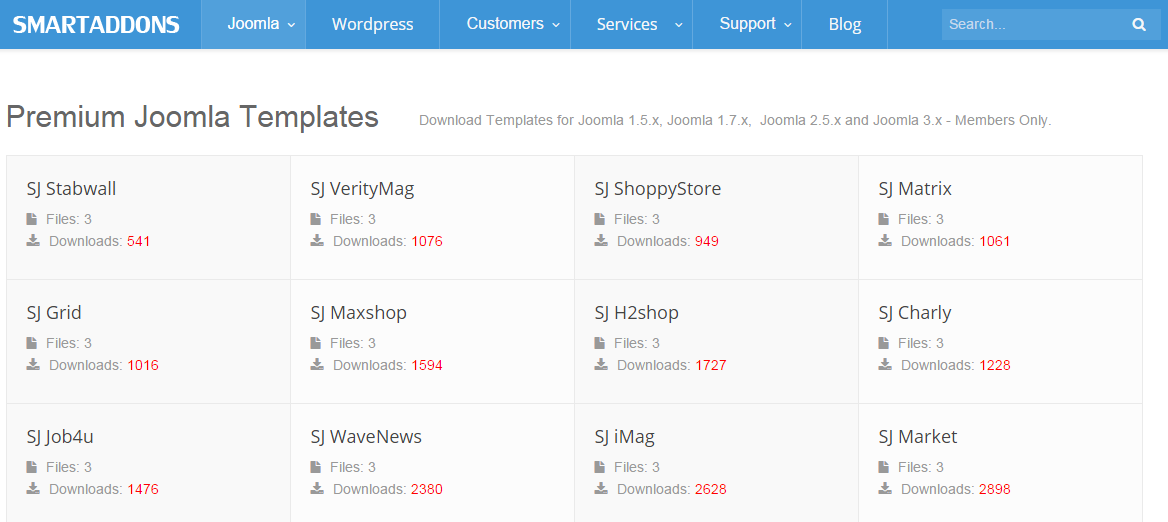
Step 3: Under Premium Joomla Templates –> Find and Download Template as you want
3INSTALLATION – Back to top
There are two ways to install a Joomla Template:
- Install Quickstart: By using this package, you will set the template exactly as our Demo with sample data. This is applied when you need a fresh Joomla with our template.
- Install Template and Extensions: This is applied when you have already installed a Joomla instance on your server. You will need only be using the zipped files in “Extensions” and “Template” folders mentioned above.
3.1 Install with Quickstart Package:
The following steps will guide to install a quickstart package of SmartAddons Joomla Template: Click here
3.2 Install with Template and Extensions:
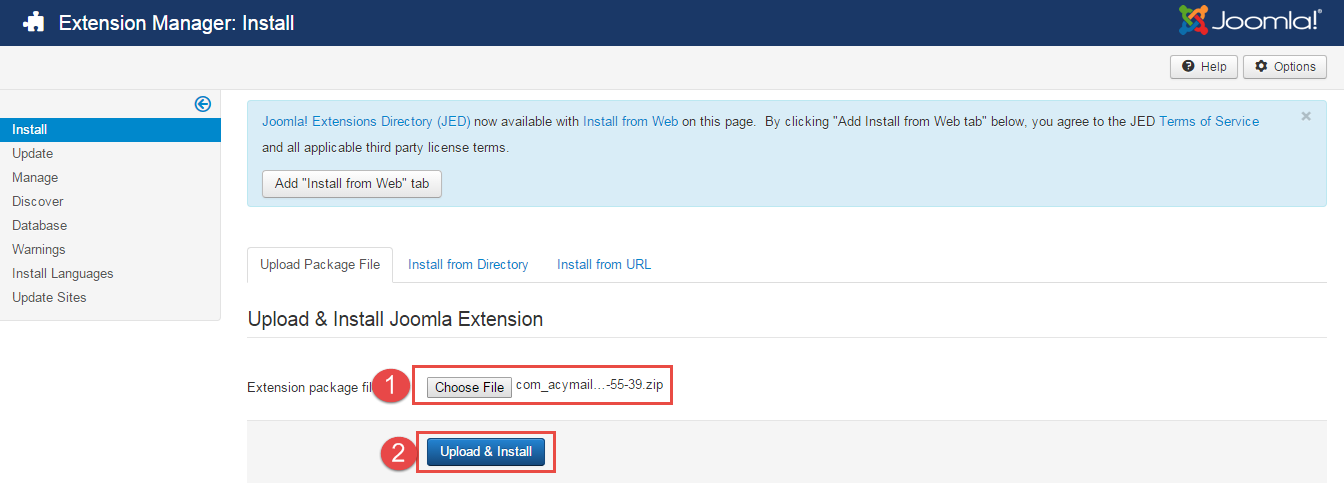
Step 1: Access the installation panel
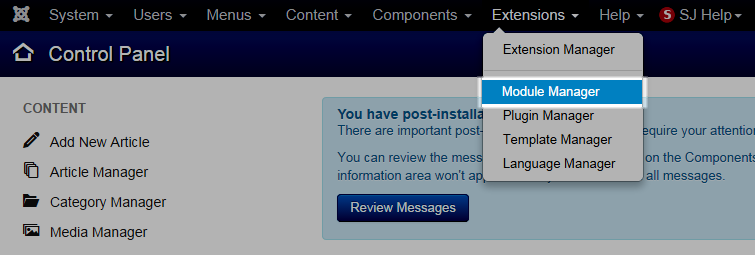
Navigate to Extensions >> Extension Manager.

Step 2: Install Template
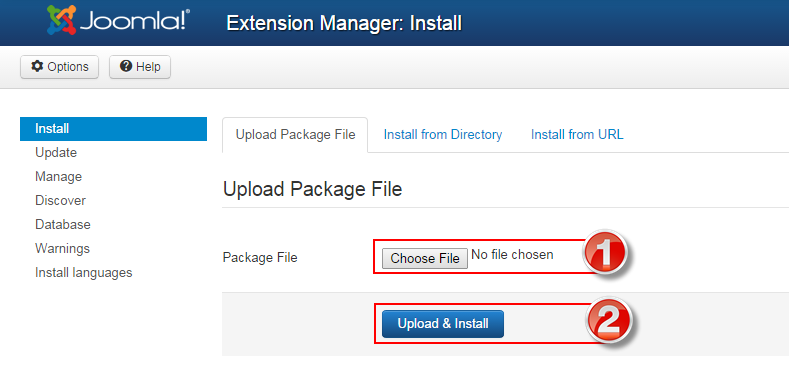
- Install with option: Upload Package File
Firstly, you choose file template.zip then click on the button Upload & Install to install the uploaded package.
Step 3: Set New Installed Template As Default Template
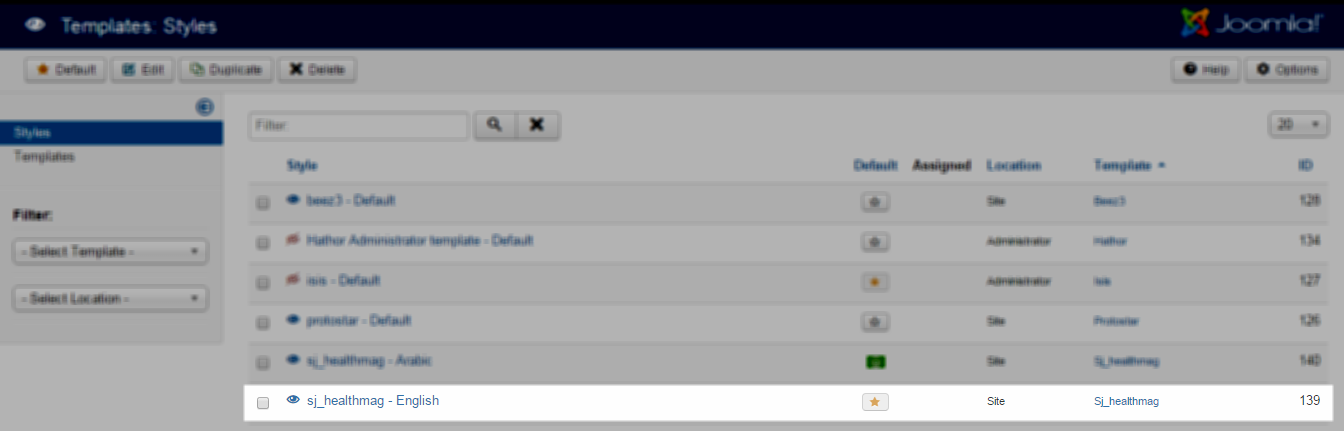
- Go to Extensions >> Template Manager.
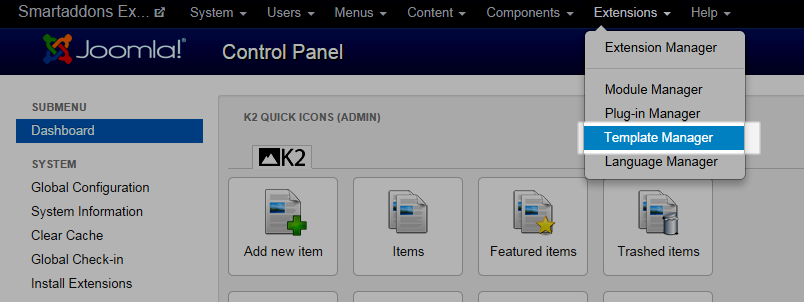
- In order to display your site with the new installed template, you have to set the template as default template
The extensions package include of (Modules/Components and Plugins).
Note: Extensions installation is the same with Template installation as above
Here is list of extensions that are used in the template.
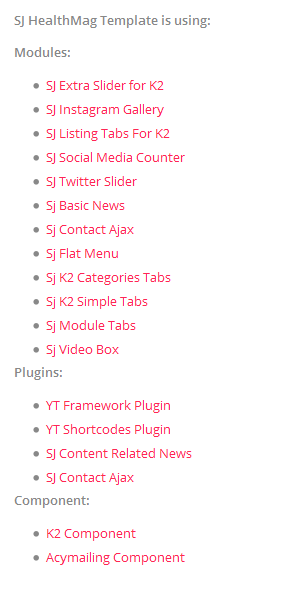
ENABLE MODULES
- Go to Extensions >> Module Manager.
- Find the new installed module. For example: with “SJ Contact Ajax “ module.
You can use the search or filter option to find the new installed module easier and enable module.
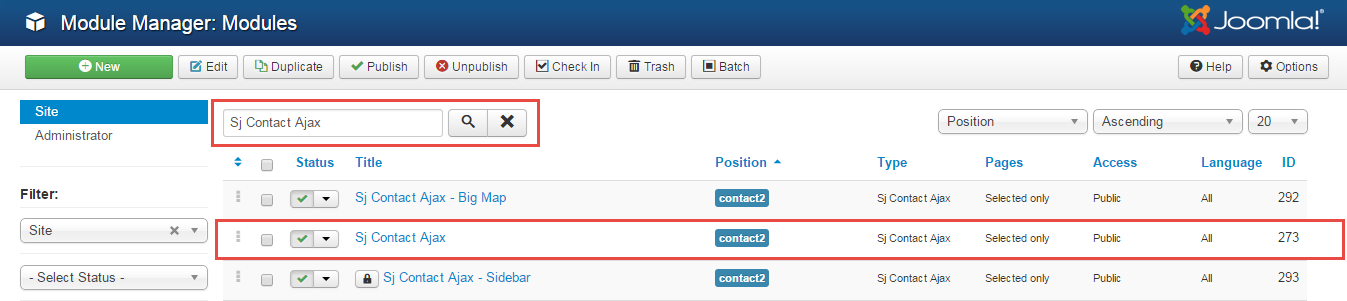
- Enable and set position for the module
When you find the new installed module, please open its configuration panel.
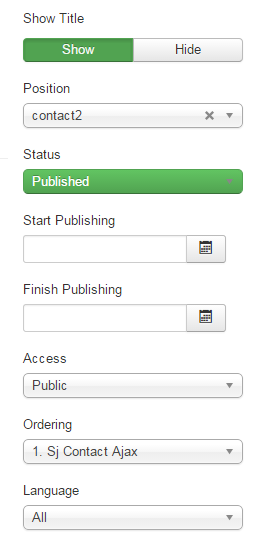
To display the module in front-page, you must publish it and set right position for the module.
Please note that not all module positions can be active in front-page, so please make sure the module is assigned to an active module position.
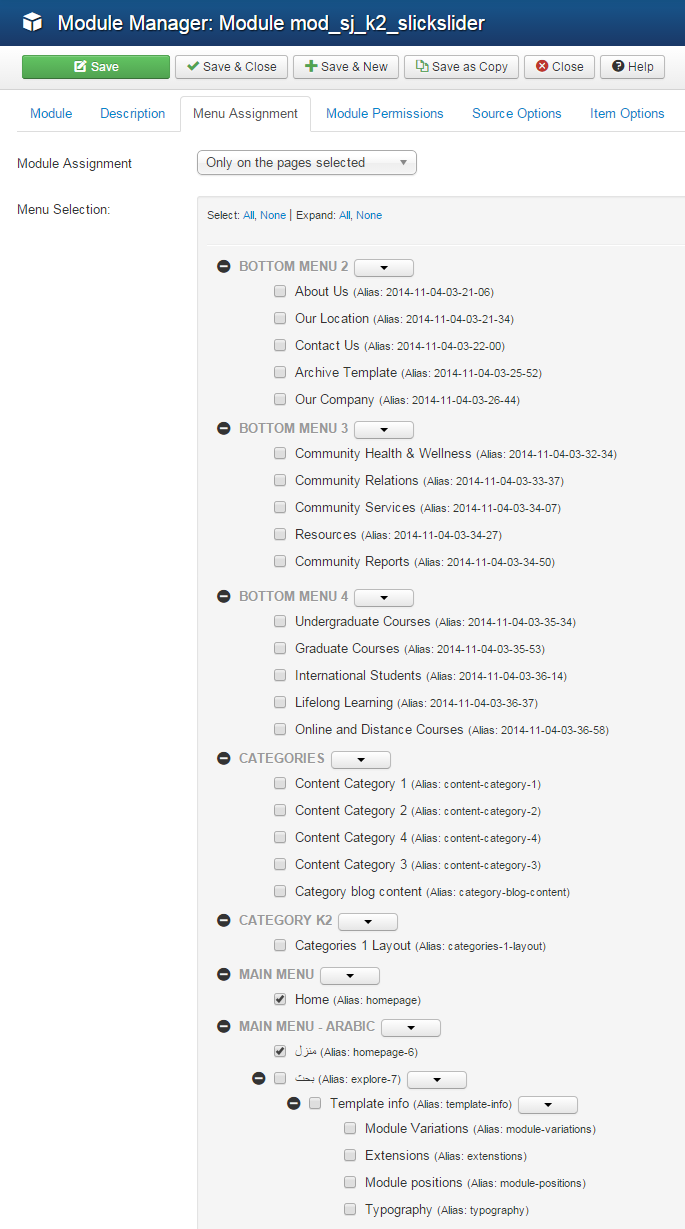
- Assign the modules to specific menus
You have to assign the modules to specific menus so that the module will be displayed in the assigned menus. There are 4 options : “On all pages, No pages, Only on the pages selected, On all pages except those selected”
- Configure the new installed module
Normally, each module has its own settings, the settings allow you to customize the module so that you can have it displayed in front-page as you wish.

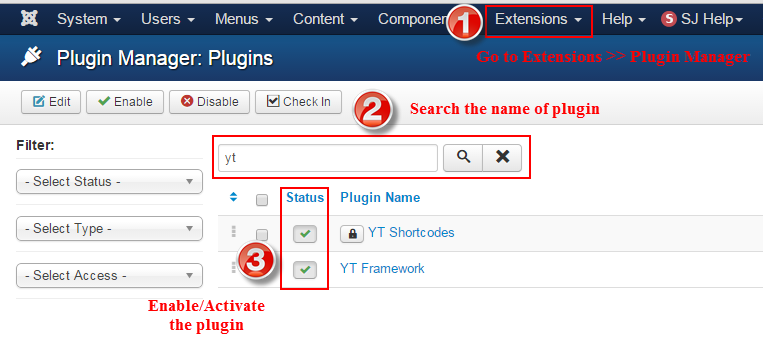
ENABLE PLUGIN
Note: all plug-ins listed are imperative.
- YT Framework Plug-in supports to add extra parameters used with Mega Menu and to compress CSS/JS/HTML when optimizing code. Besides, configure Yt Framework to show SJ Help with Report Bugs, Template Tutorials and YT Framework Tutorials or include jQuery into template. You can go here for getting more information of this plugin.
- YT Shortcode offer you an amazing tool to create advanced custom content with minimal effort or even without any knowledge how to code HTML. Please go here for getting more information of this plugin.
- SJ Content Related News is a simple plugin for content component. It helps you to show other articles in the same category. Please go here for getting more information of this plugin.
You need to install and activate them when using this template. Let’s start from 1 – 2 – 3 to active plug-ins as below:
Install Component
-
To Install Acymailing Component, you can follow these steps:
Step 1: Please go to Extensions >> Extension Manager
Step 2: Choose file Acymailing component.zip that you have downloaded and then Click on the button Upload & Install to install the uploaded package.
To install K2 Component you do the same as the installation Acymailing Component.
3.3 Install multilingual site in SJ Template
To help you about language problem when you work with SJ Template, please read this post: how to set up a multilingual site in SJ Template.
4CONFIGURATION – Back to top
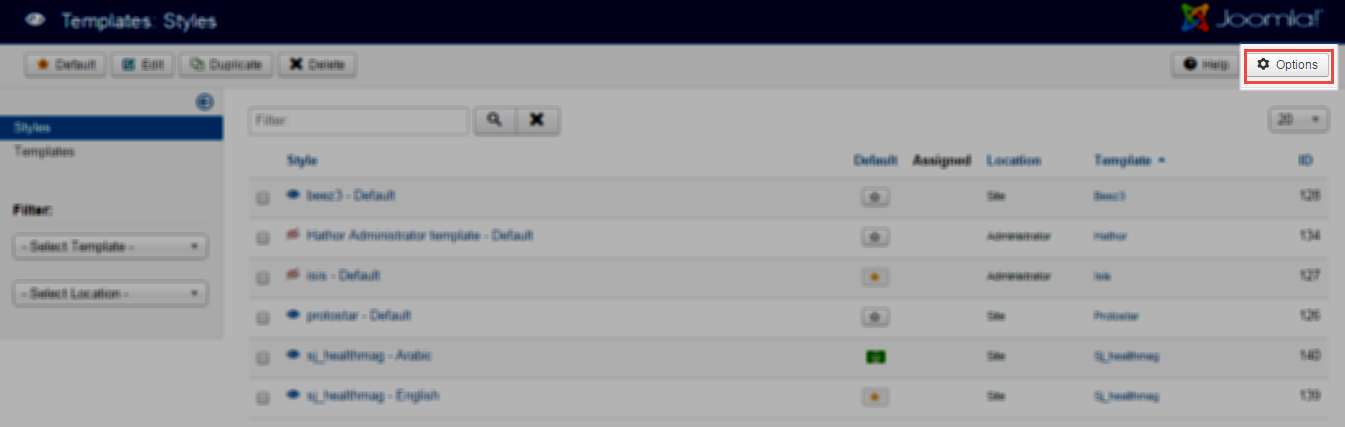
To view the Module Positions you can follow these steps:
Step 1: Go to Extensions >> Template Manager >> click the “Options” button in the toolbar.
Step 2: In the “Preview Module Positions” parameter >> click“Enable” and click the “Save” button
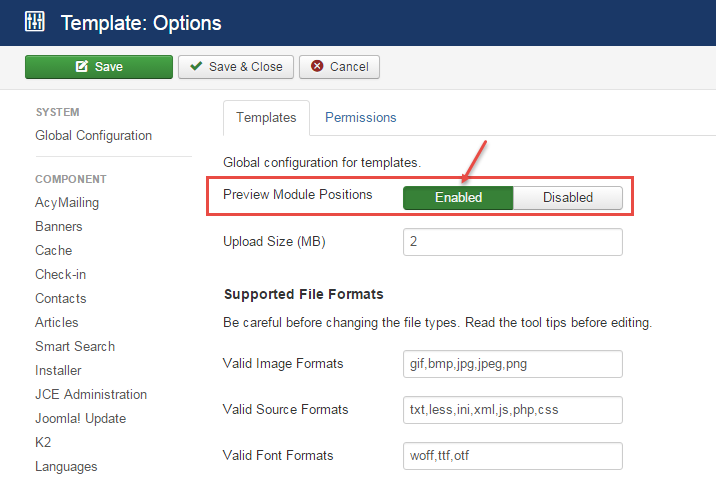
Step 3: Joomla 2.5 and Joomla 3.x will show the Template positions with ?tp=1 or &tp=1

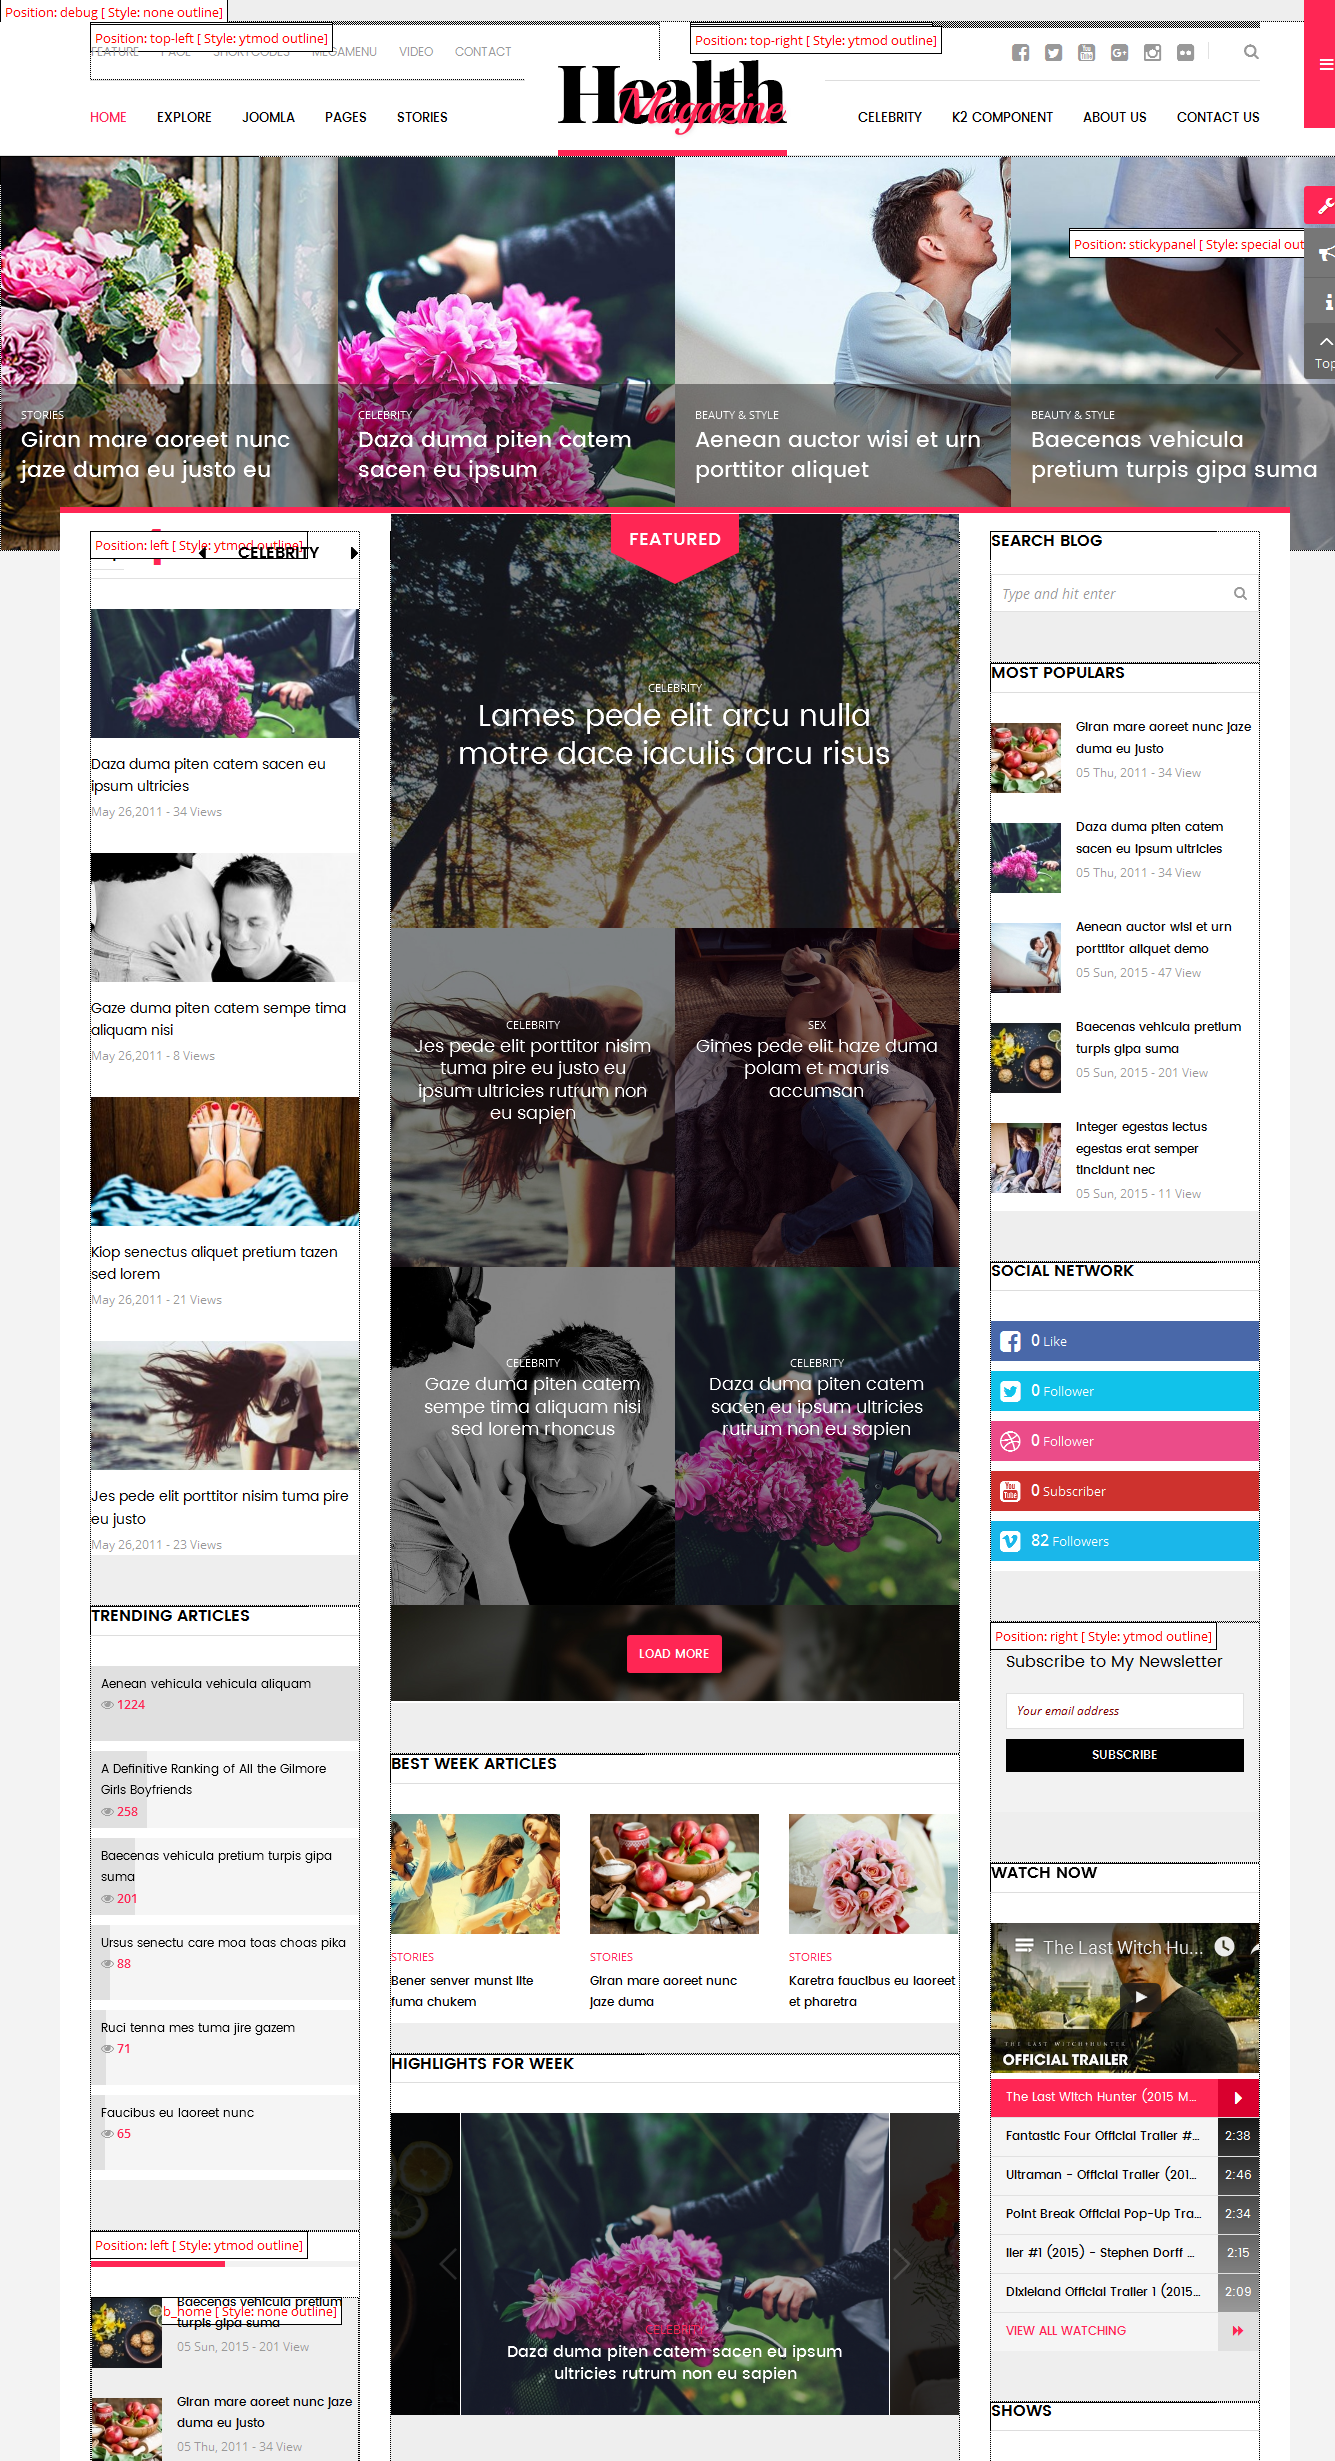
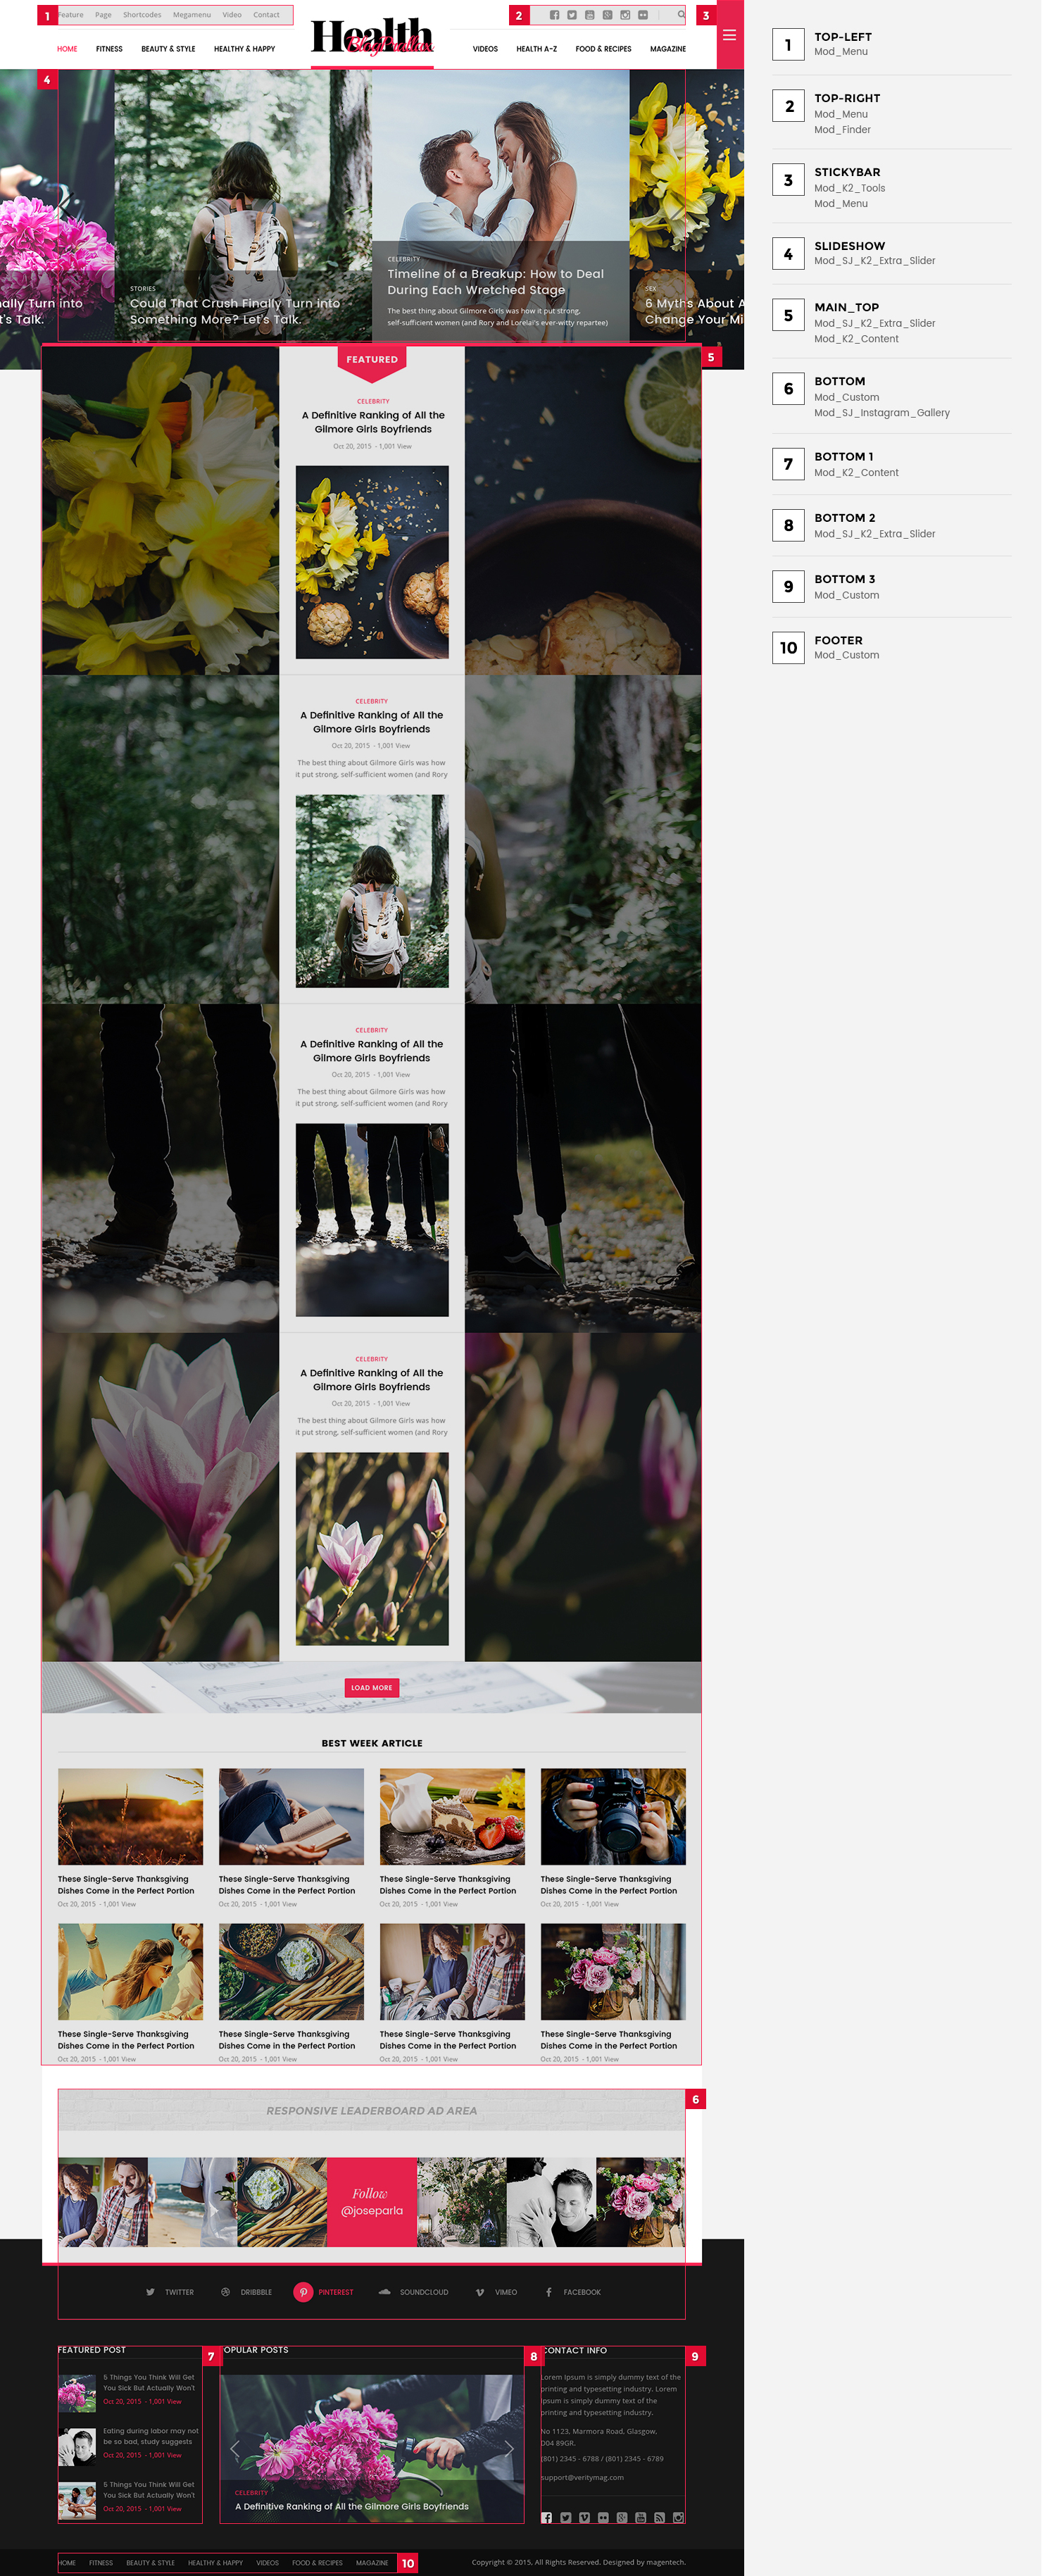
Step 4:The image below shows Module Positions
4.1 Layout Position
4.1.1 Layout1
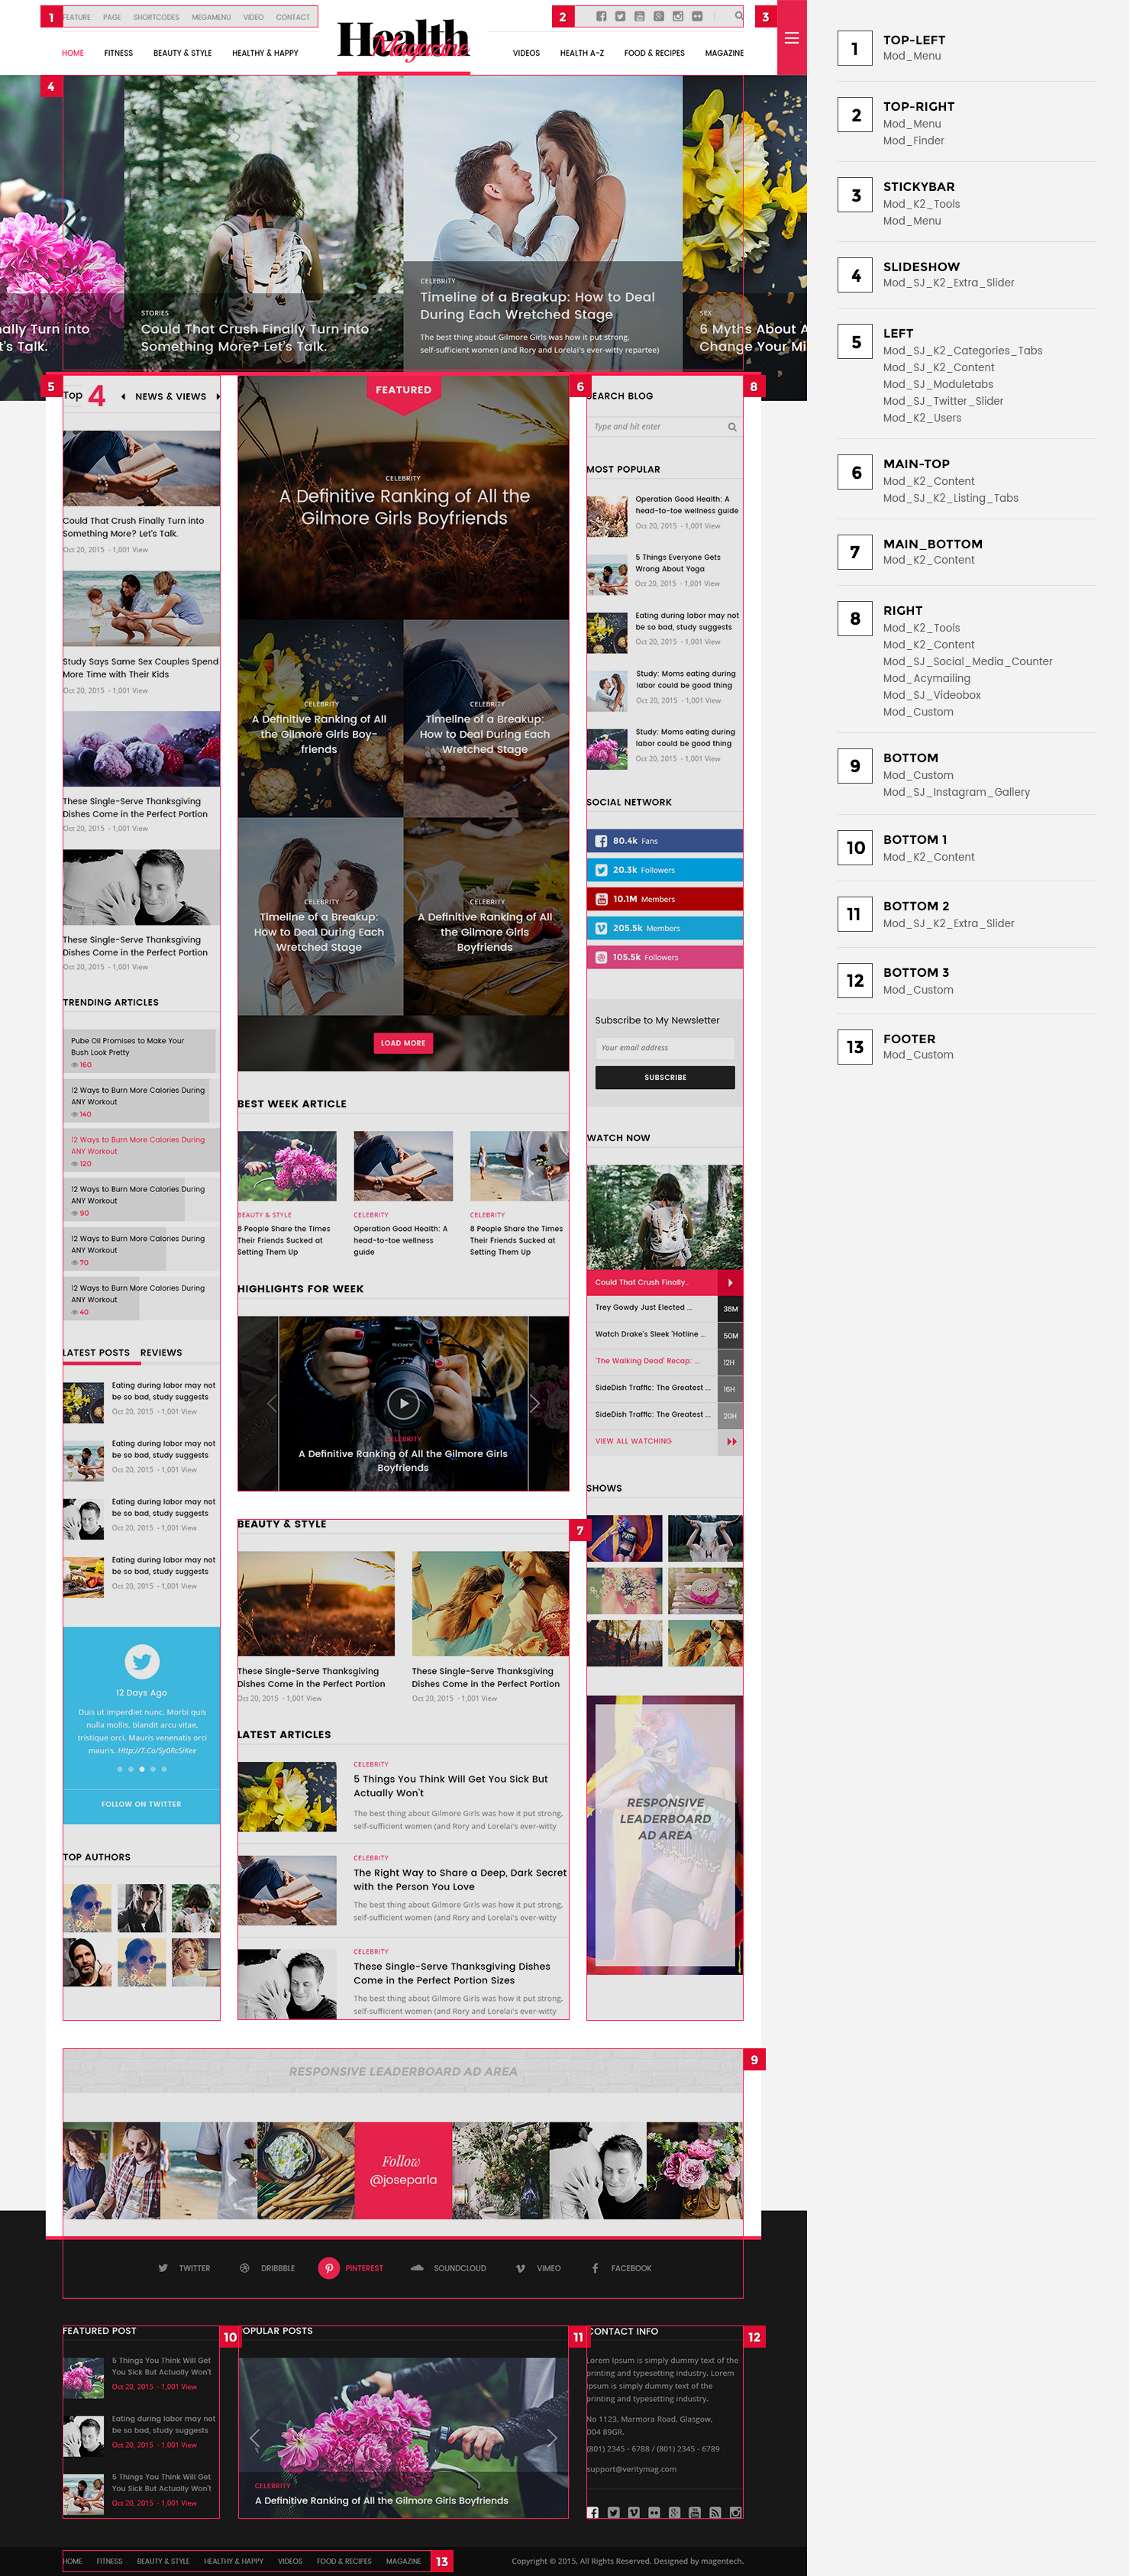
4.1.2 Layout2
4.2 Template Configuration
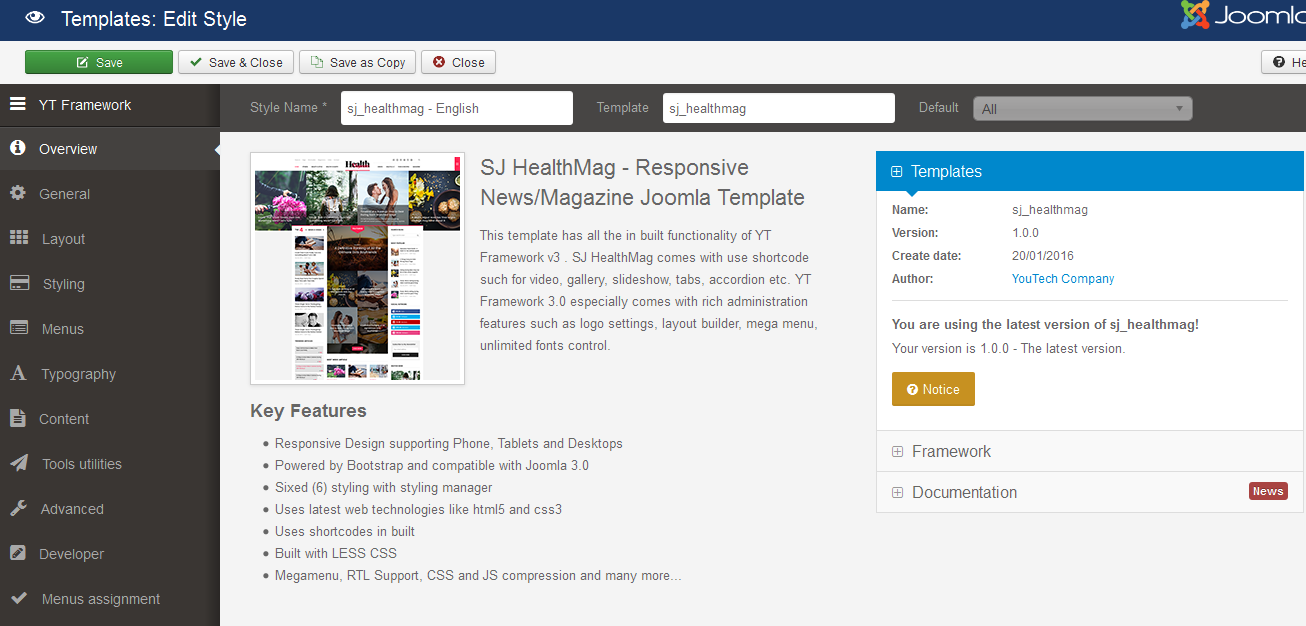
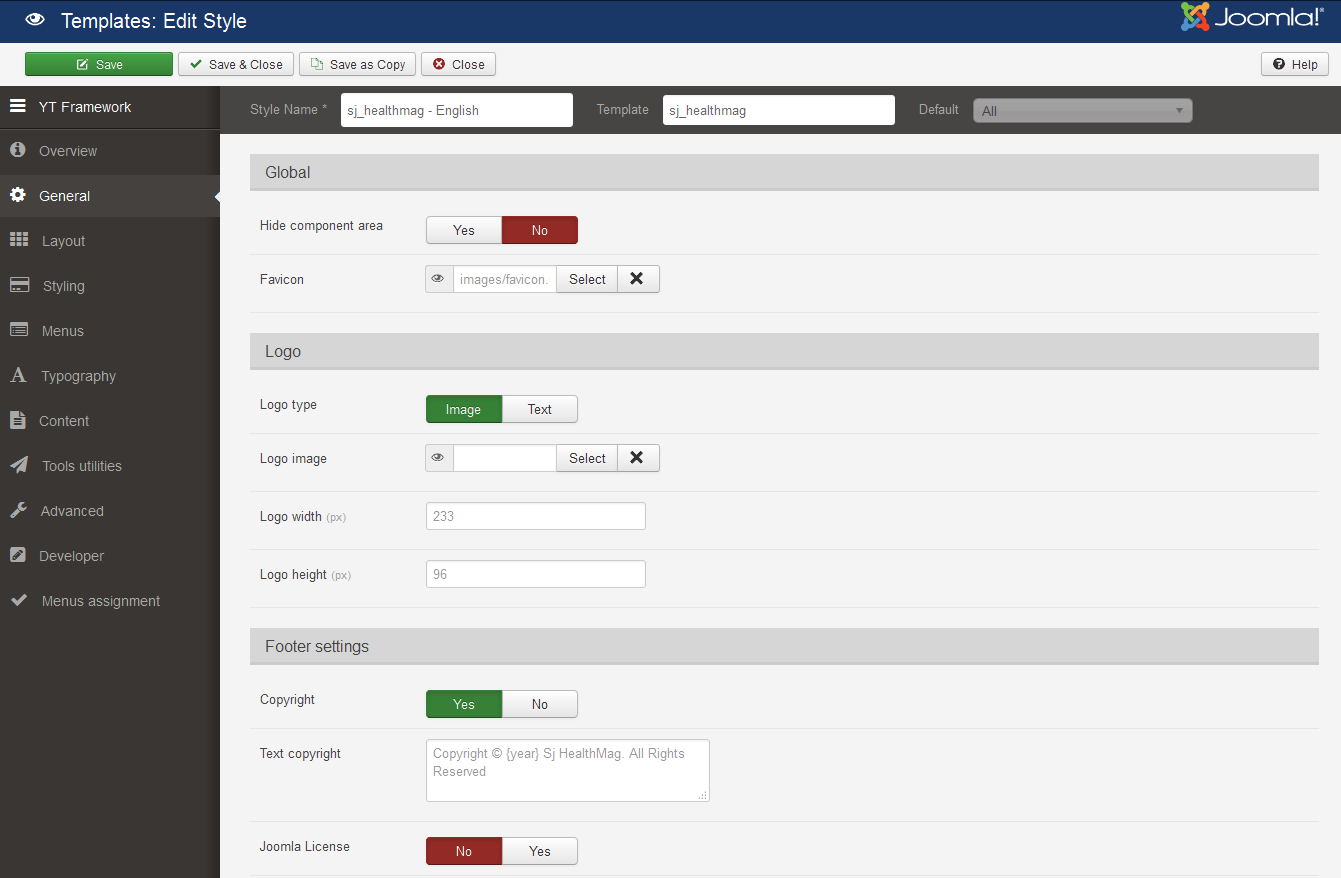
Go to Extensions > Template Manager > SJ HealthMag. All of parameters of this template are divided into the following groups, in which they are explained themselves:
OVERVIEW
GENERAL
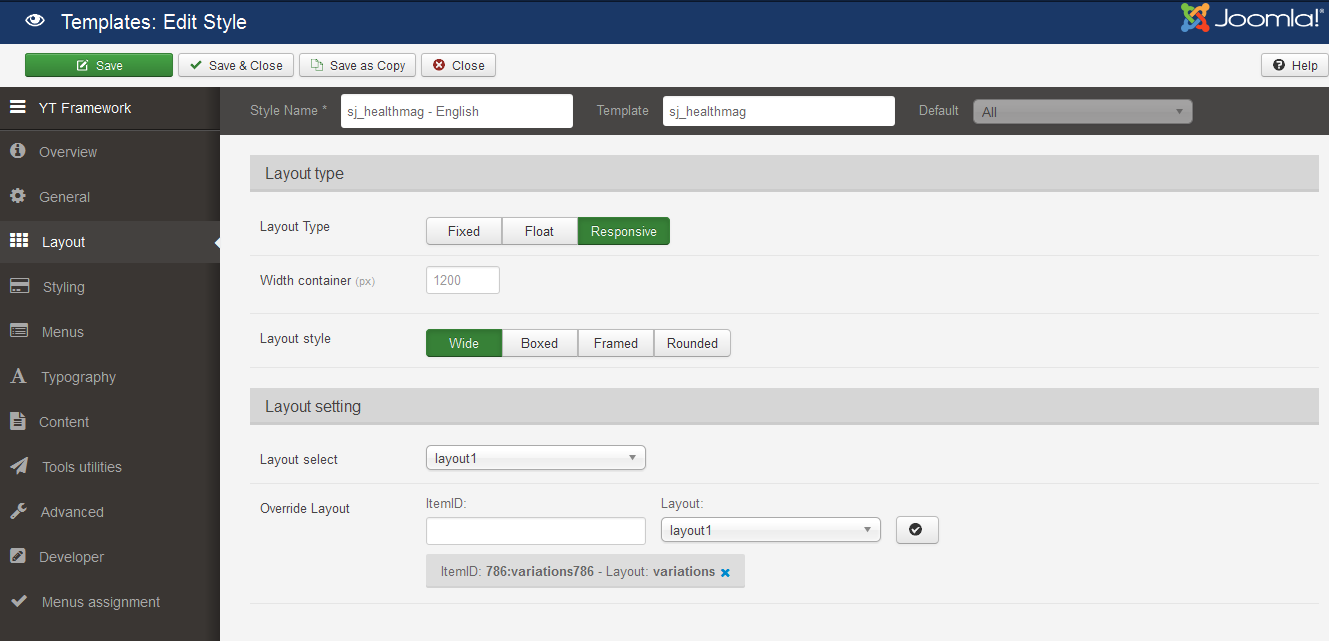
LAYOUT
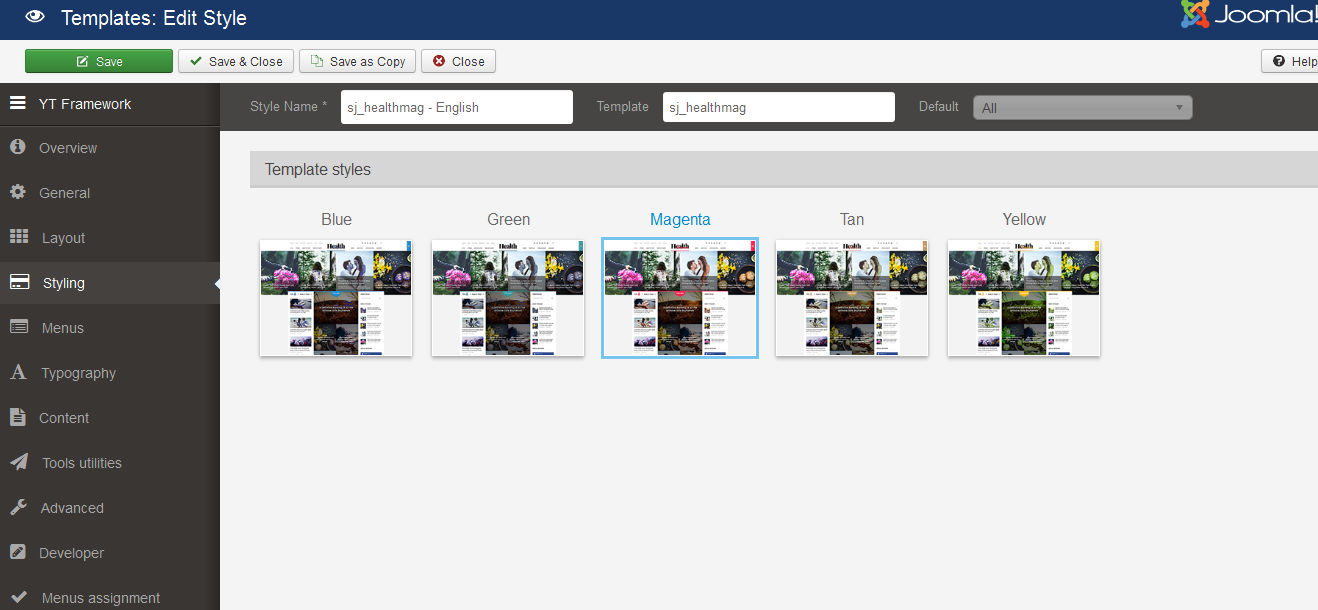
STYLING
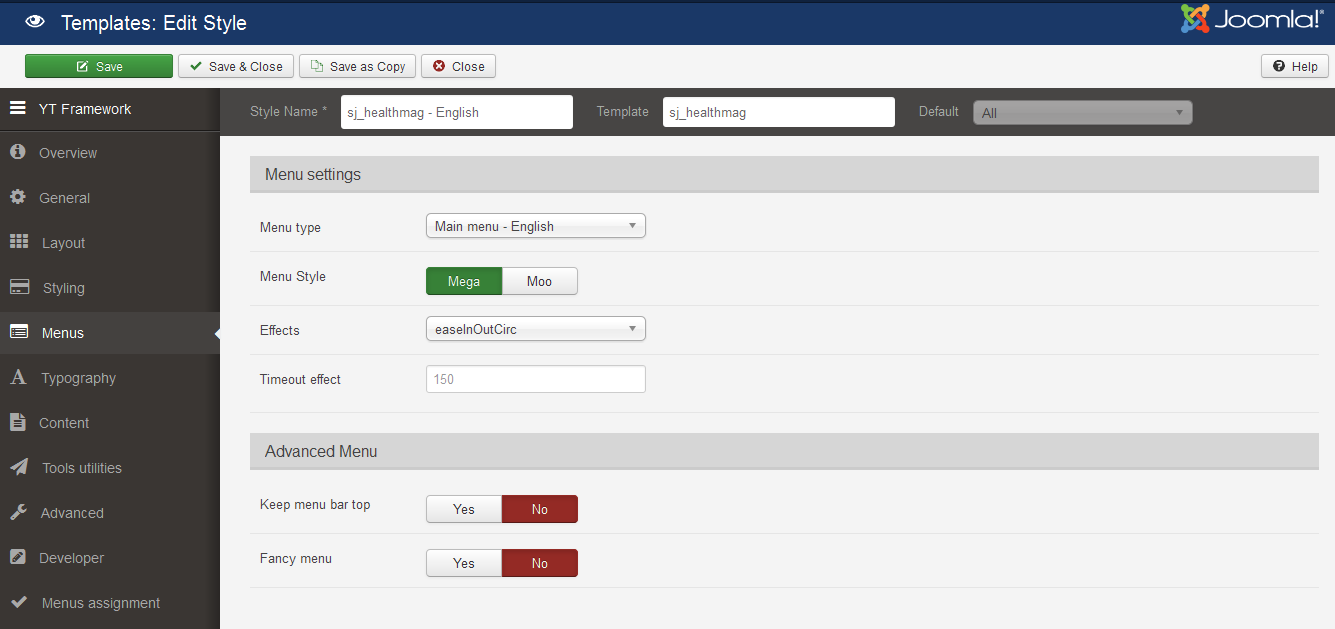
MENUS
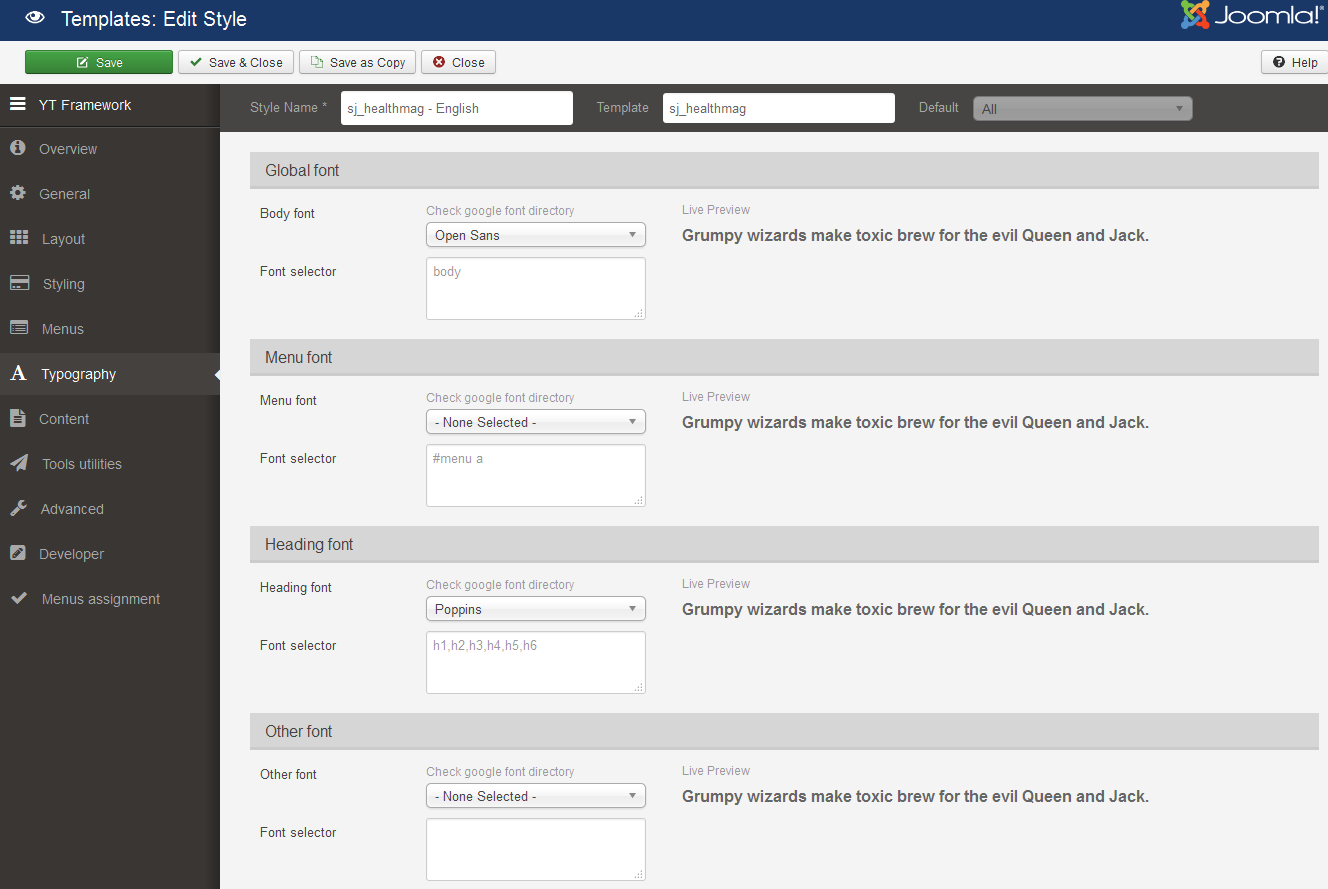
TYPOGRAPHY
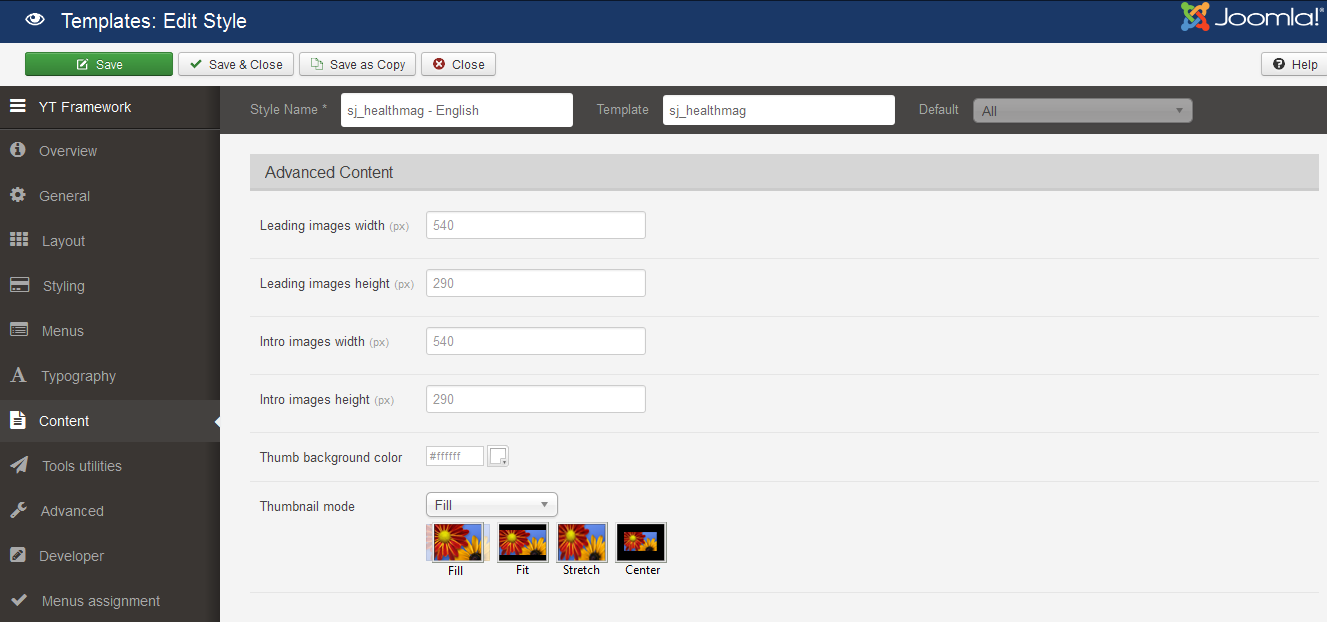
CONTENT
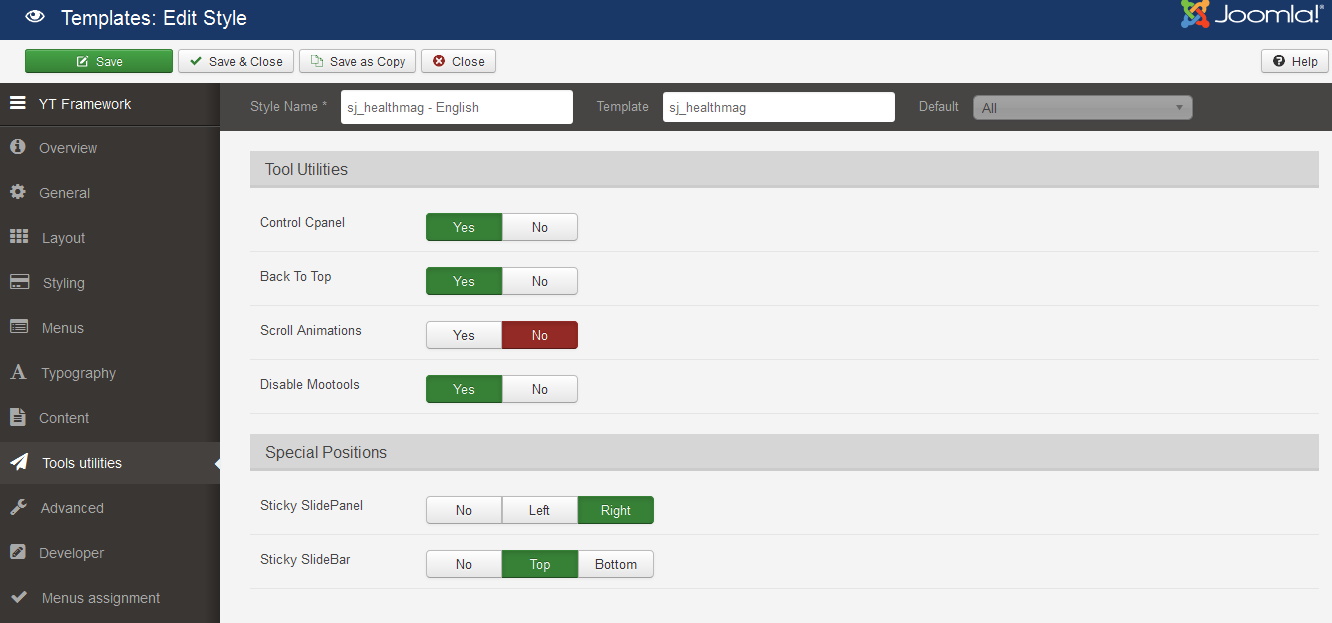
TOOLS UTILITIES
ADVANCED

4.3 Menu Configuration
If you want to make your site same as SJ HealthMag demo site, this would be helpful. We will only show the important, customized settings.
To display the Menu in SJ HealthMag, please go to Extensions >> Template Manager >> Click “Menus” parameters >> Find “Menu Type” >> choose Menu you want and click the “Save” button.
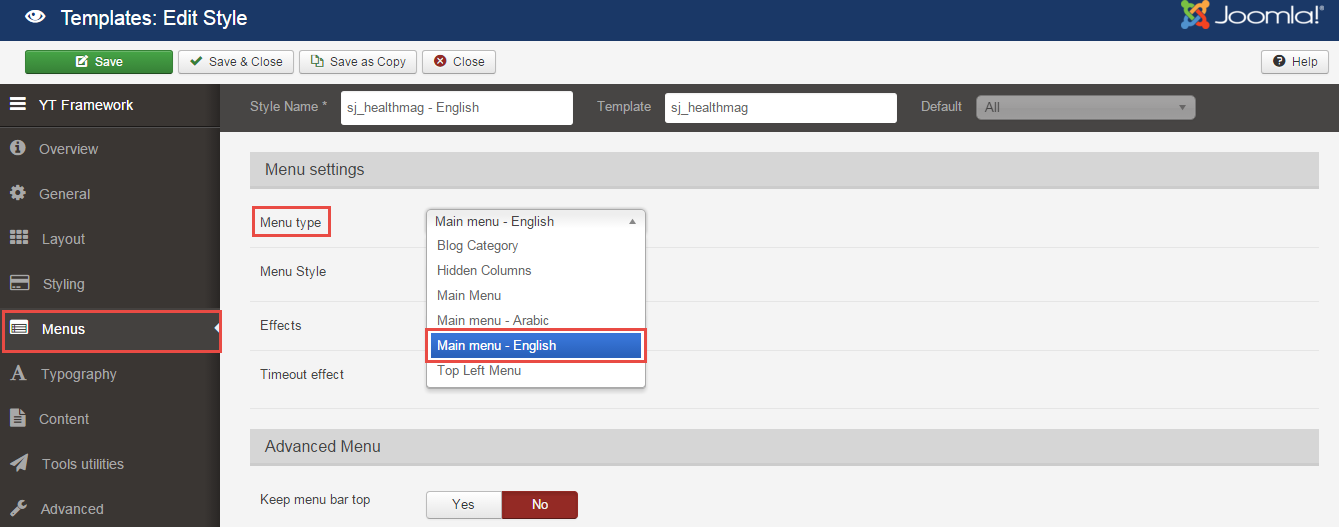
To change logo image in SJ HealthMag, please go to here
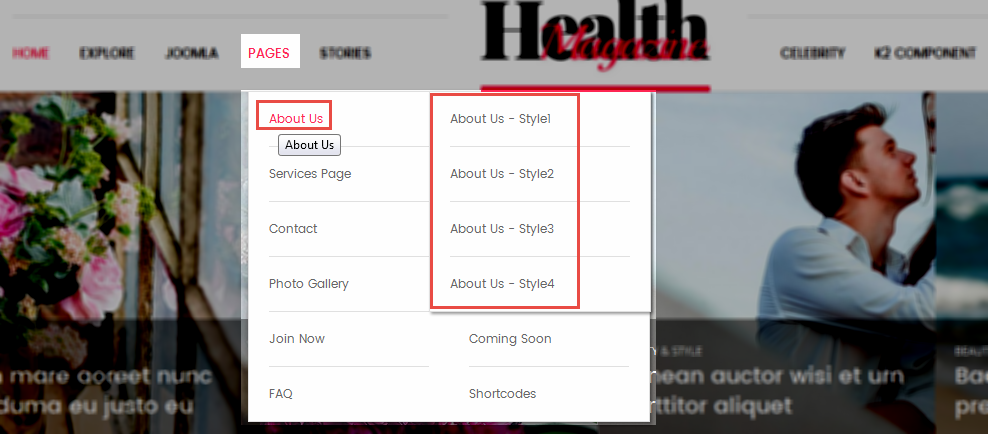
4.3.1 Pages Menu Configuration
Frontend Appearance
Tree of Pages Menu

Backend Settings
Pages Menu
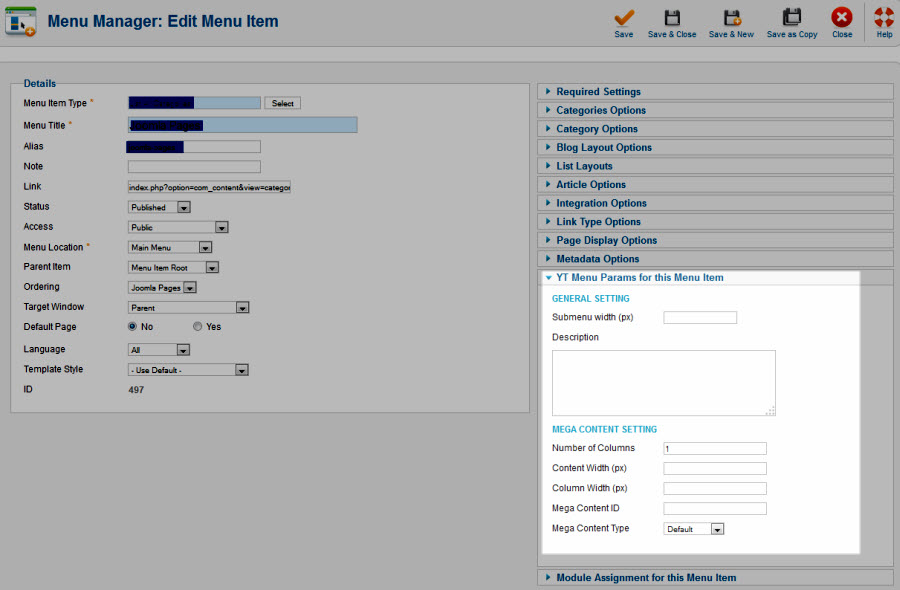
To configure “Pages Menu”, please go to Menus >> Main menu – English >> Find “Pages Menu” (you can create new menu if this menu is not exist).
Menu Item Type: Single Article
Template Style: Use default
Menu Location: Main menu – English
- Details: backend settings
- Yt Menu Params for this Menu Item: backend settings
About Us
Menu Item Type: Text Separator
Template Style: Use default
Menu Location: Main menu – English
To configure About Us, please go to Menus >> Main menu – English >> Find “About Us” (you can create new menu if this menu is not exist).
Backend Settings
- Details: backend settings
- Yt Menu Params for this Menu Item:backend settings
About Us – Style1
Menu Item Type: Single Articlef
Template Style: Use default
Menu Location: Main menu – English
To configure About Us – Style1, please go to Menus >> Main menu – English >> Find “About Us – Style1” (you can create new menu if this menu is not exist).
Backend Settings
- Details: backend settings
- Yt Menu Params for this Menu Item:backend settings
4.3.2. Stories Menu Configuration
Frontend Appearance
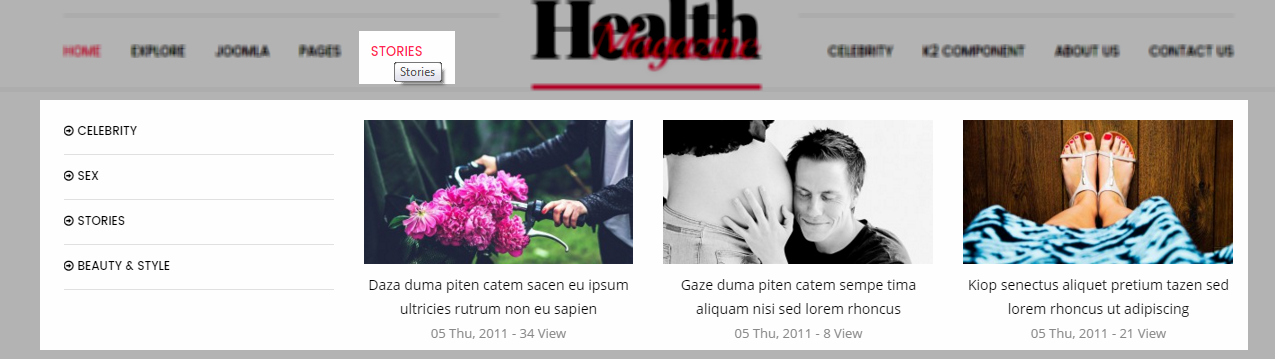
Backend Settings
Stories Menu
To configure “Stories Menu”, please go to Menus >> Main menu >> Find “Stories Menu” (you can create new menu if this menu is not exist).
Menu Item Type: Categories
Template Style: Use default
Menu Location: Main menu
- Details: Click Here
- YT Menu Params Settings: Click Here
- Options: Click Here
To configure this Menu, please go to Extensions >> Module Manager >> Click “New” button to create a new module >> Select “SJ K2 Simple Tabs” module.
Module Class Suffix: Not Use
Mega Content Type: Modules
Menu Type: SJ K2 Simple Tabs
Backend Settings
- Module: Click Here
- General Options: Click Here
- Source Options: Click Here
- Item Options: Click Here
- Advanced: Click Here
4.3.3. Celebrity Menu Configuration
Frontend Appearance
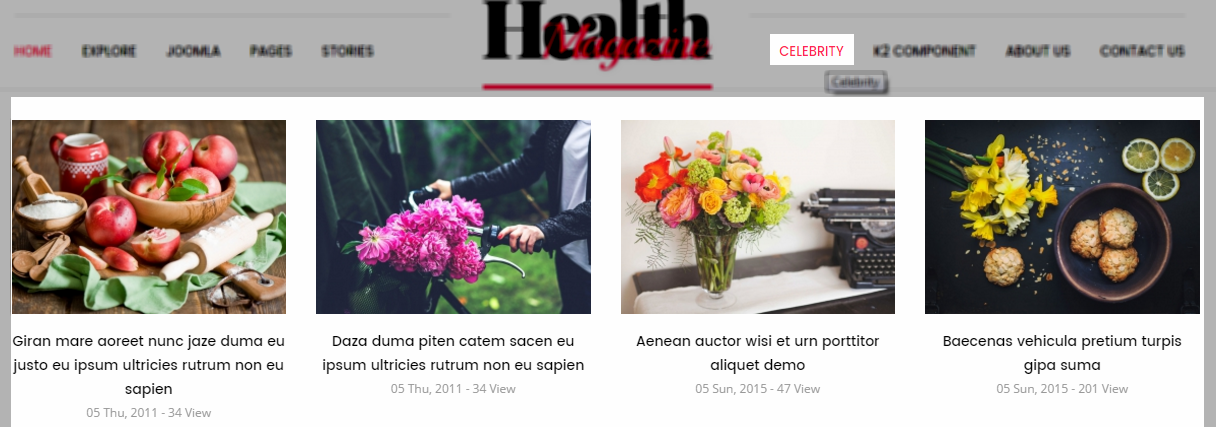
Backend Settings
Celebrity Menu
To configure “Celebrity Menu”, please go to Menus >> Main menu >> Find “Celebrity Menu” (you can create new menu if this menu is not exist).
Menu Item Type: Categories
Template Style: Use default
Menu Location: Main menu
- Details: Click Here
- YT Menu Params Settings: Click Here
- Options: Click Here
To configure this Menu, please go to Extensions >> Module Manager >> Click “New” button to create a new module >> Select “K2 Conent Mega” module.
Module Class Suffix: style_mega
Mega Content Type: Modules
Menu Type: K2 Content Mega
Backend Settings
- Module: Click Here
- Advanced: Click Here
4.4 Extension Configuration – Layout1
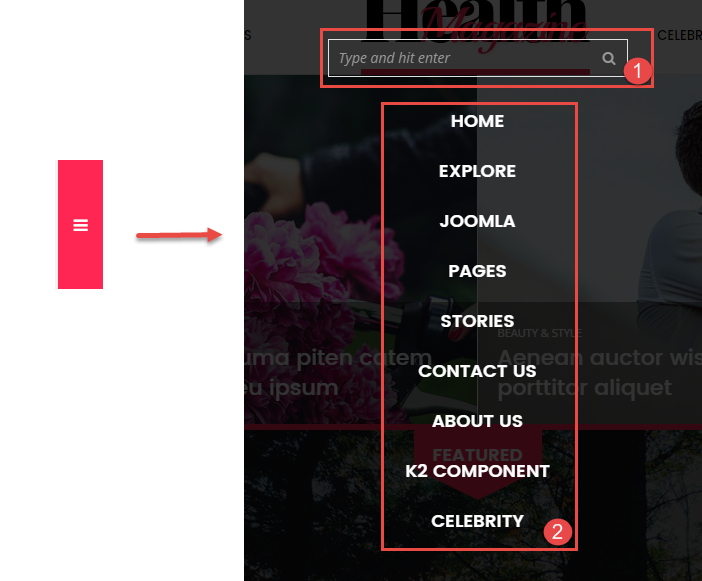
4.4.1 Top-left Position
Module Position – Module Suffix
Module Class Suffix: top_left_menu
Module Type: Menu
Frontend Appearance

Backend Settings
To configure this module, please go to Extensions >> Module Manager >> Click “New” button to create a new module >> Select “Menu” module.
- Module: backend settings
- Advanced: backend settings
4.4.2 Top-right – Position
Frontend Appearance

4.4.2.1 Follow Us – Top-right Position
Module Position – Module Suffix
Module Class Suffix: hidden-xs
Module Type: Custom HTML
Frontend Appearance

Backend Settings
To configure this module, please go to Extensions >> Module Manager >> Click “New” button to create a new module >> Select “Custom HTML” module.
- Module: backend settings
- Options: backend settings
- Advanced: backend settings
Copy and paste the Code into editor:
|
1 2 3 4 5 6 7 8 |
<ul class="hidden-xs yt_list_social"> <li><a title="Facebook" href="http://www.facebook.com/SmartAddons.page" target="_blank" rel="alternate">[yt_icon icon="icon: facebook-square" url="" size="20" background="transparent" color="#999999" radius="3px" padding="0" margin="0" border="none" ]</a></li> <li><a title="Twitter" href="https://twitter.com/smartaddons" target="_blank" rel="alternate">[yt_icon icon="icon: twitter-square" url="" size="20" background="transparent" color="#999999" radius="3px" padding="0" margin="0" border="none" ]</a></li> <li><a title="Youtube" href="http://www.youtube.com/user/smartaddons" rel="alternate">[yt_icon icon="icon: youtube-square" url="" size="20" background="transparent" color="#999999" radius="3px" padding="0" margin="0" border="none" ]</a></li> <li><a title="Google Plus" href="https://plus.google.com/u/0/103151395684525745793/posts" target="_blank" rel="alternate">[yt_icon icon="icon: google-plus-square" url="" size="20" background="transparent" color="#999999" radius="3px" padding="0" margin="0" border="none" ]</a></li> <li><a title="Instagram" href="#" target="_blank" rel="alternate">[yt_icon icon="icon: instagram" url="" size="20" background="transparent" color="#999999" radius="3px" padding="0" margin="0" border="none" ]</a></li> <li><a title="Flickr" href="#" target="_blank" rel="alternate">[yt_icon icon="icon: flickr" url="" size="20" background="transparent" color="#999999" radius="3px" padding="0" margin="0" border="none" ]</a></li> </ul> |
4.4.2.2 Search Top Right – Top-right Position
Module Position – Module Suffix
Module Class Suffix: blank search_top
Module Type: Smart Search
Frontend Appearance

Backend Settings
To configure this module, please go to Extensions >> Module Manager >> Click “New” button to create a new module >> Select “Smart Search” module.
- Module: backend settings
- Advanced: backend settings
4.4.3 StickyBar – Position
Frontend Appearance
4.4.3.1 Search Stickybar – StickyBar Position
Module Position – Module Suffix
Module Class Suffix: sj_searchbar
Module Type: K2 Tools
Backend Settings
To configure this module, please go to Extensions >> Module Manager >> Click “New” button to create a new module >> Select “K2 Tools” module.
- Module: backend settings
- Advanced: backend settings
4.4.3.2 Menu StickyBar English – StickyBar Position
Module Position – Module Suffix
Module Class Suffix: menu_stickybar
Module Type: Menu
Backend Settings
To configure this module, please go to Extensions >> Module Manager >> Click “New” button to create a new module >> Select “Menu” module.
- Module: backend settings
- Advanced: backend settings
4.4.4 SJ Extra Slider for K2 – Slideshow Position
Module Position – Module Suffix
Module Class Suffix: sjK2Extrasl
Module Type: SJ Extra Slider for K2
Frontend Appearance

Backend Settings
To configure this module, please go to Extensions >> Module Manager >> Click “New” button to create a new module >> Select “SJ Extra Slider for K2” module.
- Module: backend settings
- Source Options: backend settings
- Item Options: backend settings
- Image Options: backend settings
- Effect Options: backend settings
- Advanced: backend settings
4.4.5 Left – Position
Frontend Appearance

4.4.5.1 Sj K2 Categories Tabs – Left Position
Module Position – Module Suffix
Module Class Suffix: SjCatTab
Module Type: Sj K2 Categories Tabs
Backend Settings
To configure this module, please go to Extensions >> Module Manager >> Click “New” button to create a new module >> Select “Sj K2 Categories Tabs” module.
- Module: backend settings
- Source Options: backend settings
- Item Options: backend settings
- Image Options: backend settings
- Effect Options: backend settings
- Advanced: backend settings
4.4.5.2 Trending Articles – Left Position
Module Position – Module Suffix
Module Class Suffix: style_trending
Module Type: K2 Content
Backend Settings
To configure this module, please go to Extensions >> Module Manager >> Click “New” button to create a new module >> Select “K2 Content” module.
- Module: backend settings
- Advanced: backend settings
4.4.5.3 Sj Module Tabs – Left Position
Module Position – Module Suffix
Module Class Suffix: Not Use
Module Type: Sj Module Tabs
Backend Settings
To configure this module, please go to Extensions >> Module Manager >> Click “New” button to create a new module >> Select “Sj Module Tabs” module.
- Module: backend settings
- Advanced: backend settings
4.4.5.4 SJ Twitter Slider – Left Position
Module Position – Module Suffix
Module Class Suffix: Not Use
Module Type: SJ Twitter Slider
Backend Settings
To configure this module, please go to Extensions >> Module Manager >> Click “New” button to create a new module >> Select “SJ Twitter Slider” module.
- Module: backend settings
- Advanced: backend settings
4.4.5.5 Top Authors – Left Position
Module Position – Module Suffix
Module Class Suffix: sj_authors
Module Type: K2 Users
Backend Settings
To configure this module, please go to Extensions >> Module Manager >> Click “New” button to create a new module >> Select “K2 Users” module.
- Module: backend settings
- Advanced: backend settings
4.4.6 Main-top – Position
Frontend Appearance
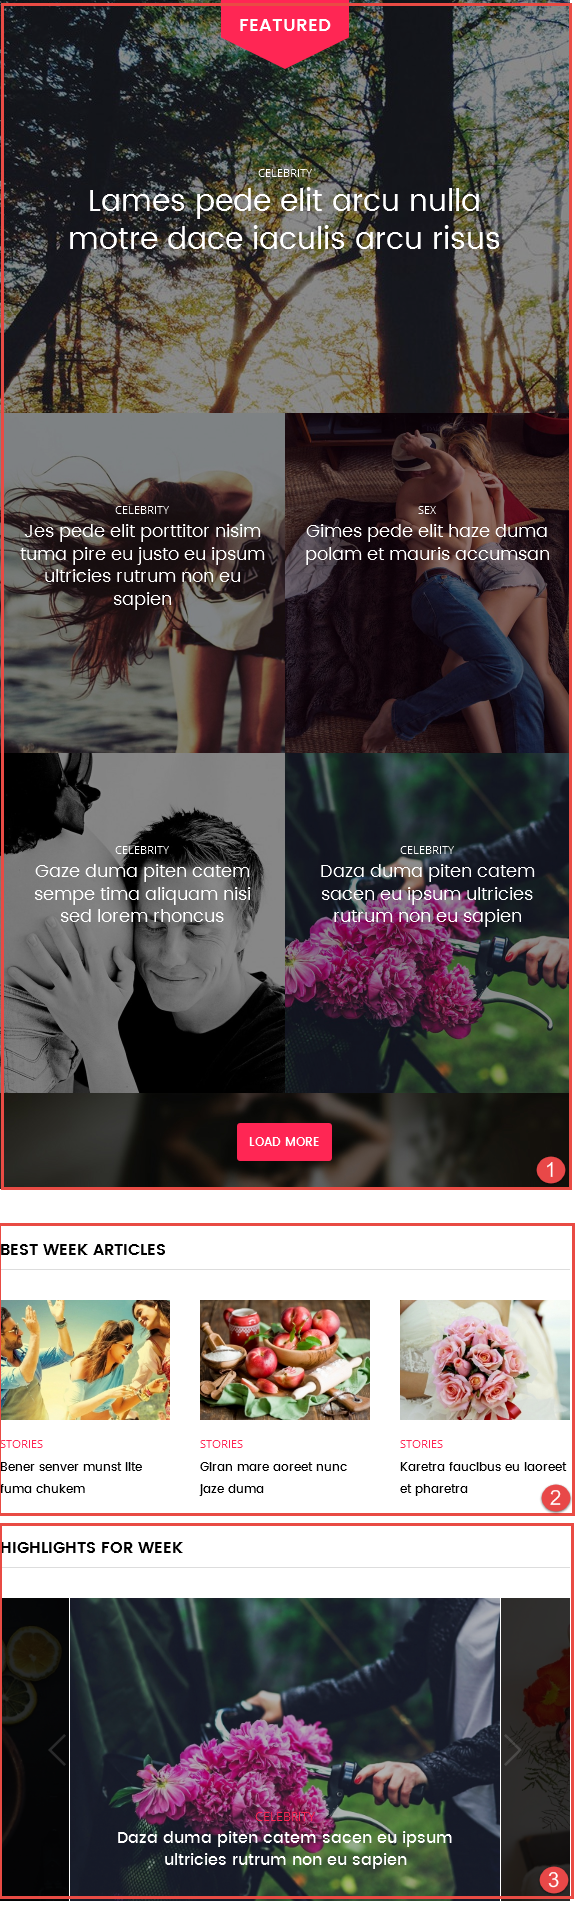
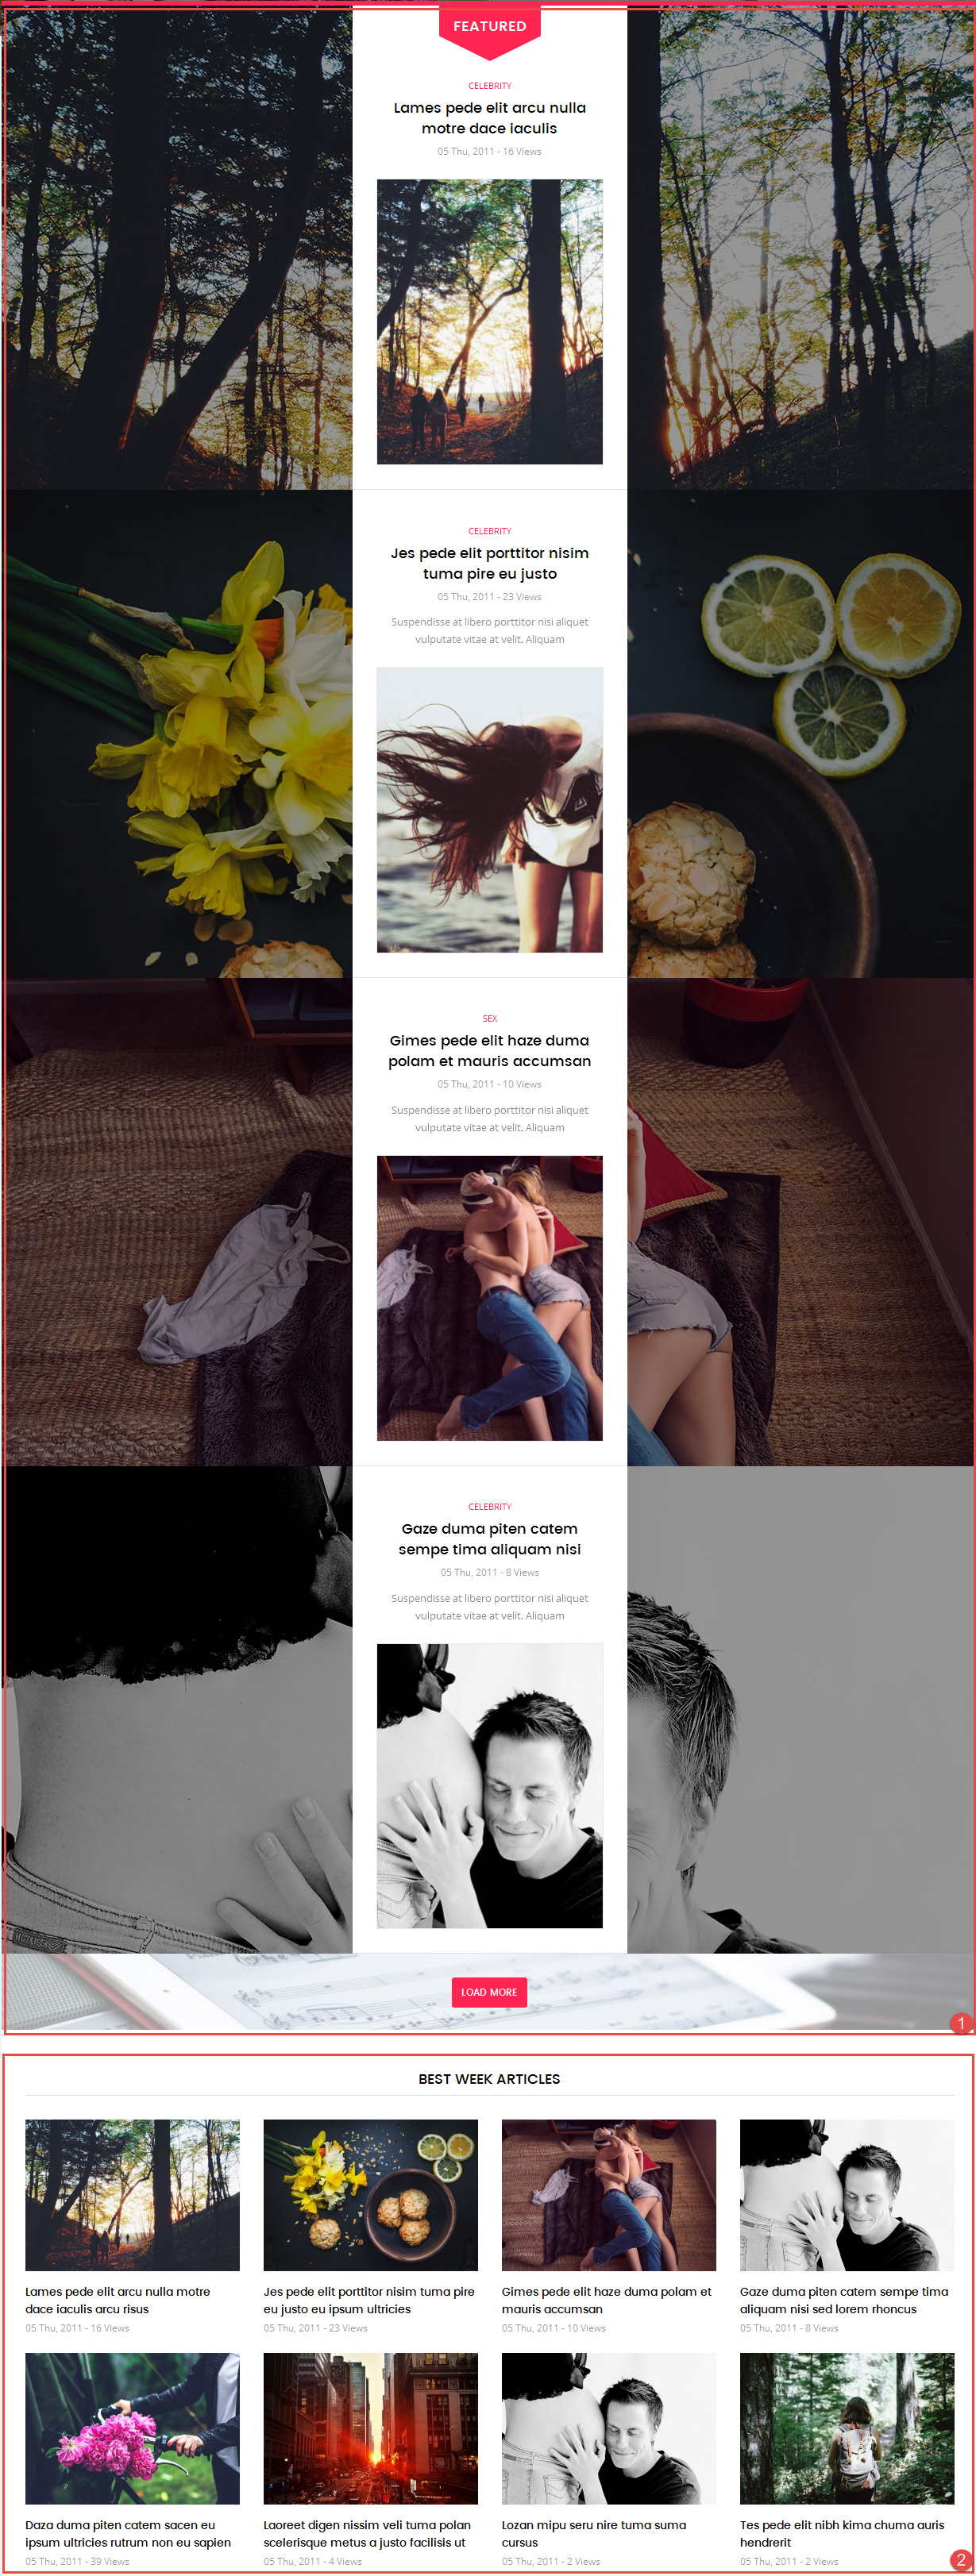
4.4.6.1 Sj Listing Tab Home1 – Featured – Main-top Position
Module Position – Module Suffix
Module Class Suffix: Not Use
Module Type: SJ Listing Tabs For K2
Backend Settings
To configure this module, please go to Extensions >> Module Manager >> Click “New” button to create a new module >> Select “SJ Listing Tabs For K2” module.
- Module: backend settings
- Source Options: backend settings
- Tabs Options: backend settings
- Items Options: backend settings
- Image Options: backend settings
- Effect Options: backend settings
- Advanced: backend settings
4.4.6.2 Best Week Articles – Main-top Position
Module Position – Module Suffix
Module Class Suffix: style5
Module Type: K2 Content
Backend Settings
To configure this module, please go to Extensions >> Module Manager >> Click “New” button to create a new module >> Select “K2 Content” module.
- Module: backend settings
- Advanced: backend settings
4.4.6.3 Highlights For Week – Main-top Position
Module Position – Module Suffix
Module Class Suffix: sjK2Highlight
Module Type: K2 Content
Backend Settings
To configure this module, please go to Extensions >> Module Manager >> Click “New” button to create a new module >> Select “K2 Content” module.
- Module: backend settings
- Advanced: backend settings
4.4.7 Main-bottom – Position
Frontend Appearance
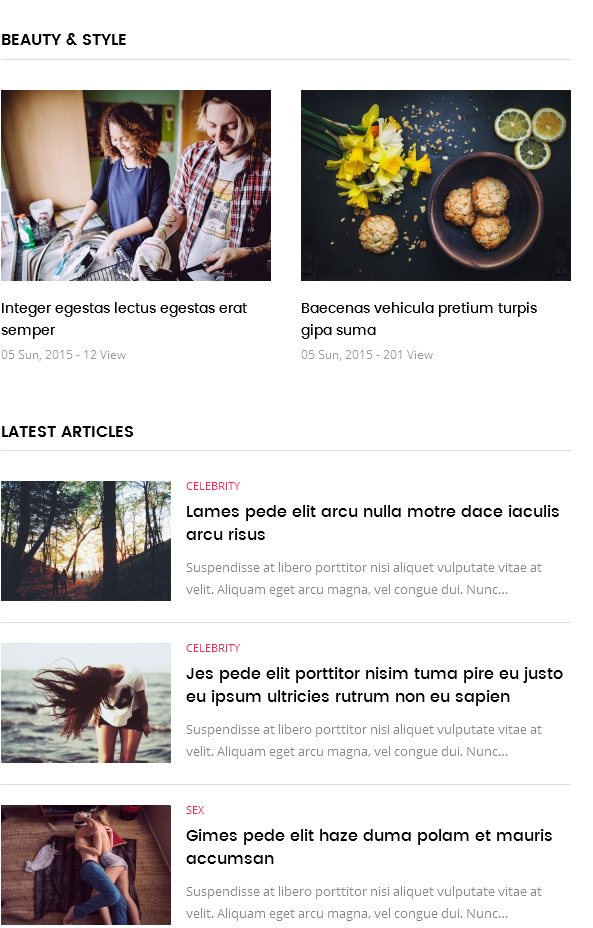
4.4.7.1 Beauty & Style – Main-bottom Position
Module Position – Module Suffix
Module Class Suffix: style4
Module Type: K2 Content
Backend Settings
To configure this module, please go to Extensions >> Module Manager >> Click “New” button to create a new module >> Select “K2 Content” module.
- Module: backend settings
- Advanced: backend settings
4.4.7.2 Latest Articles – Main-bottom Position
Module Position – Module Suffix
Module Class Suffix: style3
Module Type: K2 Content
Backend Settings
To configure this module, please go to Extensions >> Module Manager >> Click “New” button to create a new module >> Select “K2 Content” module.
- Module: backend settings
- Advanced: backend settings
4.4.8 Right- Position
Frontend Appearance

4.4.8.1 Search Blog – Right Position
Module Position – Module Suffix
Module Class Suffix: sj_searchblog
Module Type: K2 Tools
Backend Settings
To configure this module, please go to Extensions >> Module Manager >> Click “New” button to create a new module >> Select “K2 Tools” module.
- Module: backend settings
- Advanced: backend settings
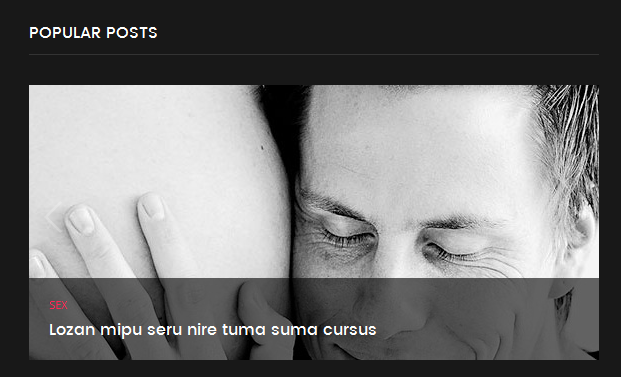
4.4.8.2 Most Populars – Right Position
Module Position – Module Suffix
Module Class Suffix: style1
Module Type: K2 Content
Backend Settings
To configure this module, please go to Extensions >> Module Manager >> Click “New” button to create a new module >> Select “K2 Content” module.
- Module: backend settings
- Advanced: backend settings
4.4.8.3 Social Network – Right Position
Module Position – Module Suffix
Module Class Suffix: sjsocial
Module Type: SJ Social Media Counter
Backend Settings
To configure this module, please go to Extensions >> Module Manager >> Click “New” button to create a new module >> Select “SJ Social Media Counter” module.
- Module: backend settings
- Advanced: backend settings
4.4.8.4 Newsletter – Right Position
Module Position – Module Suffix
Module Class Suffix: blank newsletter
Module Type: AcyMailing Module
Backend Settings
To configure this module, please go to Extensions >> Module Manager >> Click “New” button to create a new module >> Select “AcyMailing Module” module.
- Module: backend settings
- Advanced: backend settings
4.4.8.5 Watch Now – Right Position
Module Position – Module Suffix
Module Class Suffix: Not Use
Module Type: Sj Video Box
Backend Settings
To configure this module, please go to Extensions >> Module Manager >> Click “New” button to create a new module >> Select “Sj Video Box” module.
- Module: backend settings
- Advanced: backend settings
4.4.8.6 Shows – Right Position
Module Position – Module Suffix
Module Class Suffix: style2
Module Type: K2 Content
Backend Settings
To configure this module, please go to Extensions >> Module Manager >> Click “New” button to create a new module >> Select “K2 Content” module.
- Module: backend settings
- Advanced: backend settings
4.4.8.7 Banner Right – Right Position
Module Position – Module Suffix
Module Class Suffix: blank hidden-xs hidden-sm
Module Type: Custom HTML
Backend Settings
To configure this module, please go to Extensions >> Module Manager >> Click “New” button to create a new module >> Select “Custom HTML” module.
- Module: backend settings
- Advanced: backend settings
Copy and paste the Code into editor:
|
1 |
<a href="#" rel="alternate"><img src="images/content/banner/bnr.jpg" alt="" /></a> |
4.4.9 Bottom- Position
Frontend Appearance
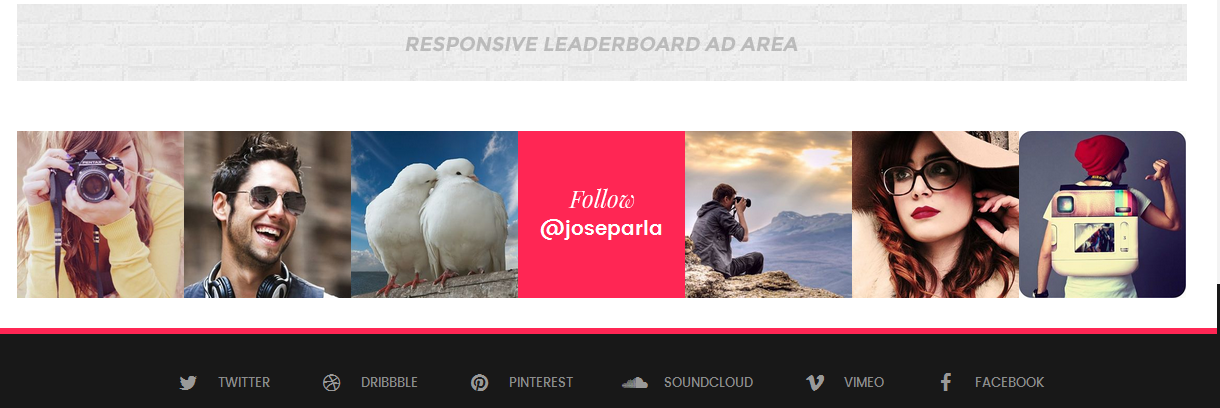
4.4.9.1 Banner Home Bottom – Bottom Position
Module Position – Module Suffix
Module Class Suffix: hidden-xs bnhb
Module Type: Custom HTML
Backend Settings
To configure this module, please go to Extensions >> Module Manager >> Click “New” button to create a new module >> Select “Custom HTML” module.
- Module: backend settings
- Advanced: backend settings
Copy and paste the Code into editor:
|
1 |
<a href="#" rel="alternate"><img src="images/content/banner/bnb.jpg" alt="" /></a> |
4.4.9.2 SJ Instagram Gallery – Bottom Position
Module Position – Module Suffix
Module Class Suffix: Not use
Module Type: SJ Instagram Gallery
Backend Settings
To configure this module, please go to Extensions >> Module Manager >> Click “New” button to create a new module >> Select “SJ Instagram Gallery” module.
- Module: backend settings
- Source Options: backend settings
- Advanced: backend settings
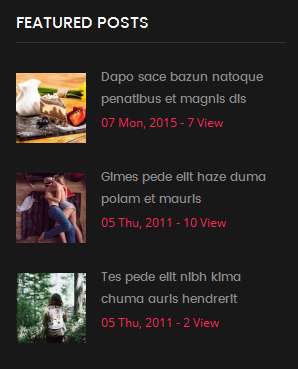
4.4.10 Featured Posts – Bottom1 Position
Module Position – Module Suffix
Module Class Suffix: style6
Module Type: K2 Content
Frontend Appearance
Backend Settings
To configure this module, please go to Extensions >> Module Manager >> Click “New” button to create a new module >> Select “K2 Content” module.
- Module: backend settings
- Advanced: backend settings
4.4.11 SJ Extra Slider for K2 (2) – Bottom2 Position
Module Position – Module Suffix
Module Class Suffix: sjK2Extrasl sjK2Extrasl-bottom
Module Type: SJ Extra Slider for K2
Frontend Appearance
Backend Settings
To configure this module, please go to Extensions >> Module Manager >> Click “New” button to create a new module >> Select “SJ Extra Slider for K2” module.
- Module: backend settings
- Source Options: backend settings
- Item Options: backend settings
- Image Options: backend settings
- Effect Options: backend settings
- Advanced: backend settings
4.4.12 Contact Info – Bottom3 Position
Module Position – Module Suffix
Module Class Suffix: block_contact_info
Module Type: Custom HTML
Frontend Appearance

Backend Settings
To configure this module, please go to Extensions >> Module Manager >> Click “New” button to create a new module >> Select “Custom HTML” module.
- Module: backend settings
- Options: backend settings
- Advanced: backend settings
Copy and paste the Code into editor:
|
1 2 3 4 5 6 7 8 9 10 11 12 13 14 |
<ul class="contact_info"> <li>Lorem Ipsum is simply dummy text of the printing and typesetting industry. Lorem Ipsum is simply dummy text of the printing and typesetting industry.</li> <li>No 1123, Marmora Road, Glasgow, D04 89GR.</li> <li>(801) 2345 - 6788 / (801) 2345 - 6789</li> <li>support@healthmag.com</li> </ul> <ul class="yt_list_social_bottom"> <li><a title="Facebook" href="http://www.facebook.com/SmartAddons.page" target="_blank" rel="alternate">[yt_icon icon="icon: facebook-square" url="" size="20" background="transparent" color="#999999" radius="3px" padding="0" margin="0" border="none" ]</a></li> <li><a title="Twitter" href="https://twitter.com/smartaddons" target="_blank" rel="alternate">[yt_icon icon="icon: twitter-square" url="" size="20" background="transparent" color="#999999" radius="3px" padding="0" margin="0" border="none" ]</a></li> <li><a title="Youtube" href="http://www.youtube.com/user/smartaddons" rel="alternate">[yt_icon icon="icon: youtube-square" url="" size="20" background="transparent" color="#999999" radius="3px" padding="0" margin="0" border="none" ]</a></li> <li><a title="Google Plus" href="https://plus.google.com/u/0/103151395684525745793/posts" target="_blank" rel="alternate">[yt_icon icon="icon: google-plus-square" url="" size="20" background="transparent" color="#999999" radius="3px" padding="0" margin="0" border="none" ]</a></li> <li><a title="Instagram" href="#" target="_blank" rel="alternate">[yt_icon icon="icon: instagram" url="" size="20" background="transparent" color="#999999" radius="3px" padding="0" margin="0" border="none" ]</a></li> <li><a title="Flickr" href="#" target="_blank" rel="alternate">[yt_icon icon="icon: flickr" url="" size="20" background="transparent" color="#999999" radius="3px" padding="0" margin="0" border="none" ]</a></li> </ul> |
4.4.13 Menu Footer – Footer Position
Module Position – Module Suffix
Module Class Suffix: Not use
Module Type: Custom HTML
Frontend Appearance

Backend Settings
To configure this module, please go to Extensions >> Module Manager >> Click “New” button to create a new module >> Select “Custom HTML” module.
- Module: backend settings
- Advanced: backend settings
Copy and paste the Code into editor:
|
1 2 3 4 5 6 7 8 |
<ul class="menu_footer"> <li><a title="Home" href="#" rel="alternate">Home</a></li> <li><a title="Fitness" href="#" rel="alternate">Fitness</a></li> <li><a title="Beauty & Style" href="#" rel="alternate">Beauty & Style</a></li> <li><a title="Healthy & Happy" href="#" rel="alternate">Healthy & Happy</a></li> <li><a title="Videos" href="#" rel="alternate">Videos</a></li> <li><a title="Food & Recipes" href="#" rel="alternate">Food & Recipes</a></li> </ul> |
4.5 Extension Configuration – Layout2
4.5.1 Main-top – Position
Frontend Appearance
4.5.1.1 Sj Listing Tab Home2 – Featured – Main-top Position
Module Position – Module Suffix
Module Class Suffix: Not Use
Module Type: SJ Listing Tabs For K2
Backend Settings
To configure this module, please go to Extensions >> Module Manager >> Click “New” button to create a new module >> Select “SJ Listing Tabs For K2” module.
- Module: backend settings
- Source Options: backend settings
- Tabs Options: backend settings
- Items Options: backend settings
- Images Options: backend settings
- Effect Options: backend settings
- Advanced: backend settings
4.5.1.2 Best Week Article 2 – Main-top Position
Module Position – Module Suffix
Module Class Suffix: style5
Module Type: K2 Content
Backend Settings
To configure this module, please go to Extensions >> Module Manager >> Click “New” button to create a new module >> Select “K2 Content” module.
- Module: backend settings
- Advanced: backend settings
5COPYRIGHT – Back to top
To remove Designed by SmartAddons.Com at the footer of template, please purchase our Copyright Removal here
6SUPPORT – Back to top
Thank you so much for purchasing this template. If you have any questions that are beyond the scope of this help file, please send us via: Submit a Ticket
Thanks so much!
