1SYSTEM REQUIREMENTS – Back to top
SJ Fitness is compatible with Joomla v2.5 and Joomla v3.x. Please make sure your system meets the following requirements:
1.1 System Requirements – Joomla version 3.x
Software
- Software: PHP 5.3.1+ (5.4+ recommended)
Databases
- MySQL(InnoDB support required): 5.1+
- MSSQL 10.50.1600.1+
- PostgreSQL 8.3.18+
Web Severs
- Apache 2.x+
- Microsoft IIS 7
- Nginx 1.0 (1.1 recommended)
1.2 Browser Requirements
The requirements are the same with both Joomla 2.5 and Joomla 3.x
- Firefox 4+
- IE (Internet Explorer) 9+
- Google Chrome 10+
- Opera 10+
- Safari 5+
1.3 Development Environment
The requirements are the same with both Joomla 2.5 and Joomla 3.x
During the development process, Localhost is preferred. You can use the following servers on your PC to develop your site.
Windows
- WAMPSEVER
- XAMPP for Windows
Linux
- LAMP Bubdle
- XAMPP for Linux
Mac OS
- MAMP & MAMP Pro
- XAMPP for Mac OS
1.4 Component Requirements
K2 component – V3.0.x
Acymailing component
2DOWNLOAD – Back to top
Download Packages from our store:
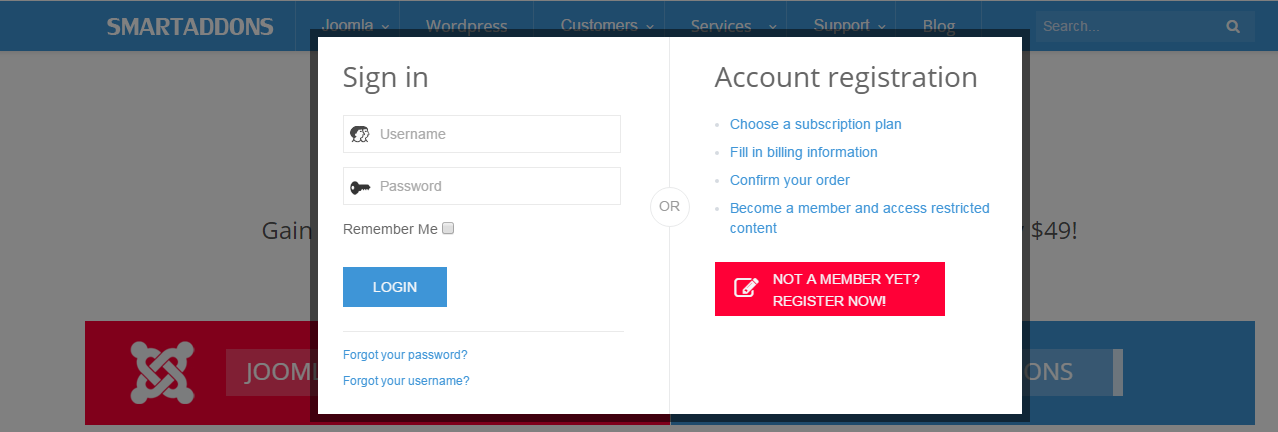
Step 1: Login your account
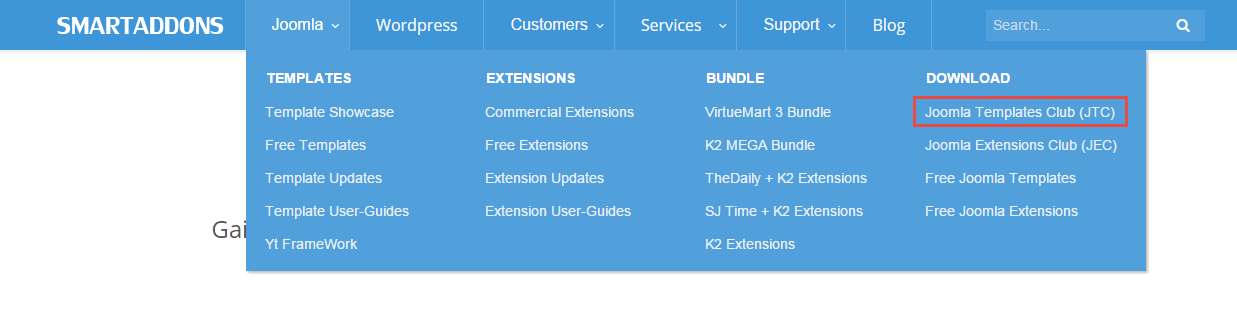
Step 2: Go to Joomla > Download > Joomla Templates Club
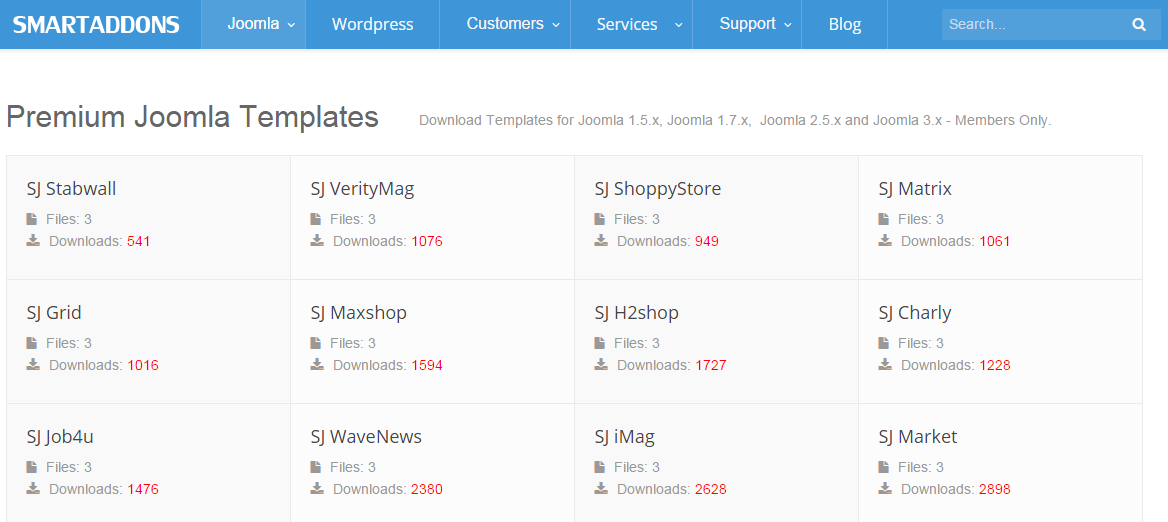
Step 3: Under Premium Joomla Templates –> Find and Download Template as you want
3INSTALLATION – Back to top
There are two ways to install a Joomla Template:
- Install Quickstart: By using this package, you will set the template exactly as our Demo with sample data. This is applied when you need a fresh Joomla with our template.
- Install Template and Extensions: This is applied when you have already installed a Joomla instance on your server. You will need only be using the zipped files in “Extensions” and “Template” folders mentioned above.
3.1 Install with Quickstart Package:
The following steps will guide to install a quickstart package of SmartAddons Joomla Template: Click here
3.2 Install with Template and Extensions:
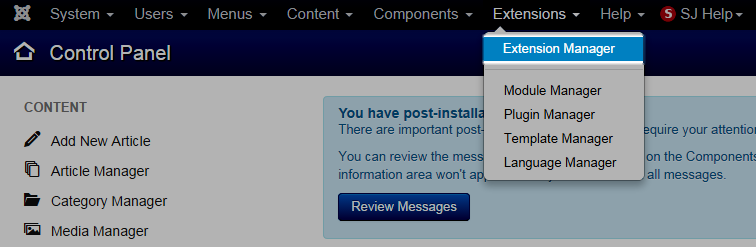
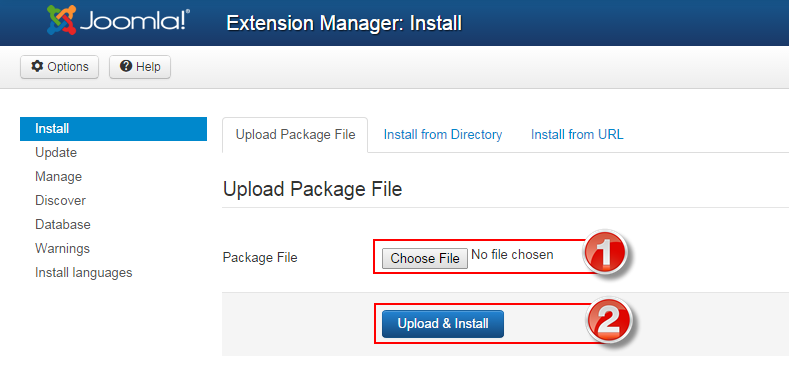
Step 1: Access the installation panel
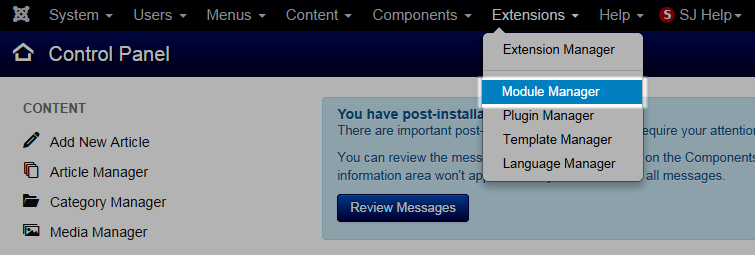
Navigate to Extensions >> Extension Manager.
Step 2: Install Template
- Install with option: Upload Package File
Firstly, you choose file template.zip then click on the button Upload & Install to install the uploaded package.
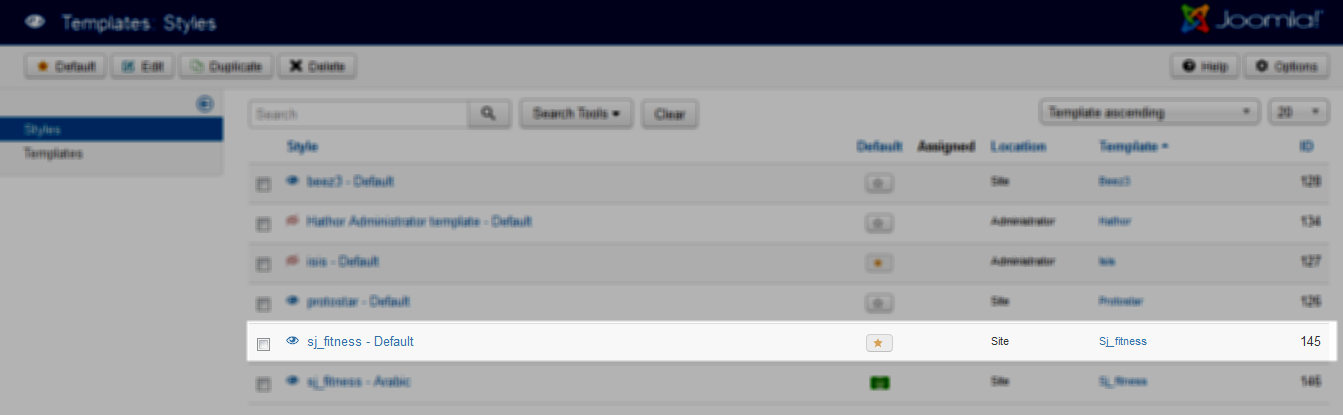
Step 3: Set New Installed Template As Default Template
- Go to Extensions >> Template Manager.
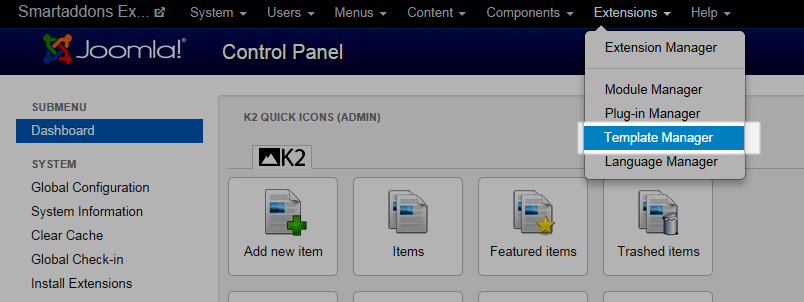
- In order to display your site with the new installed template, you have to set the template as default template
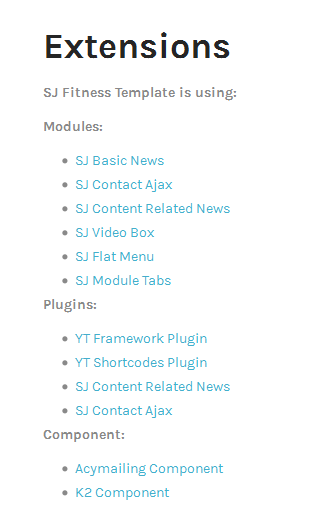
The extensions package include of (Modules/Components and Plugins).
Note: Extensions installation is the same with Template installation as above
Here is list of extensions that are used in the template.
ENABLE MODULES
- Go to Extensions >> Module Manager.
- Find the new installed module. For example: with “SJ Contact Ajax “ module.
You can use the search or filter option to find the new installed module easier and enable module.
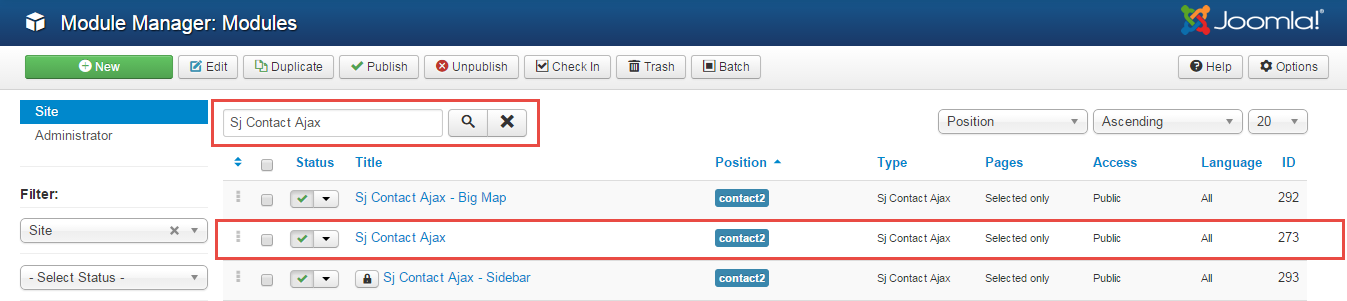
- Enable and set position for the module
When you find the new installed module, please open its configuration panel.
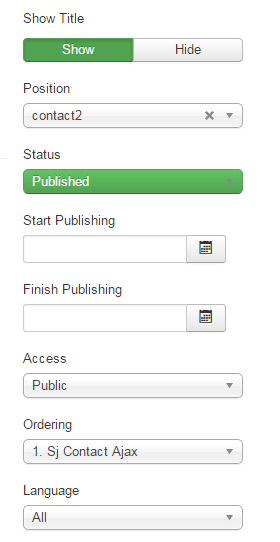
To display the module in front-page, you must publish it and set right position for the module.
Please note that not all module positions can be active in front-page, so please make sure the module is assigned to an active module position.
- Assign the modules to specific menus
You have to assign the modules to specific menus so that the module will be displayed in the assigned menus. There are 4 options : “On all pages, No pages, Only on the pages selected, On all pages except those selected”

- Configure the new installed module
Normally, each module has its own settings, the settings allow you to customize the module so that you can have it displayed in front-page as you wish.

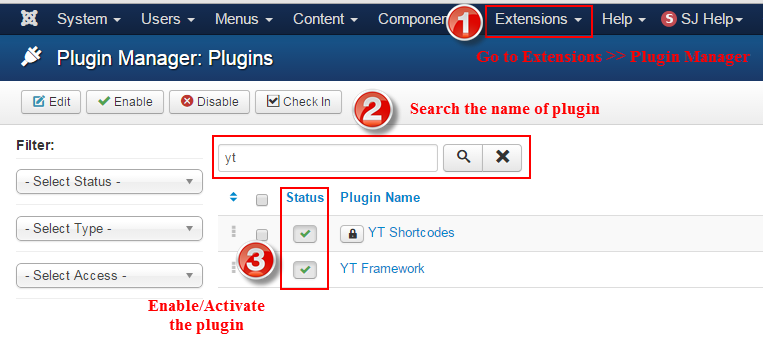
ENABLE PLUGIN
Note: all plug-ins listed are imperative.
- YT Framework Plug-in supports to add extra parameters used with Mega Menu and to compress CSS/JS/HTML when optimizing code. Besides, configure Yt Framework to show SJ Help with Report Bugs, Template Tutorials and YT Framework Tutorials or include jQuery into template. You can go here for getting more information of this plugin.
- YT Shortcode offer you an amazing tool to create advanced custom content with minimal effort or even without any knowledge how to code HTML. Please go here for getting more information of this plugin.
- SJ Content Related News is a simple plugin for content component. It helps you to show other articles in the same category. Please go here for getting more information of this plugin.
You need to install and activate them when using this template. Let’s start from 1 – 2 – 3 to active plug-ins as below:
Install Component
-
To Install K2 Component, you can follow these steps:
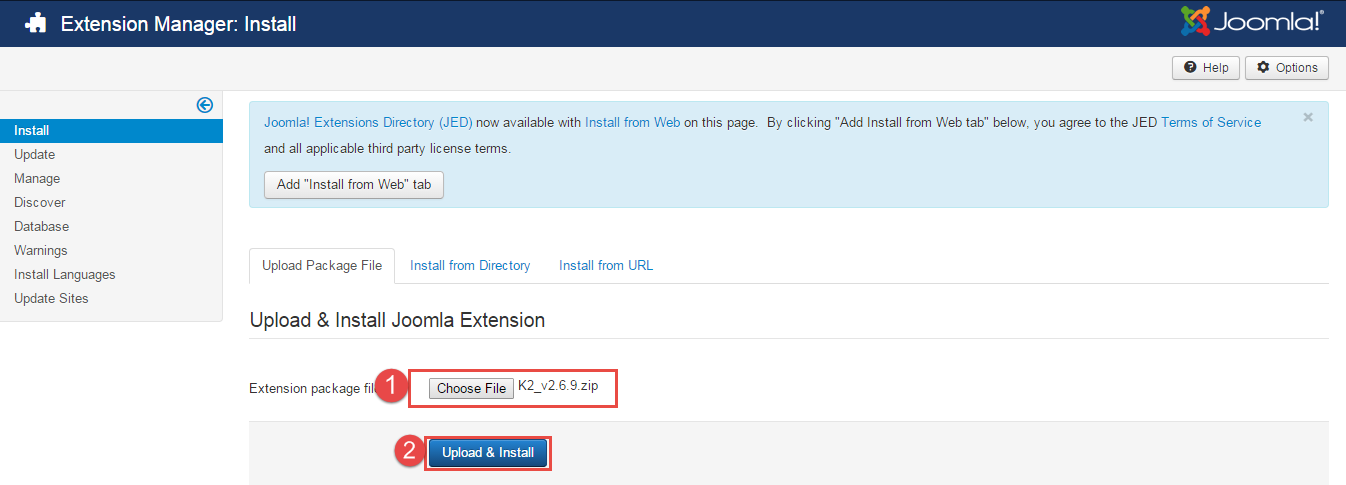
Step 1: Please go to Extensions >> Extension Manager
Step 2: Choose file K2 component.zip that you have downloaded and then Click on the button Upload & Install to install the uploaded package.
To install Acymailing Component you do the same as the installation K2 Component.
3.3 Install multilingual site in SJ Template
To help you about language problem when you work with SJ Template, please read this post: how to set up a multilingual site in SJ Template.
4CONFIGURATION – Back to top
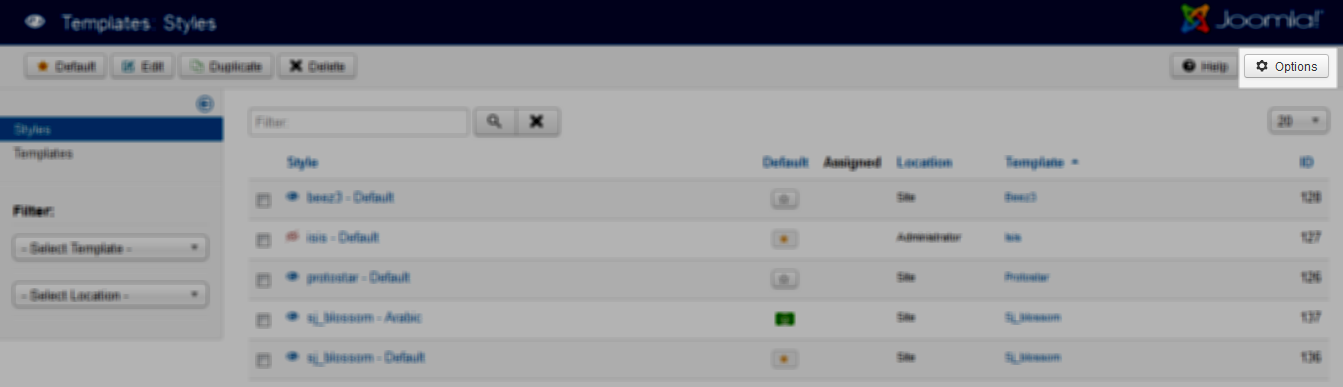
To view the Module Positions you can follow these steps:
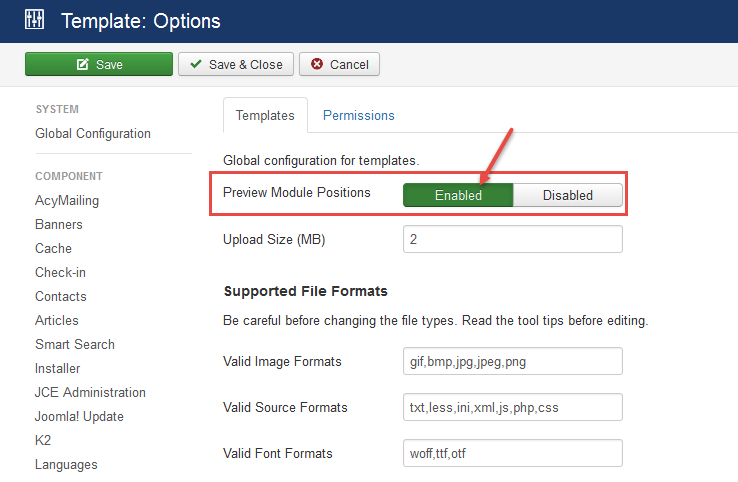
Step 1: Go to Extensions >> Template Manager >> click the “Options” button in the toolbar.
Step 2: In the “Preview Module Positions” parameter >> click“Enable” and click the “Save” button
Step 3: Joomla 2.5 and Joomla 3.x will show the Template positions with ?tp=1 or &tp=1

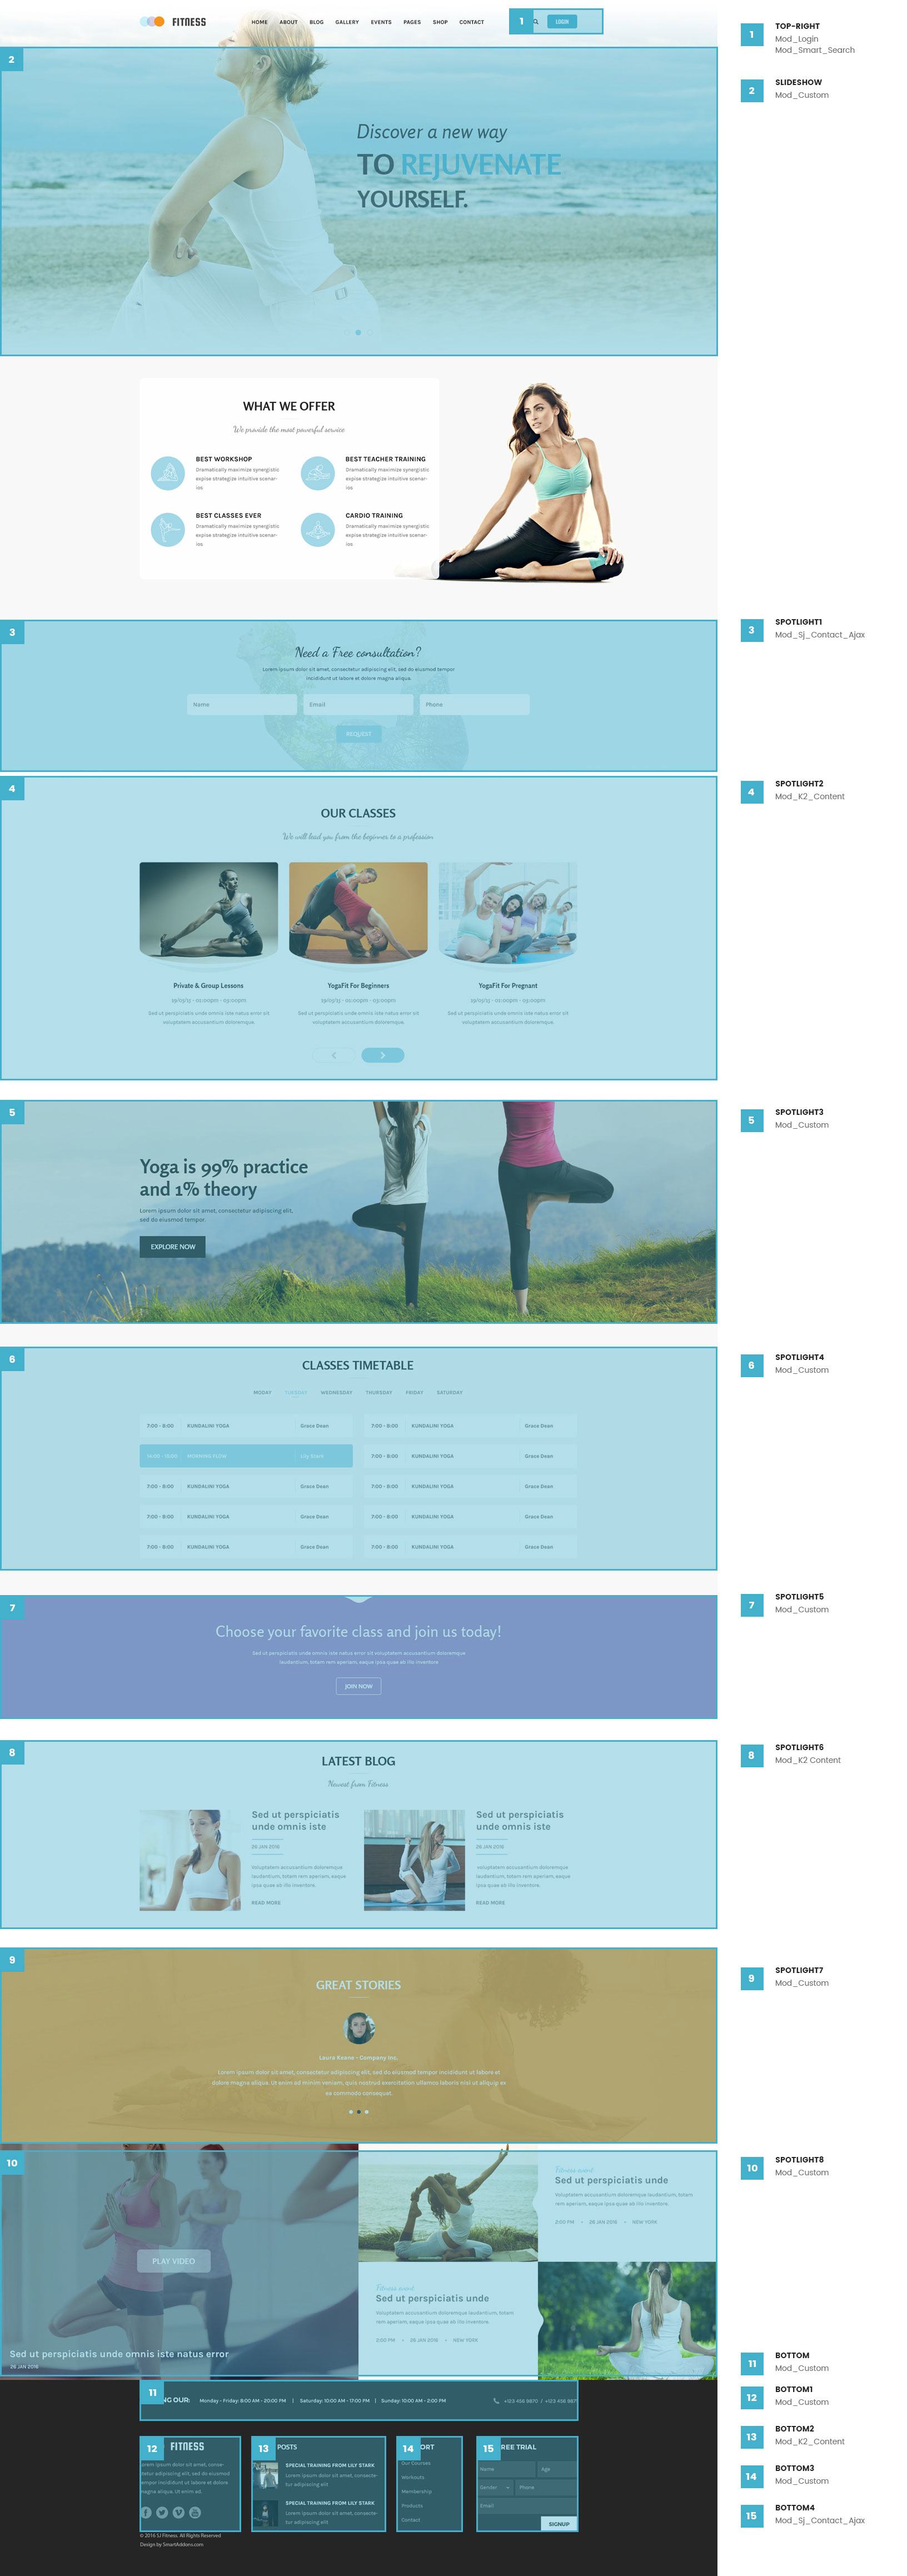
Step 4:The image below shows Module Positions
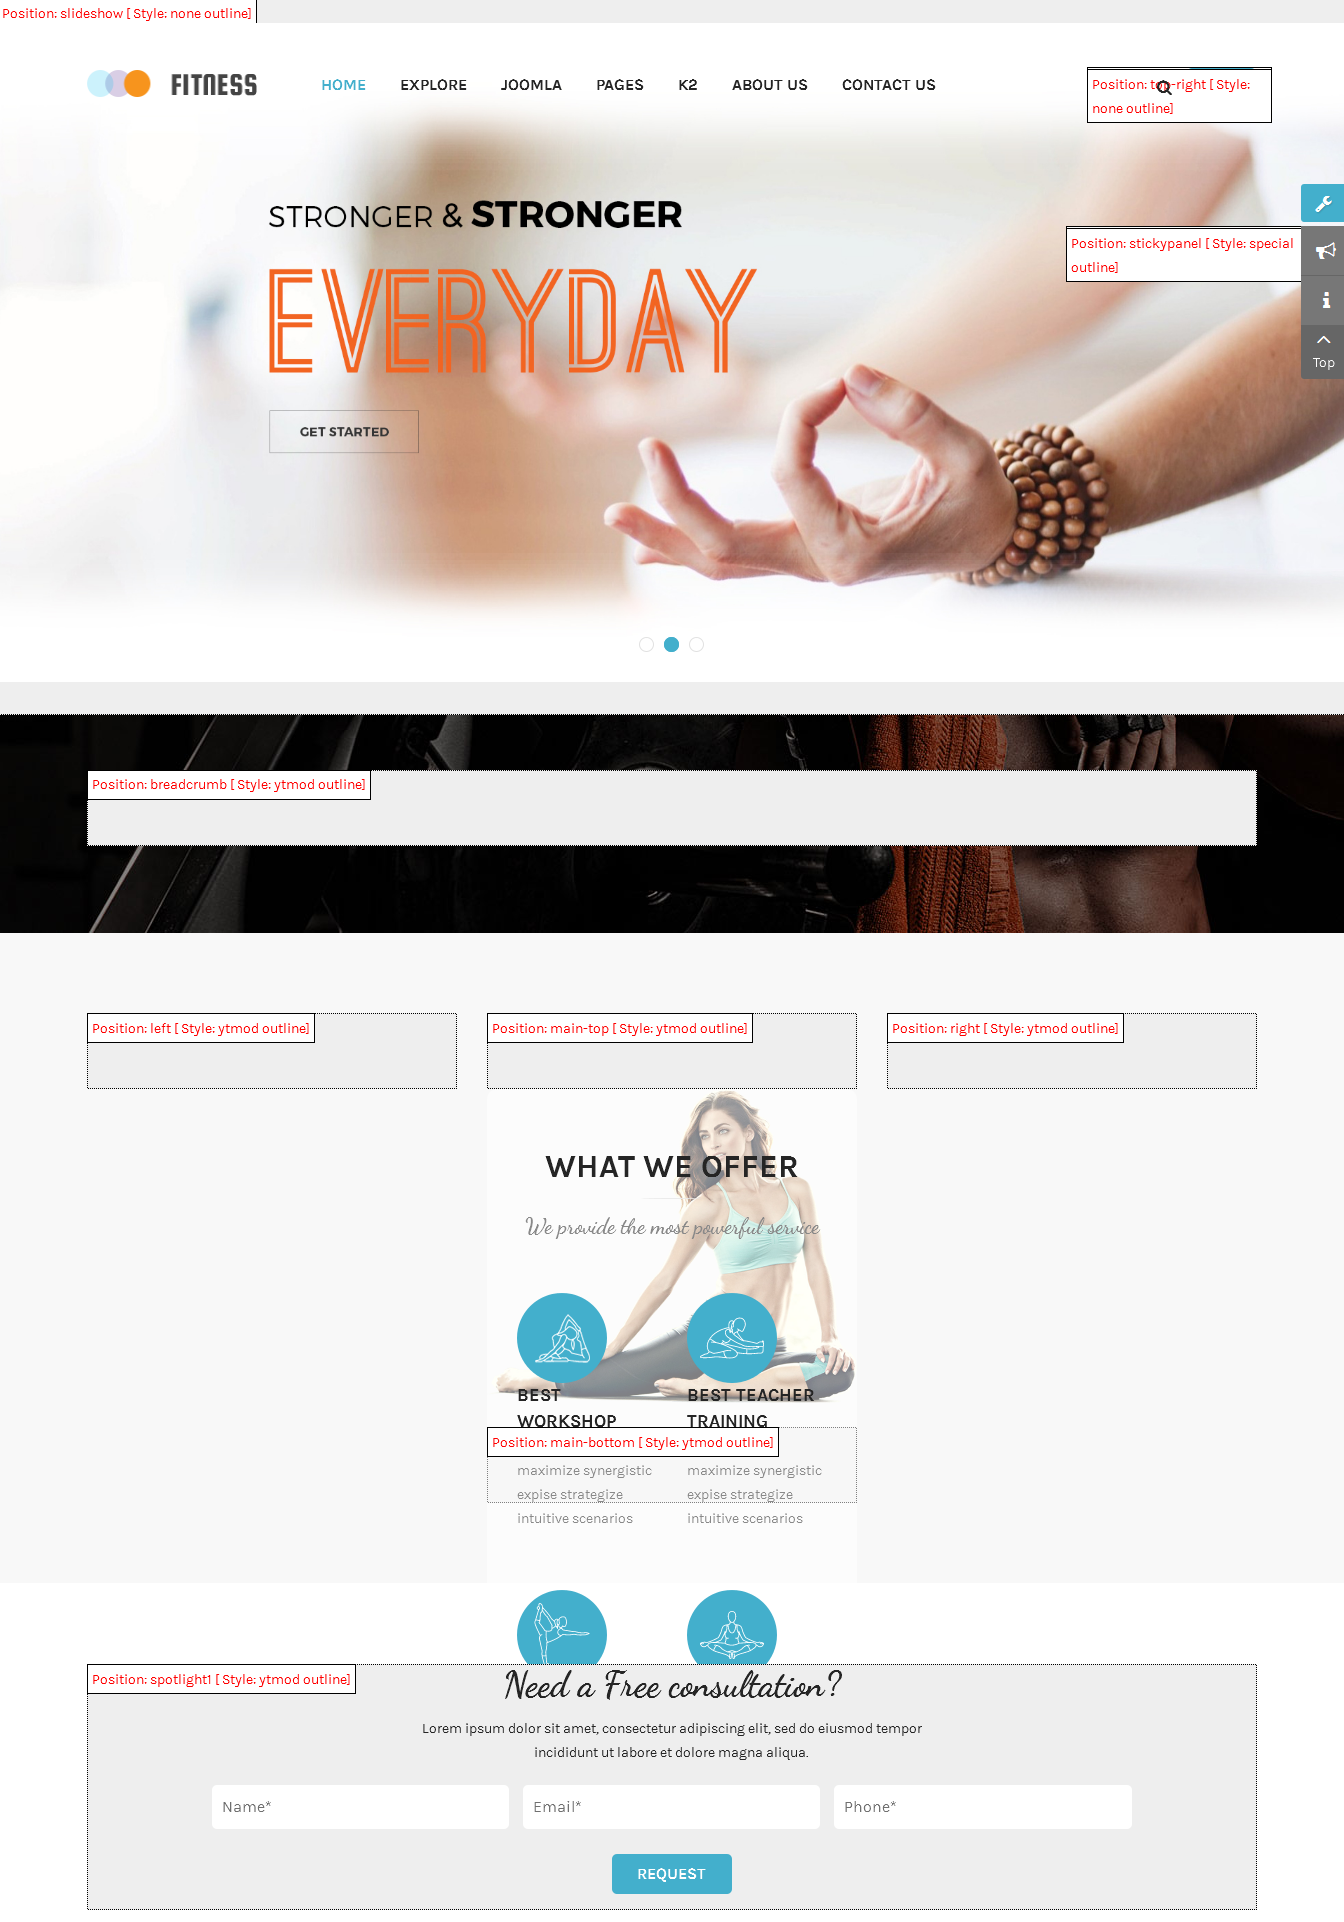
4.1 Layout Position
4.2 Template Configuration
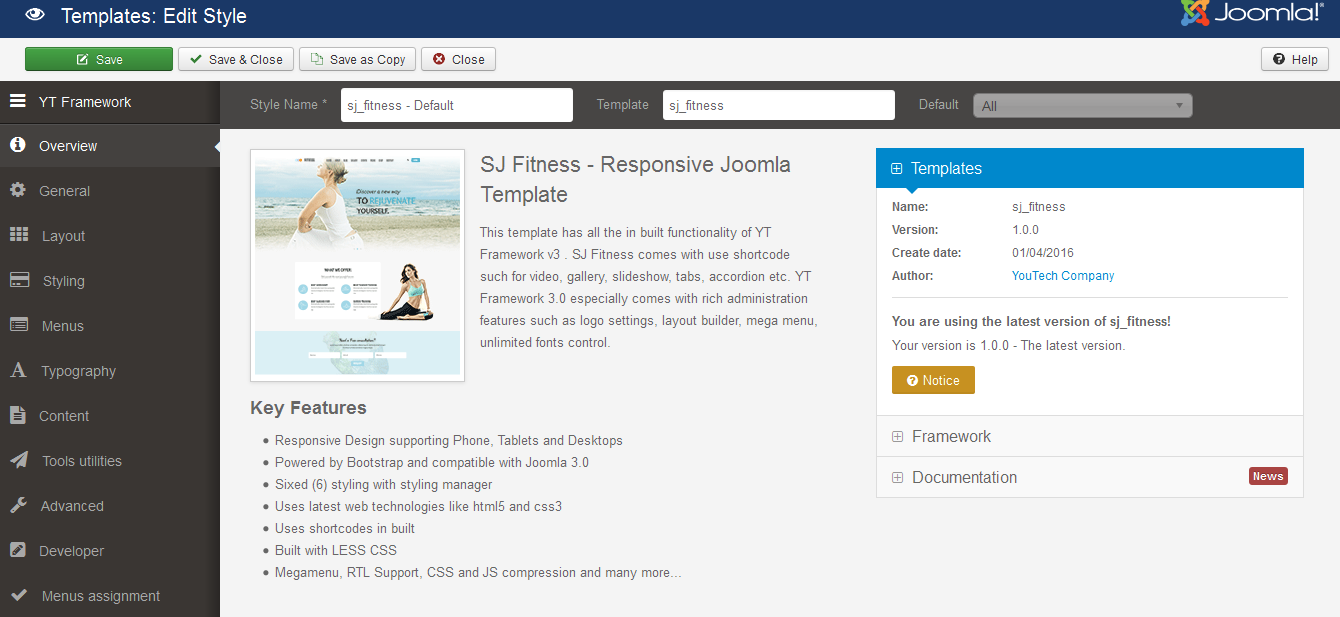
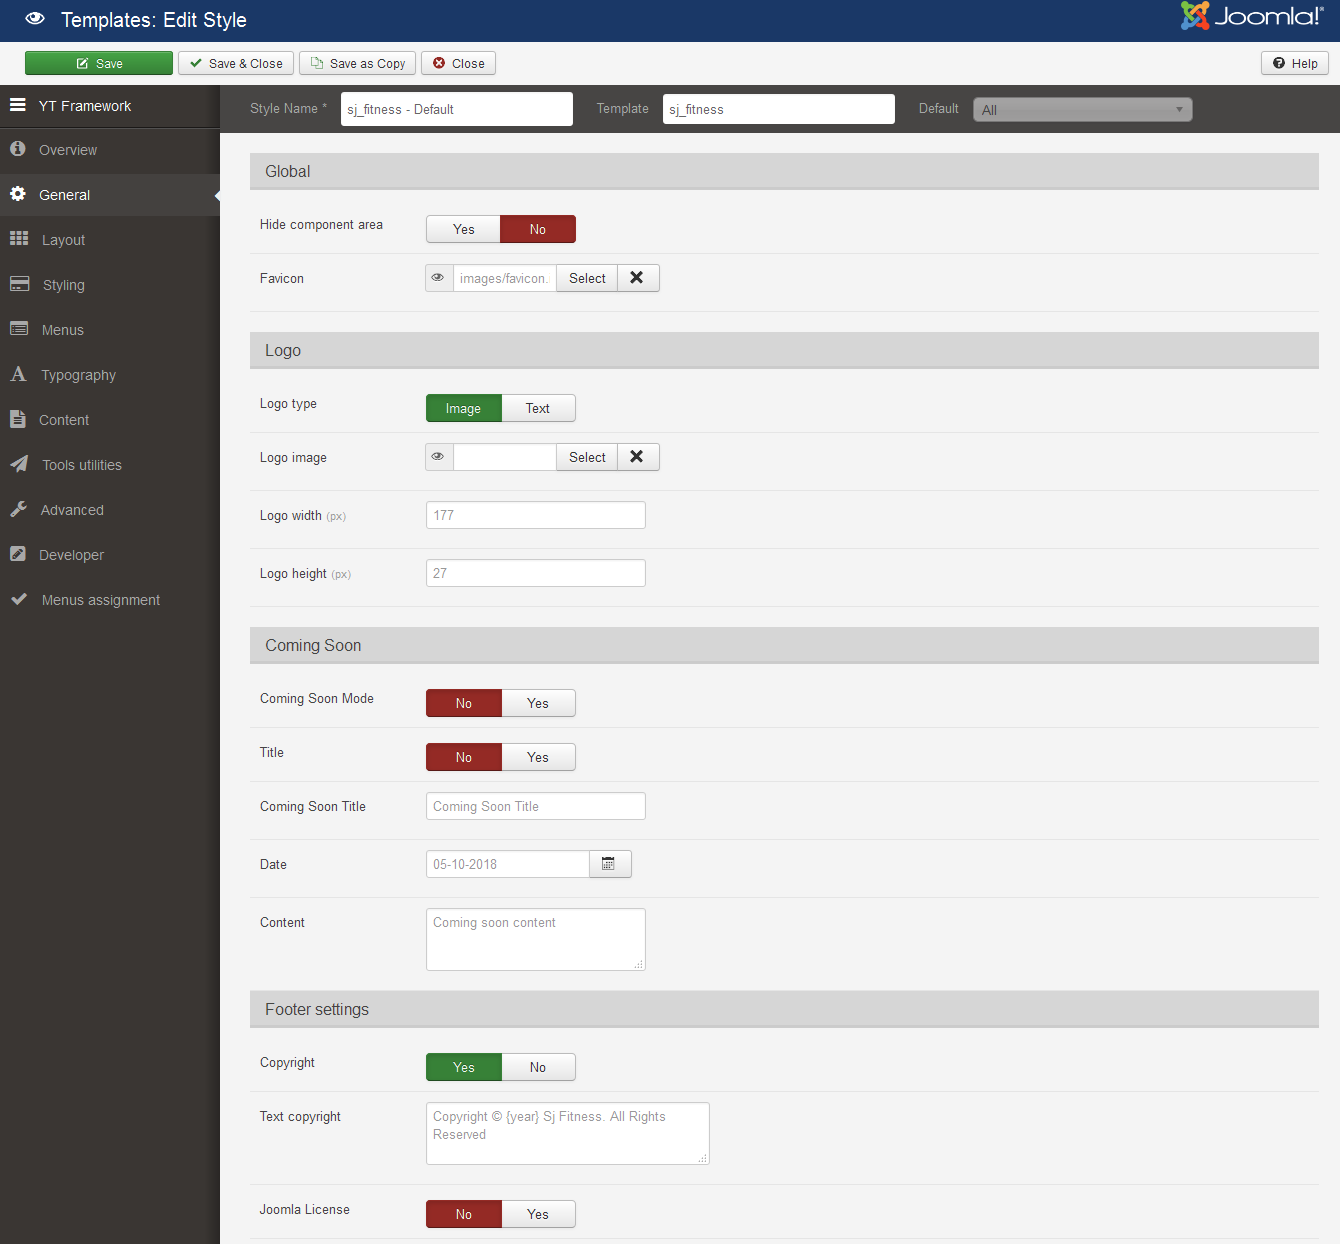
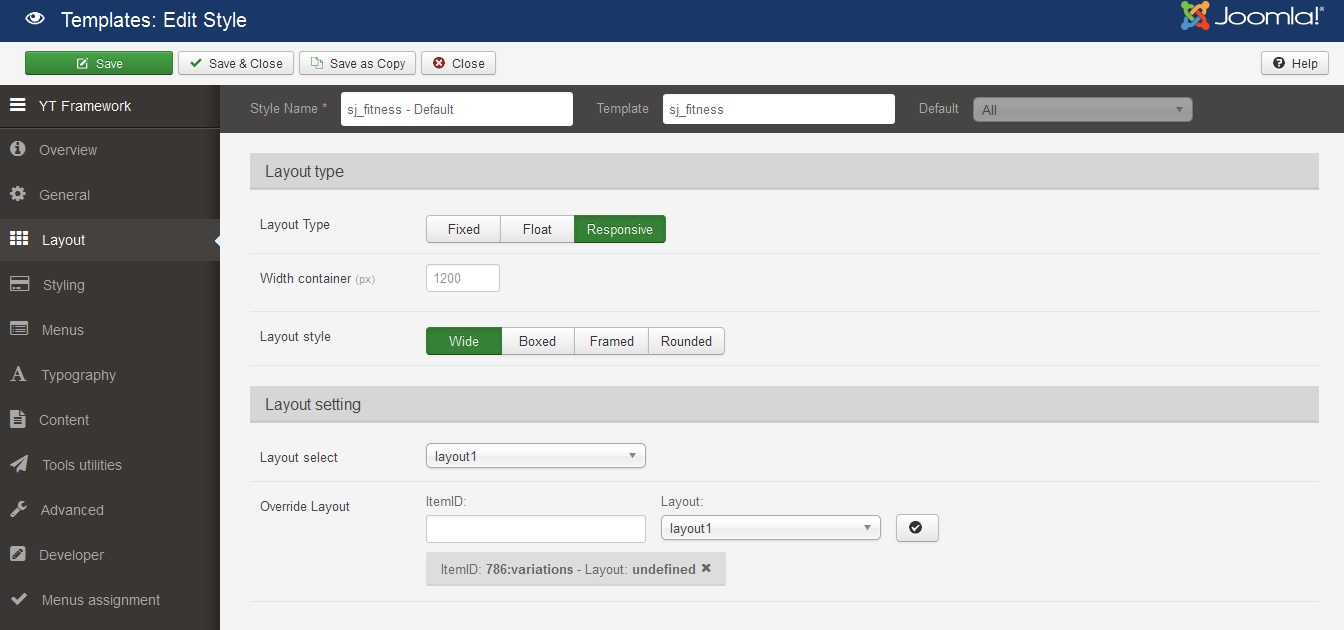
Go to Extensions > Template Manager > SJ Fitness. All of parameters of this template are divided into the following groups, in which they are explained themselves:
OVERVIEW
GENERAL
LAYOUT
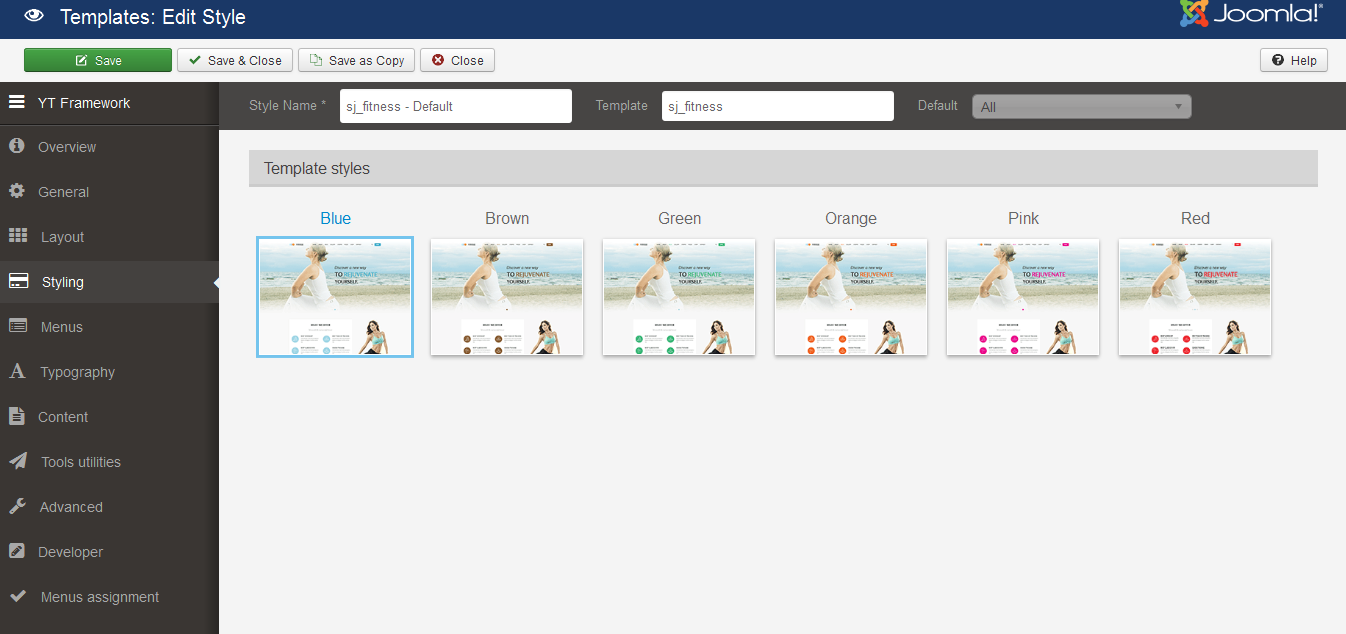
STYLING
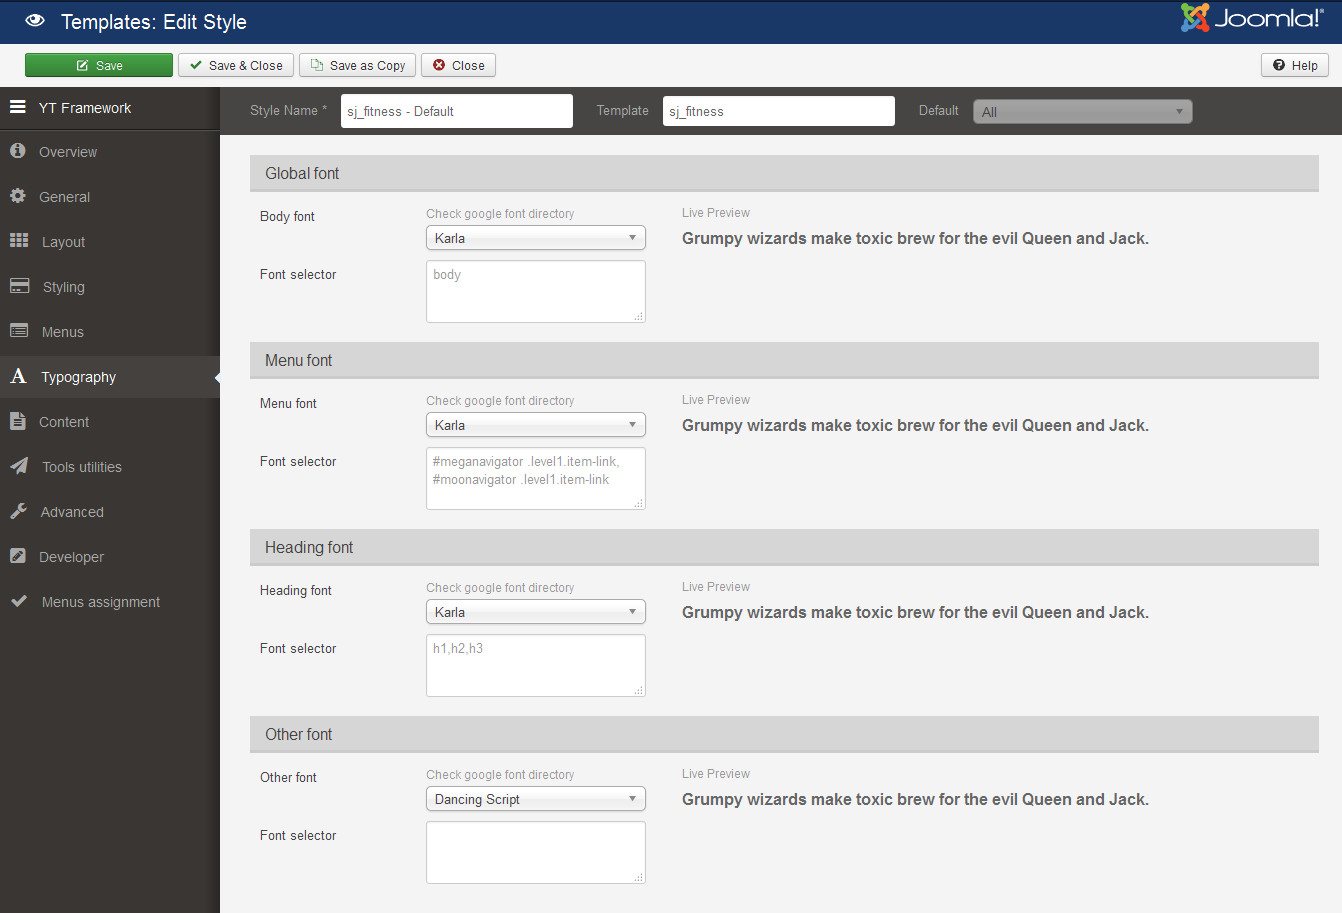
TYPOGRAPHY
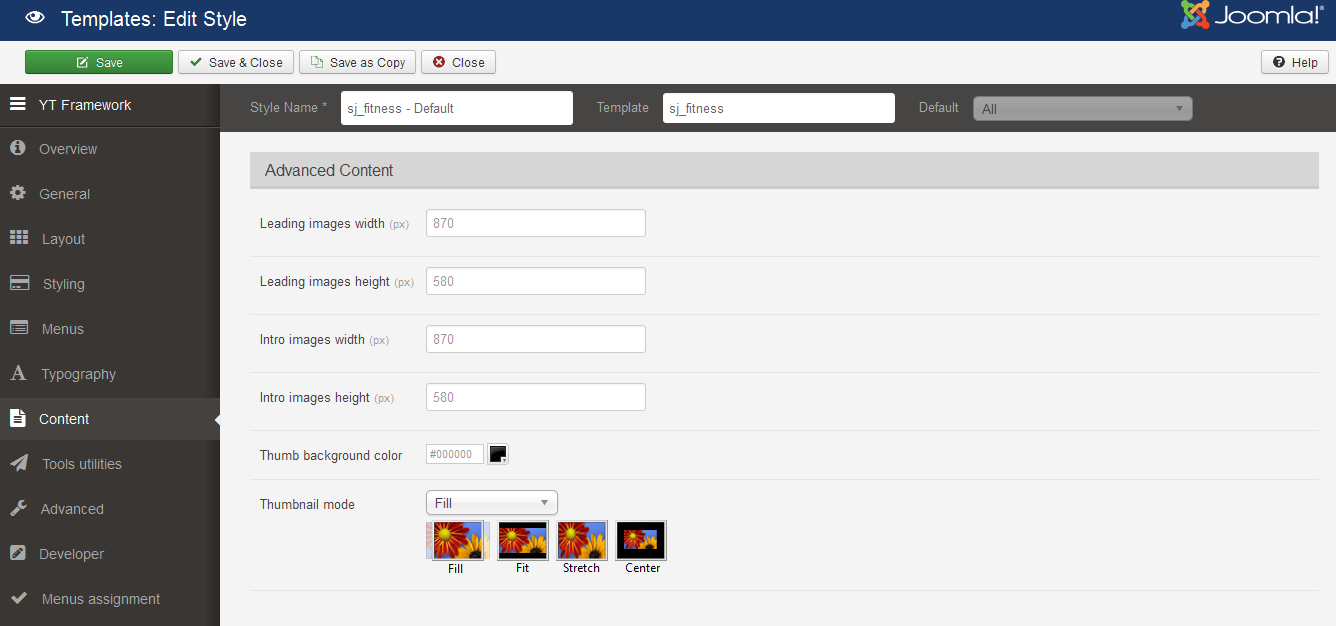
CONTENT
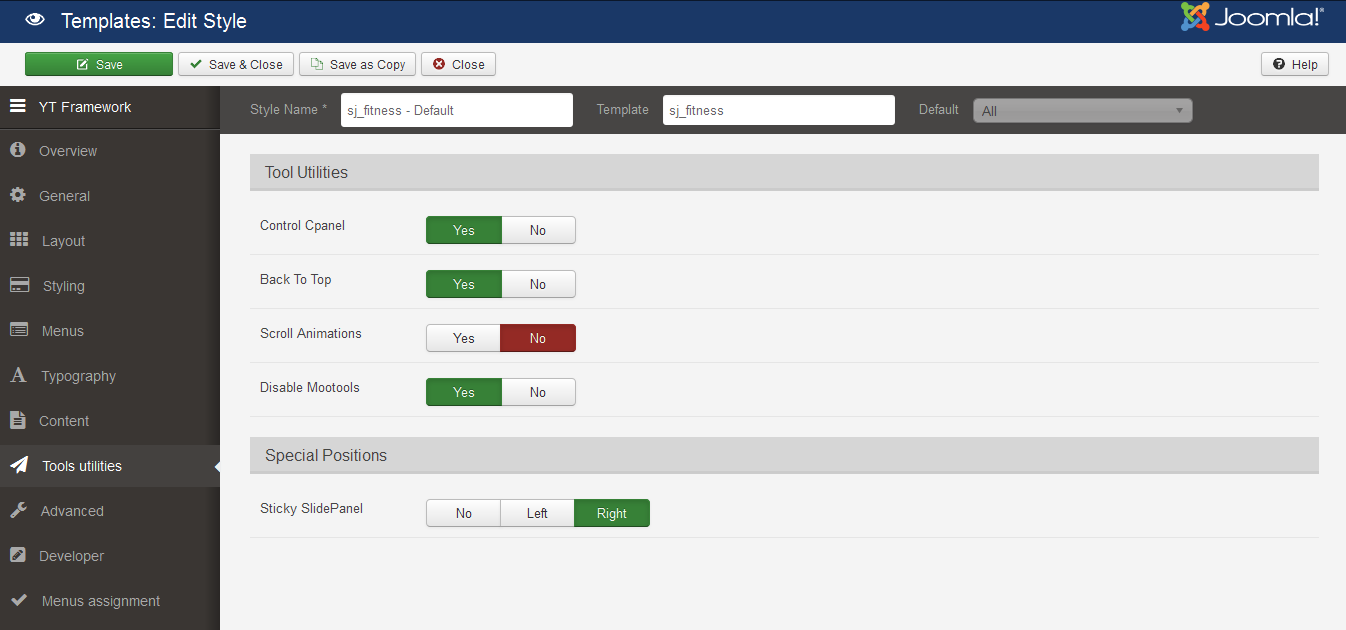
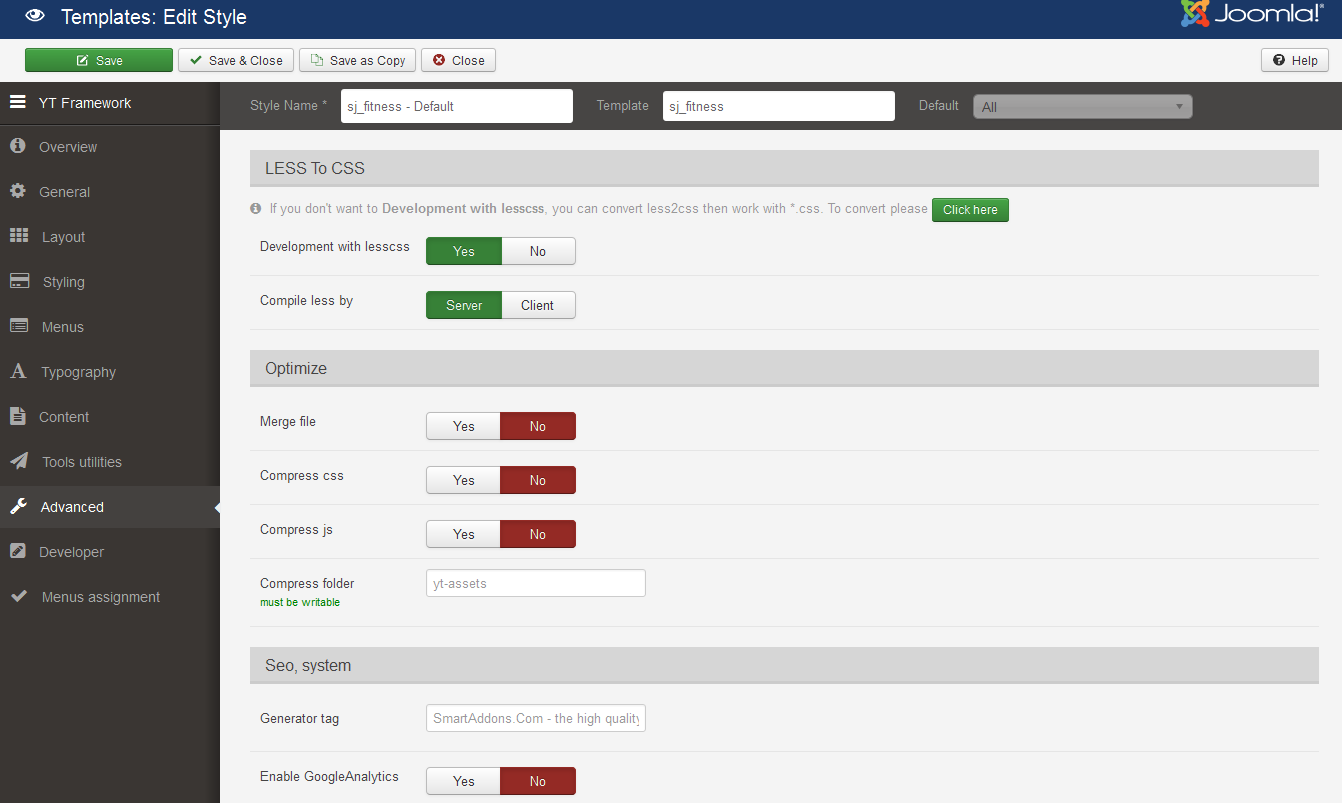
TOOLS UTILITIES
ADVANCED
4.3 Menu Configuration
If you want to make your site same as SJ Fitness demo site, this would be helpful. We will only show the important, customized settings.
To change logo image in SJ Fitness, please go to here
4.3.1 Joomla Menu Configuration
Frontend Appearance
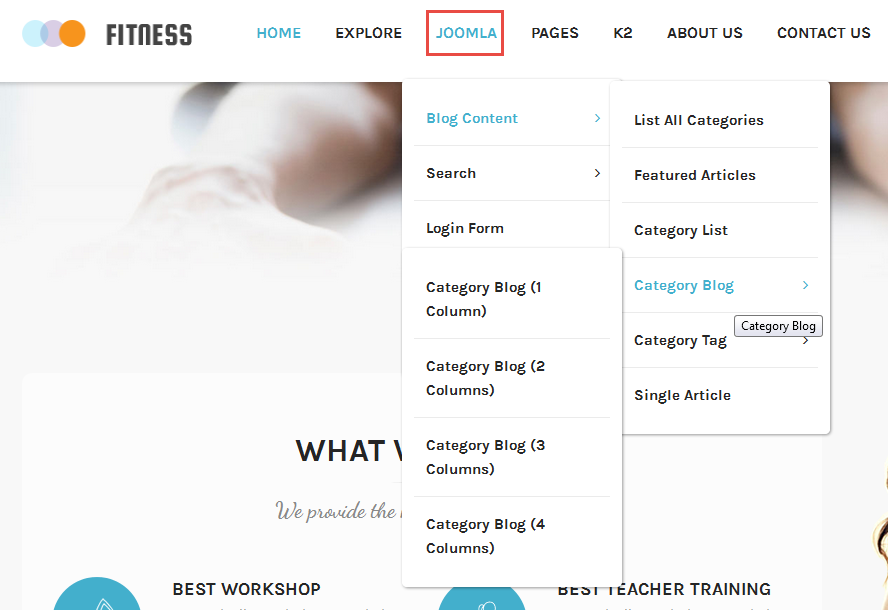
Tree of Joomla Menu
Backend Settings
Joomla Menu
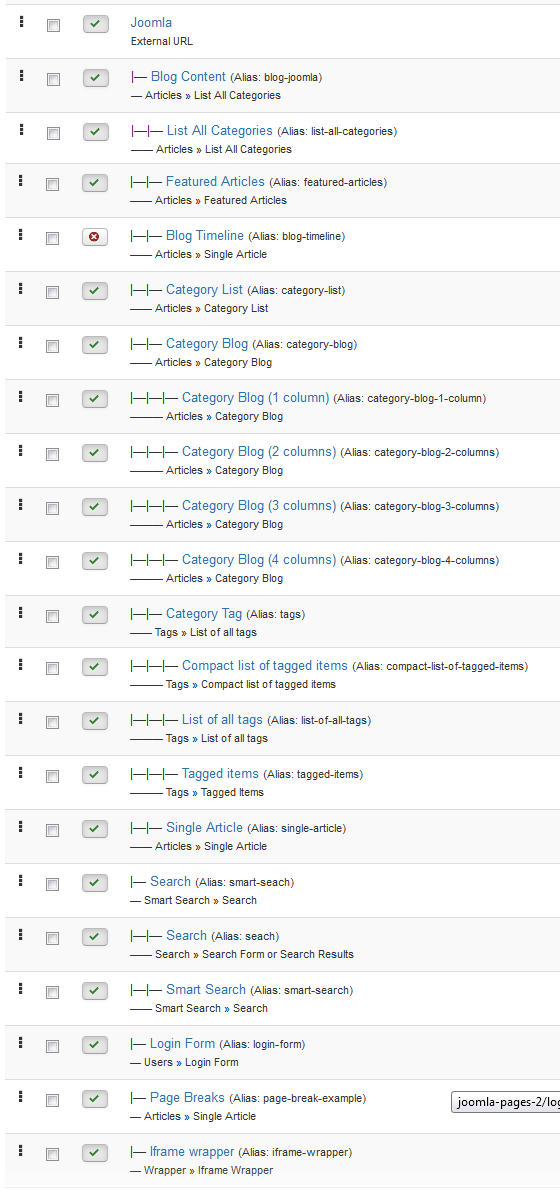
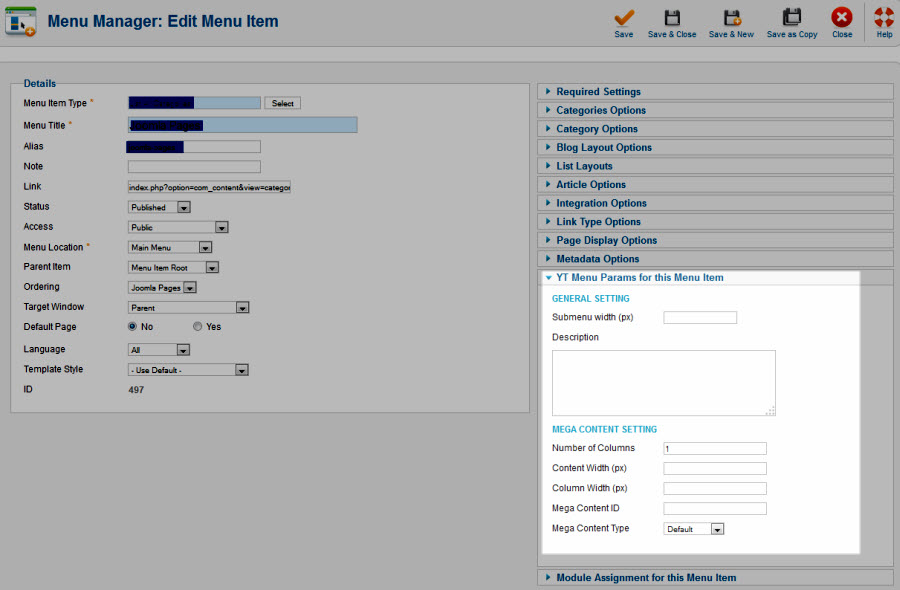
To configure “Joomla Menu”, please go to Menus >> Main menu – English >> Find “Joomla Menu” (you can create new menu if this menu is not exist).
Menu Item Type: External URL
Template Style: Use default
Menu Location: Main menu – English
- Details: backend settings
- YT Menu Params Settings:: backend settings
Blog Content
Menu Item Type: List All Categories
Template Style: Use default
Menu Location: Main menu – English
To configure Blog Content, please go to Menus >> Main menu – English >> Find “Blog Content” (you can create new menu if this menu is not exist).
Backend Settings
- Details: backend settings
- YT Menu Params Settings:backend settings
Category Blog
Menu Item Type: Category Blog
Template Style: Use default
Menu Location: Main menu – English
To configure Category Blog, please go to Menus >> Main menu – English >> Find “Category Blog” (you can create new menu if this menu is not exist).
Backend Settings
- Details: backend settings
- YT Menu Params Settings:backend settings
Category Blog (1 Column)
Menu Item Type: Category Blog
Template Style: Use default
Menu Location: Main menu – English
To configure Category Blog (1 Column), please go to Menus >> Main menu – English >> Find “Category Blog (1 Column)” (you can create new menu if this menu is not exist).
Backend Settings
- Details: backend settings
- YT Menu Params Settings:backend settings
4.3.2 Pages Menu Configuration
Frontend Appearance
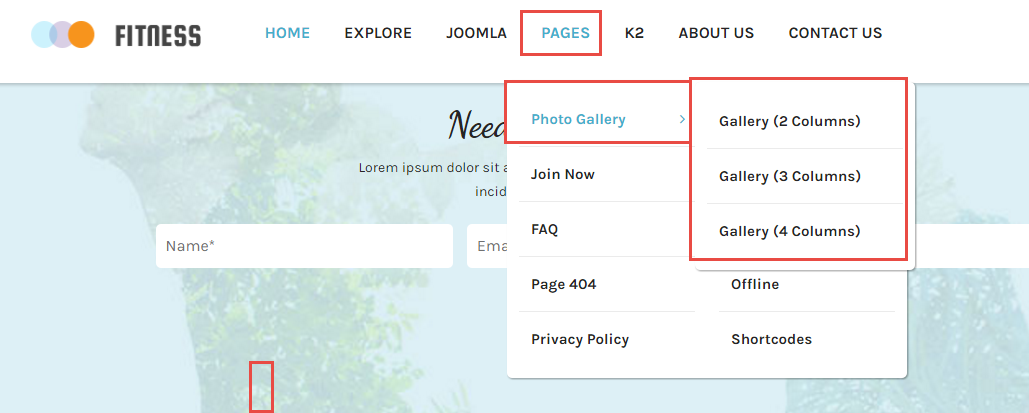
Tree of Pages Menu
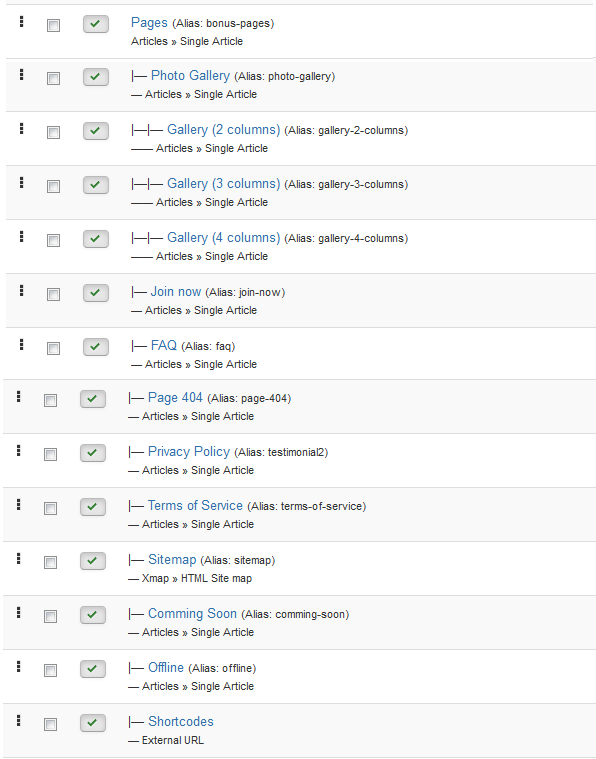
Backend Settings
Pages Menu
To configure “Pages Menu”, please go to Menus >> Main menu – English >> Find “Pages Menu” (you can create new menu if this menu is not exist).
Menu Item Type: Single Article
Template Style: Use default
Menu Location: Main menu – English
- Details: backend settings
- YT Menu Params Settings:: backend settings
Photo Gallery
Menu Item Type: Single Article
Template Style: Use default
Menu Location: Main menu – English
To configure Photo Gallery, please go to Menus >> Main menu – English >> Find “Photo Gallery” (you can create new menu if this menu is not exist).
Backend Settings
- Details: backend settings
- YT Menu Params Settings:backend settings
Gallery (2 columns)
Menu Item Type: Single Article
Template Style: Use default
Menu Location: Main menu – English
To configure Gallery (2 columns), please go to Menus >> Main menu – English >> Find “Gallery (2 columns)” (you can create new menu if this menu is not exist).
Backend Settings
- Details: backend settings
- YT Menu Params Settings:backend settings
4.3.3 Contact-us Menu Configuration
Frontend Appearance
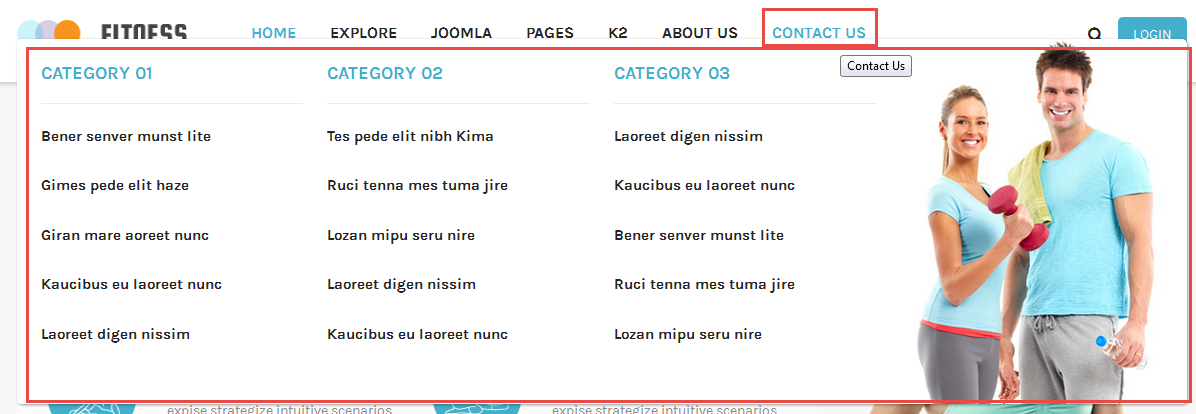
Backend Settings
Contact-us Menu
To configure “Contact-us Menu”, please go to Menus >> Main menu – English >> Find “Contact-us Menu” (you can create new menu if this menu is not exist).
Menu Item Type: Single Article
Template Style: Use default
Menu Location: Main menu – English
- Details: backend settings
- YT Menu Params Settings:: backend settings
1. To configure Category 01, please go to Extensions >> Module Manager >> Click “New” button to create a new module >> Select “Sj Basic News” module.
Backend Settings
- Module: Click Here
- Other Options: Click Here
- Image Options: Click Here
- Advanced: Click Here
2. To configure Ads Megamenu, please go to Extensions >> Module Manager >> Click “New” button to create a new module >> Select “Custom HTML” module.
Backend Settings
- Module: Click Here
- Options: Click Here
- Advanced: Click Here
Copy and paste the Code into editor:
|
1 |
<p><a class="adsmega" href="#" rel="alternate"><img src="images/content/bg/bg-mega.jpg" alt="" /></a></p> |
4.4 Extension Configuration
4.4.1 Top-right – Position
Frontend Appearance
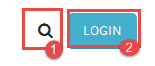
4.4.1.1 Search Top Right – Top-right Position
Module Position – Module Suffix
Module Class Suffix: blank search_top
Module Type: Smart Search
Backend Settings
To configure this module, please go to Extensions >> Module Manager >> Click “New” button to create a new module >> Select “Smart Search” module.
- Module: backend settings
- Advanced: backend settings
4.4.1.2 Login – Top-right Position
Module Position – Module Suffix
Module Class Suffix: Not Use
Module Type: Login
Backend Settings
To configure this module, please go to Extensions >> Module Manager >> Click “New” button to create a new module >> Select “Login” module.
- Module: backend settings
- Advanced: backend settings
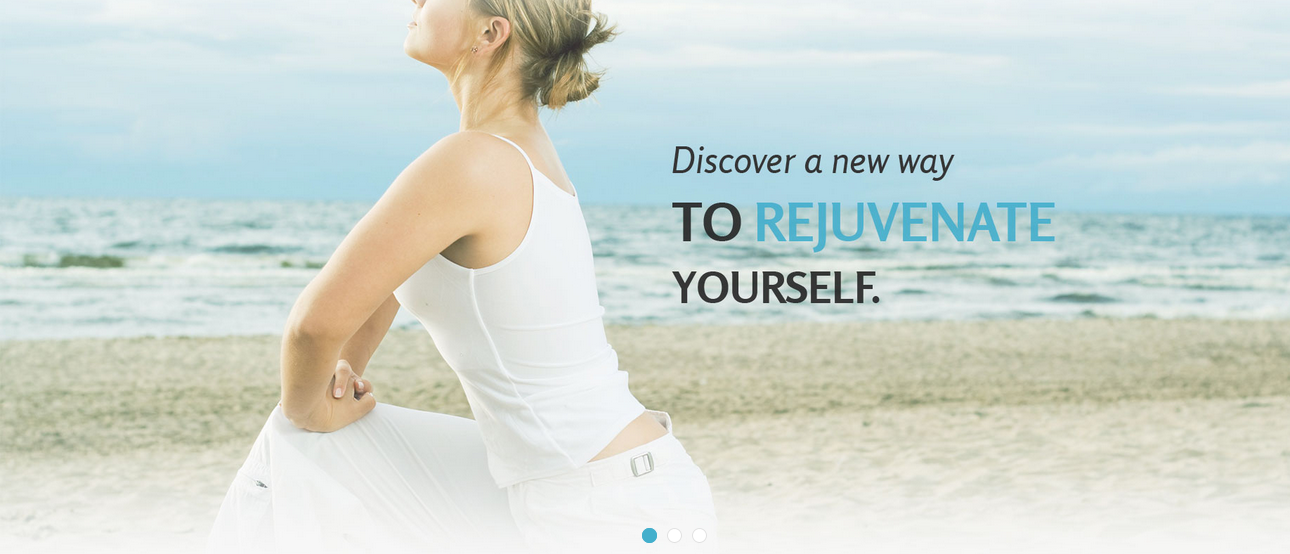
4.4.2 Main Slideshow – Slideshow
Module Position – Module Suffix
Module Class Suffix: Not Use
Module Type: Custom HTML
Frontend Appearance
Backend Settings
To configure this module, please go to Extensions >> Module Manager >> Click “New” button to create a new module >> Select “Custom HTML” module.
- Module: backend settings
- Option: backend settings
- Advanced: backend settings
Copy and paste the Code into editor:
|
1 |
<div class="sjmainslide">[yt_content_slider style="default" margin="0" items_column0="1" items_column1="1" items_column2="1" items_column3="1" items_column4="1" type_change="fade" transitionin="fadeIn" transitionout="fadeOut" arrows="no" arrow_position="arrow-default" pagination="yes" autoplay="yes" autoheight="no" hoverpause="yes" lazyload="no" loop="yes" speed="0.6" delay="4" ] [yt_content_slider_item src="images/content/slideshow/sl01.jpg" caption="no" link="#" ] [/yt_content_slider_item] [yt_content_slider_item src="images/content/slideshow/sl02.jpg" caption="no" link="#" ] [/yt_content_slider_item] [yt_content_slider_item src="images/content/slideshow/sl03.jpg" caption="no" link="#" ] [/yt_content_slider_item] [/yt_content_slider]</div> |
4.4.3 Sj contact ajax Spotlight1 – Spotlight1
Module Position – Module Suffix
Module Class Suffix: sj-contactht
Module Type: SJ Contact Ajax
Frontend Appearance

Backend Settings
To configure this module, please go to Extensions >> Module Manager >> Click “New” button to create a new module >> Select “SJ Contact Ajax” module.
- Module: backend settings
- Captcha Options: backend settings
- Maps Options: backend settings
- Advanced: backend settings
4.4.4 Our Classes – Spotlight2-Position
Module Position – Module Suffix
Module Class Suffix: sj-ourclass
Module Type: K2 Content
Frontend Appearance
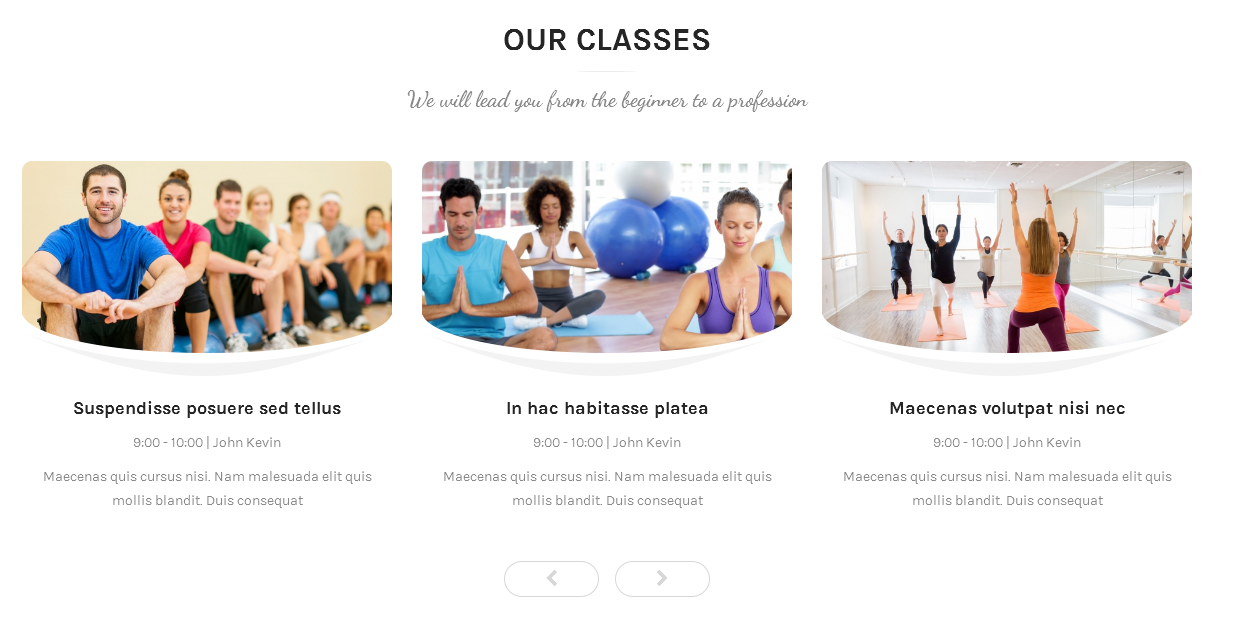
Backend Settings
To configure this module, please go to Extensions >> Module Manager >> Click “New” button to create a new module >> Select “K2 Content” module.
- Module: backend settings
- Advanced: backend settings
4.4.5 Spotlight2 – Spotlight3 Position
Module Position – Module Suffix
Module Class Suffix: not use
Module Type: Custom HTML
Frontend Appearance
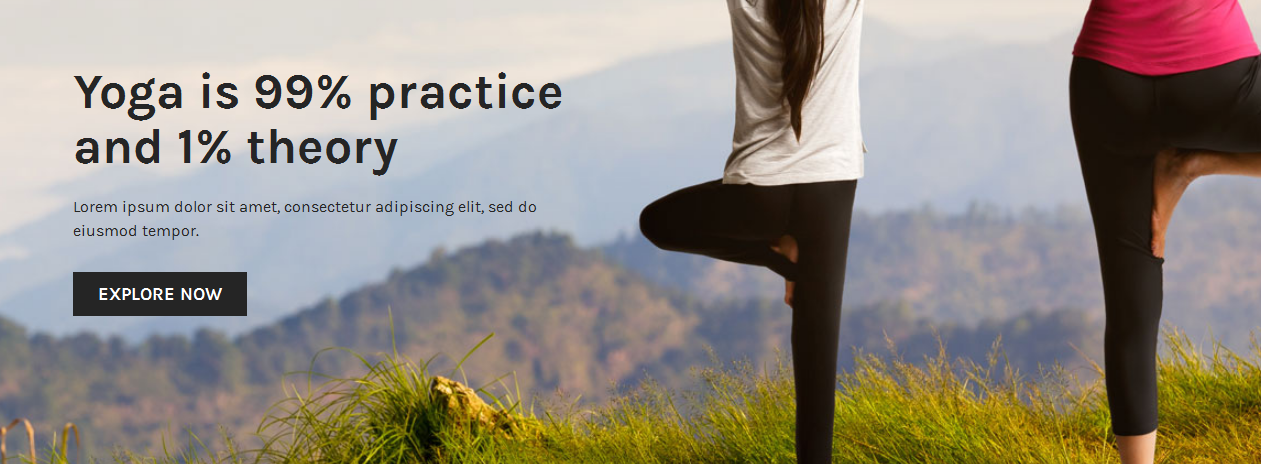
Backend Settings
To configure this module, please go to Extensions >> Module Manager >> Click “New” button to create a new module >> Select “Custom HTML” module.
- Module: backend settings
- Options: backend settings
- Advanced: backend settings
Copy and paste the Code into editor:
|
1 2 3 4 |
<div class="ads-spotlight3"> <h3 class="title">Yoga is 99% practice and 1% theory</h3> <p>Lorem ipsum dolor sit amet, consectetur adipiscing elit, sed do eiusmod tempor.</p> <a title="" href="#">Explore now</a></div> |
4.4.5 Classes timetable – Spotlight4 Position
Module Position – Module Suffix
Module Class Suffix: sjtimetable
Module Type: Custom HTML
Frontend Appearance
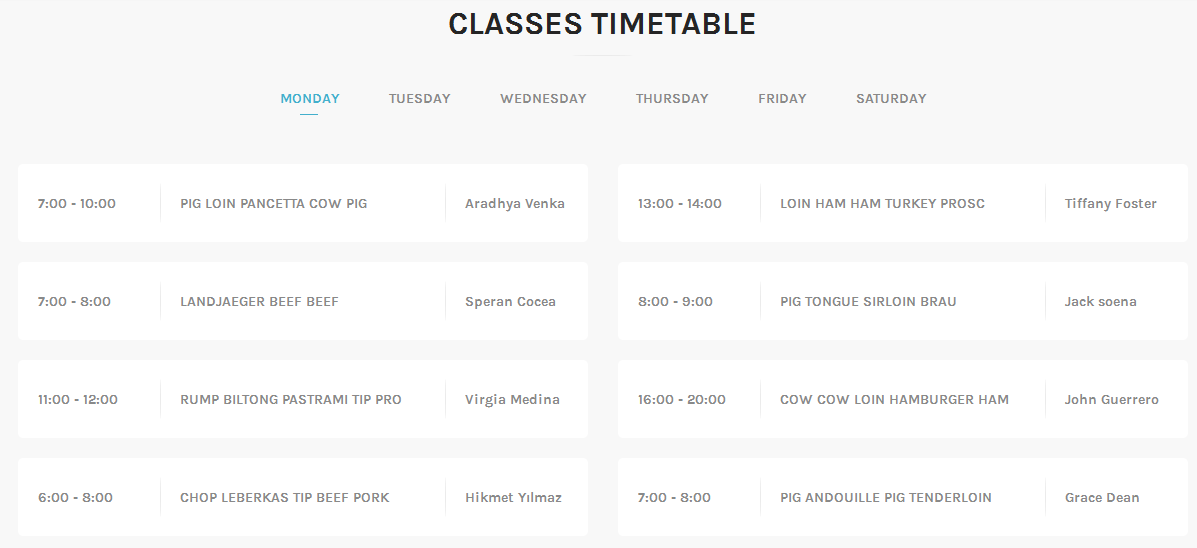
Backend Settings
To configure this module, please go to Extensions >> Module Manager >> Click “New” button to create a new module >> Select “Custom HTML” module.
- Module: backend settings
- Options: backend settings
- Advanced: backend settings
Copy and paste the Code into editor:
|
1 2 3 4 5 6 7 8 9 10 11 12 13 14 15 16 17 18 19 20 21 22 23 24 25 26 27 28 29 30 31 32 33 34 35 36 37 38 39 40 41 42 43 44 45 46 47 48 49 50 51 52 53 54 55 56 57 58 59 60 61 62 63 64 65 66 67 68 69 70 71 72 73 74 75 76 77 78 79 80 81 82 83 84 85 86 87 88 89 90 91 92 93 94 95 96 97 98 99 100 101 102 103 104 105 106 107 108 109 110 111 112 113 114 115 116 117 118 119 120 121 122 123 124 125 126 127 128 129 130 131 132 133 134 135 136 137 138 139 140 141 142 143 144 145 146 147 148 149 150 151 152 153 154 155 156 157 158 159 160 161 162 163 164 165 166 167 168 169 170 171 172 173 174 175 176 177 178 179 180 181 182 183 184 185 186 187 188 189 190 191 192 193 194 195 196 197 198 199 200 201 202 203 204 205 206 207 208 209 210 211 212 213 214 215 216 217 218 219 220 221 222 223 224 225 226 227 228 229 230 231 232 233 234 235 236 237 238 239 240 241 242 243 244 245 246 247 248 249 250 251 252 253 254 255 256 257 258 259 260 261 262 263 264 265 266 267 268 269 270 271 272 273 274 275 276 277 278 279 280 281 282 283 284 285 286 287 288 289 290 291 292 293 294 295 296 297 298 299 300 301 302 303 304 305 306 307 308 309 310 311 312 313 314 315 316 317 318 319 320 321 322 323 324 325 326 327 328 329 330 331 332 333 334 335 336 337 338 339 340 341 342 343 |
<p>[yt_tabs type="basic" style="" width="100%" height="auto" align="left" ] [yt_tabs_item title="monday" icon="" ]</p> <div class="box-timetable"> <ul> <li>7:00 - 10:00</li> <li class="class"><a title="" href="#">Pig loin pancetta cow pig</a></li> <li>Aradhya Venka</li> </ul> </div> <div class="box-timetable"> <ul> <li>13:00 - 14:00</li> <li class="class"><a title="" href="#">Loin ham ham turkey prosc</a></li> <li>Tiffany Foster</li> </ul> </div> <div class="box-timetable"> <ul> <li>7:00 - 8:00</li> <li class="class"><a title="" href="#">Landjaeger beef beef</a></li> <li>Speran Cocea</li> </ul> </div> <div class="box-timetable"> <ul> <li>8:00 - 9:00</li> <li class="class"><a title="" href="#">Pig tongue sirloin brau</a></li> <li>Jack soena</li> </ul> </div> <div class="box-timetable"> <ul> <li>11:00 - 12:00</li> <li class="class"><a title="" href="#">Rump biltong pastrami tip pro</a></li> <li>Virgia Medina</li> </ul> </div> <div class="box-timetable"> <ul> <li>16:00 - 20:00</li> <li class="class"><a title="" href="#">Cow cow loin hamburger ham</a></li> <li>John Guerrero</li> </ul> </div> <div class="box-timetable"> <ul> <li>6:00 - 8:00</li> <li class="class"><a title="" href="#">Chop leberkas tip beef pork</a></li> <li>Hikmet Yılmaz</li> </ul> </div> <div class="box-timetable"> <ul> <li>7:00 - 8:00</li> <li class="class"><a title="" href="#">Pig andouille pig tenderloin</a></li> <li>Grace Dean</li> </ul> </div> <p>[/yt_tabs_item] [yt_tabs_item title="tuesday" icon="" ]</p> <div class="box-timetable"> <ul> <li>6:00 - 8:00</li> <li class="class"><a title="" href="#">Chop leberkas tip beef pork</a></li> <li>Hikmet Yılmaz</li> </ul> </div> <div class="box-timetable"> <ul> <li>13:00 - 14:00</li> <li class="class"><a title="" href="#">Loin ham ham turkey prosc</a></li> <li>Tiffany Foster</li> </ul> </div> <div class="box-timetable"> <ul> <li>7:00 - 8:00</li> <li class="class"><a title="" href="#">Landjaeger beef beef</a></li> <li>Speraa Cocea</li> </ul> </div> <div class="box-timetable"> <ul> <li>7:00 - 10:00</li> <li class="class"><a title="" href="#">Pig loin pancetta cow pig</a></li> <li>Aradhya Venka</li> </ul> </div> <div class="box-timetable"> <ul> <li>11:00 - 12:00</li> <li class="class"><a title="" href="#">Rump biltong pastrami tip pro</a></li> <li>Virgia Medina</li> </ul> </div> <div class="box-timetable"> <ul> <li>16:00 - 20:00</li> <li class="class"><a title="" href="#">Cow cow loin hamburger ham</a></li> <li>John Guerrero</li> </ul> </div> <div class="box-timetable"> <ul> <li>8:00 - 9:00</li> <li class="class"><a title="" href="#">Pig tongue sirloin brau</a></li> <li>Jack soena</li> </ul> </div> <div class="box-timetable"> <ul> <li>7:00 - 8:00</li> <li class="class"><a title="" href="#">Pig andouille pig tenderloin</a></li> <li>Grace Dean</li> </ul> </div> <p>[/yt_tabs_item] [yt_tabs_item title="wednesday" icon="" ]</p> <div class="box-timetable"> <ul> <li>7:00 - 10:00</li> <li class="class"><a title="" href="#">Pig loin pancetta cow pig</a></li> <li>Aradhya Venka</li> </ul> </div> <div class="box-timetable"> <ul> <li>13:00 - 14:00</li> <li class="class"><a title="" href="#">Loin ham ham turkey prosc</a></li> <li>Tiffany Foster</li> </ul> </div> <div class="box-timetable"> <ul> <li>7:00 - 8:00</li> <li class="class"><a title="" href="#">Landjaeger beef beef</a></li> <li>Speraa Cocea</li> </ul> </div> <div class="box-timetable"> <ul> <li>8:00 - 9:00</li> <li class="class"><a title="" href="#">Pig tongue sirloin brau</a></li> <li>Jack soena</li> </ul> </div> <div class="box-timetable"> <ul> <li>11:00 - 12:00</li> <li class="class"><a title="" href="#">Rump biltong pastrami tip pro</a></li> <li>Virgia Medina</li> </ul> </div> <div class="box-timetable"> <ul> <li>16:00 - 20:00</li> <li class="class"><a title="" href="#">Cow cow loin hamburger ham</a></li> <li>John Guerrero</li> </ul> </div> <div class="box-timetable"> <ul> <li>6:00 - 8:00</li> <li class="class"><a title="" href="#">Chop leberkas tip beef pork</a></li> <li>Hikmet Yılmaz</li> </ul> </div> <div class="box-timetable"> <ul> <li>7:00 - 8:00</li> <li class="class"><a title="" href="#">Pig andouille pig tenderloin</a></li> <li>Grace Dean</li> </ul> </div> <p>[/yt_tabs_item] [yt_tabs_item title="thursday" icon="" ]</p> <div class="box-timetable"> <ul> <li>6:00 - 8:00</li> <li class="class"><a title="" href="#">Chop leberkas tip beef pork</a></li> <li>Hikmet Yılmaz</li> </ul> </div> <div class="box-timetable"> <ul> <li>13:00 - 14:00</li> <li class="class"><a title="" href="#">Loin ham ham turkey prosc</a></li> <li>Tiffany Foster</li> </ul> </div> <div class="box-timetable"> <ul> <li>7:00 - 8:00</li> <li class="class"><a title="" href="#">Landjaeger beef beef</a></li> <li>Speranța Cocea</li> </ul> </div> <div class="box-timetable"> <ul> <li>7:00 - 10:00</li> <li class="class"><a title="" href="#">Pig loin pancetta cow pig</a></li> <li>Aradhya Venka</li> </ul> </div> <div class="box-timetable"> <ul> <li>11:00 - 12:00</li> <li class="class"><a title="" href="#">Rump biltong pastrami tip pro</a></li> <li>Virgia Medina</li> </ul> </div> <div class="box-timetable"> <ul> <li>16:00 - 20:00</li> <li class="class"><a title="" href="#">Cow cow loin hamburger ham</a></li> <li>John Guerrero</li> </ul> </div> <div class="box-timetable"> <ul> <li>8:00 - 9:00</li> <li class="class"><a title="" href="#">Pig tongue sirloin brau</a></li> <li>Jack soena</li> </ul> </div> <div class="box-timetable"> <ul> <li>7:00 - 8:00</li> <li class="class"><a title="" href="#">Pig andouille pig tenderloin</a></li> <li>Grace Dean</li> </ul> </div> <p>[/yt_tabs_item] [yt_tabs_item title="friday" icon="" ]</p> <div class="box-timetable"> <ul> <li>7:00 - 10:00</li> <li class="class"><a title="" href="#">Pig loin pancetta cow pig</a></li> <li>Aradhya Venka</li> </ul> </div> <div class="box-timetable"> <ul> <li>13:00 - 14:00</li> <li class="class"><a title="" href="#">Loin ham ham turkey prosc</a></li> <li>Tiffany Foster</li> </ul> </div> <div class="box-timetable"> <ul> <li>7:00 - 8:00</li> <li class="class"><a title="" href="#">Landjaeger beef beef</a></li> <li>Speraa Cocea</li> </ul> </div> <div class="box-timetable"> <ul> <li>8:00 - 9:00</li> <li class="class"><a title="" href="#">Pig tongue sirloin brau</a></li> <li>Jack soena</li> </ul> </div> <div class="box-timetable"> <ul> <li>11:00 - 12:00</li> <li class="class"><a title="" href="#">Rump biltong pastrami tip pro</a></li> <li>Virgia Medina</li> </ul> </div> <div class="box-timetable"> <ul> <li>16:00 - 20:00</li> <li class="class"><a title="" href="#">Cow cow loin hamburger ham</a></li> <li>John Guerrero</li> </ul> </div> <div class="box-timetable"> <ul> <li>6:00 - 8:00</li> <li class="class"><a title="" href="#">Chop leberkas tip beef pork</a></li> <li>Hikmet Yılmaz</li> </ul> </div> <div class="box-timetable"> <ul> <li>7:00 - 8:00</li> <li class="class"><a title="" href="#">Pig andouille pig tenderloin</a></li> <li>Grace Dean</li> </ul> </div> <p>[/yt_tabs_item] [yt_tabs_item title="saturday" icon="" ]</p> <div class="box-timetable"> <ul> <li>6:00 - 8:00</li> <li class="class"><a title="" href="#">Chop leberkas tip beef pork</a></li> <li>Hikmet Yılmaz</li> </ul> </div> <div class="box-timetable"> <ul> <li>13:00 - 14:00</li> <li class="class"><a title="" href="#">Loin ham ham turkey prosc</a></li> <li>Tiffany Foster</li> </ul> </div> <div class="box-timetable"> <ul> <li>7:00 - 8:00</li> <li class="class"><a title="" href="#">Landjaeger beef beef</a></li> <li>Speraa Cocea</li> </ul> </div> <div class="box-timetable"> <ul> <li>7:00 - 10:00</li> <li class="class"><a title="" href="#">Pig loin pancetta cow pig</a></li> <li>Aradhya Venka</li> </ul> </div> <div class="box-timetable"> <ul> <li>11:00 - 12:00</li> <li class="class"><a title="" href="#">Rump biltong pastrami tip pro</a></li> <li>Virgia Medina</li> </ul> </div> <div class="box-timetable"> <ul> <li>16:00 - 20:00</li> <li class="class"><a title="" href="#">Cow cow loin hamburger ham</a></li> <li>John Guerrero</li> </ul> </div> <div class="box-timetable"> <ul> <li>8:00 - 9:00</li> <li class="class"><a title="" href="#">Pig tongue sirloin brau</a></li> <li>Jack soena</li> </ul> </div> <div class="box-timetable"> <ul> <li>7:00 - 8:00</li> <li class="class"><a title="" href="#">Pig andouille pig tenderloin</a></li> <li>Grace Dean</li> </ul> </div> <p>[/yt_tabs_item] [/yt_tabs]</p> |
4.4.7 Ads Spotlight5 – Spotlight5 Position
Module Position – Module Suffix
Module Class Suffix: Not Use
Module Type: Custom HTML
Frontend Appearance

Backend Settings
To configure this module, please go to Extensions >> Module Manager >> Click “New” button to create a new module >> Select “Custom HTML” module.
- Module: backend settings
- Options: backend settings
- Advanced: backend settings
Copy and paste the Code into editor:
|
1 2 3 4 |
<div class="ads-spotlight5"> <h3 class="title">Choose your favorite class and join us today!</h3> <p>Sed ut perspiciatis unde omnis iste natus error sit voluptatem accusantium doloremque laudantium, totam rem aperiam, eaque ipsa quae ab illo inventore.</p> <a title="" href="#">Join Now</a></div> |
4.4.8 Latest Blog – Spotlight6 Position
Module Position – Module Suffix
Module Class Suffix: Not Use
Module Type: K2 Content
Frontend Appearance
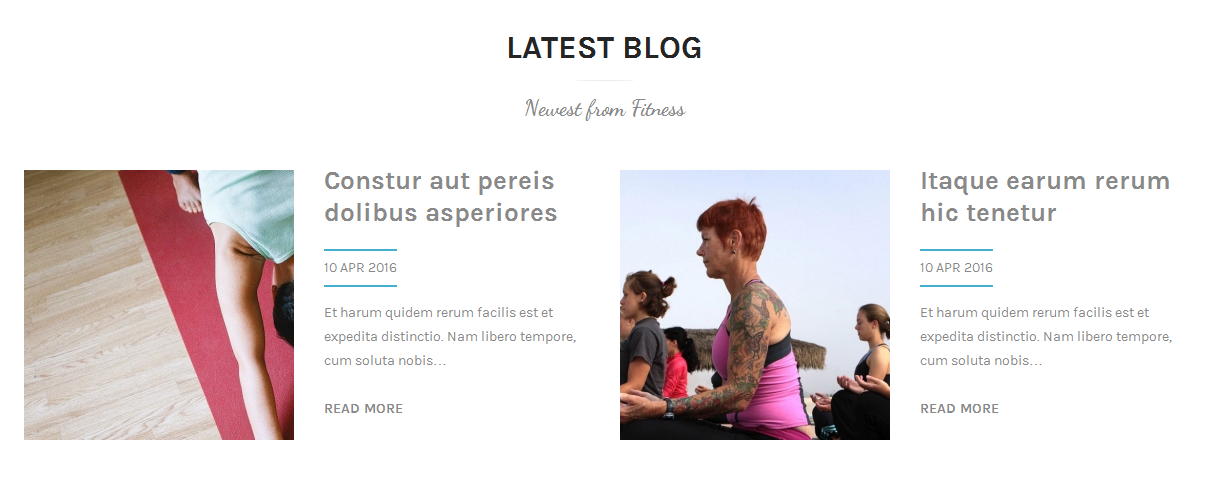
Backend Settings
To configure this module, please go to Extensions >> Module Manager >> Click “New” button to create a new module >> Select “K2 Content” module.
- Module: backend settings
- Advanced: backend settings
4.4.9 Testmonial Spotlight7 – Spotlight7 Position
Module Position – Module Suffix
Module Class Suffix: Not use
Module Type: Custom HTML
Frontend Appearance
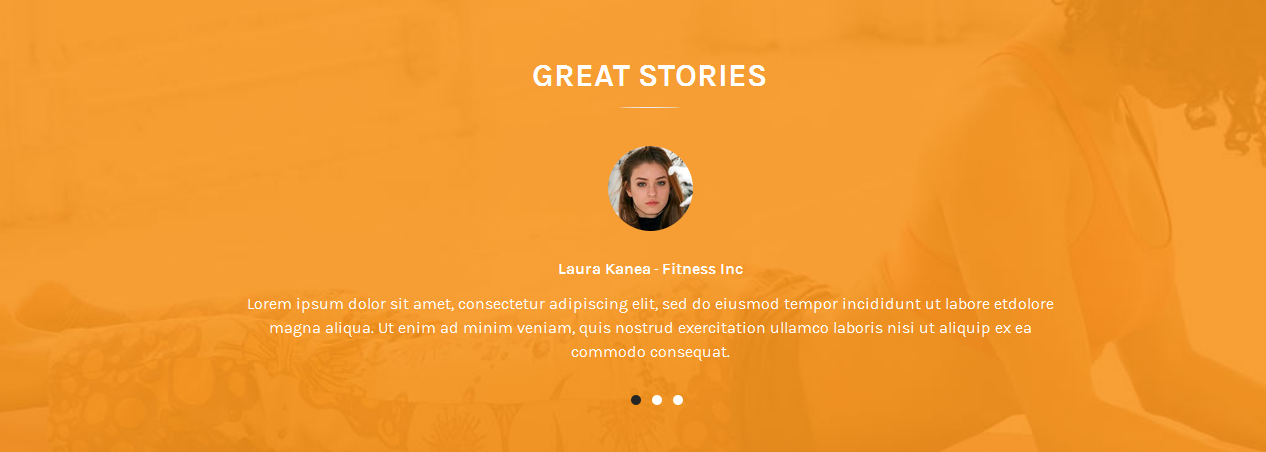
Backend Settings
To configure this module, please go to Extensions >> Module Manager >> Click “New” button to create a new module >> Select “Custom HTML” module.
- Module: backend settings
- Options: backend settings
- Advanced: backend settings
Copy and paste the Code into editor:
|
1 |
<div class="sjtestimonial">[yt_testimonial title="Great Stories" column="1" border="0px solid #ccc" background="" title_color="#ccc" ] [yt_testimonial_item author="Laura Kanea" position="Fitness Inc" avatar="images/content/testimonial/01.jpg" ] Lorem ipsum dolor sit amet, consectetur adipiscing elit, sed do eiusmod tempor incididunt ut labore etdolore magna aliqua. Ut enim ad minim veniam, quis nostrud exercitation ullamco laboris nisi ut aliquip ex ea commodo consequat. [/yt_testimonial_item] [yt_testimonial_item author="Jeny Loasm" position="Mahe Dc" avatar="images/content/testimonial/02.jpg" ] Lorem ipsum dolor sit amet, consectetur adipiscing elit, sed do eiusmod tempor incididunt ut labore et dolore magna aliqua. Ut enim ad minim veniam, quis nostrud exercitation ullamco laboris nisi ut aliquip ex ea commodo consequat. [/yt_testimonial_item] [yt_testimonial_item author="Lee Kang" position="Founder" avatar="images/content/testimonial/03.jpg" ] Lorem ipsum dolor sit amet, consectetur adipiscing elit, sed do eiusmod tempor incididunt ut labore et magna aliqua. Ut enim ad minim veniam, quis nostrud exercitation ullamco laboris nisi ut aliquip ex ea commodo consequat. [/yt_testimonial_item] [/yt_testimonial]</div> |
4.4.10 Content Spotlight8 – Spotlight8 Position
Module Position – Module Suffix
Module Class Suffix: Not Use
Module Type: Custom HTML
Frontend Appearance
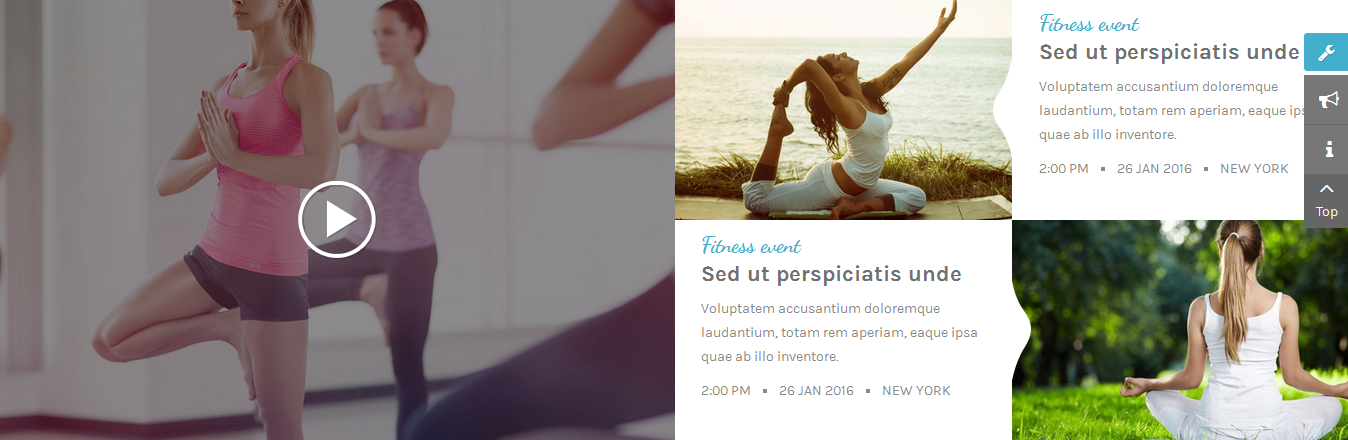
Backend Settings
To configure this module, please go to Extensions >> Module Manager >> Click “New” button to create a new module >> Select “Custom HTML” module.
- Module: backend settings
- Options: backend settings
- Advanced: backend settings
Copy and paste the Code into editor:
|
1 2 3 4 5 6 7 8 9 10 11 12 13 14 15 16 17 18 19 20 21 22 23 24 25 26 27 28 29 30 31 |
<div class="sj_content_sp8"> <div class="sp8_left">[yt_lightbox title="Jessie Hilgenberg Strong Back Workout" align="left" type="none" style="none" src="images/content/bg/item-sp71.jpg" video_addr="https://www.youtube.com/watch?v=1cYxSQzVYKI" width="100%" height="100%" lightbox="yes" description="" ]</div> <div class="sp8_right"> <div class="wcol"> <div class="col"><a class="col-img-left" title="" href="#"><img src="images/content/bg/item-sp72.jpg" alt="" /></a></div> <div class="col"> <div class="content"><span class="event">Fitness event</span> <a class="title" title="" href="#">Sed ut perspiciatis unde</a> <p>Voluptatem accusantium doloremque laudantium, totam rem aperiam, eaque ipsa quae ab illo inventore.</p> <ul class="info"> <li>2:00 PM</li> <li>26 JAN 2016</li> <li>New York</li> </ul> </div> </div> </div> <div class="wcol"> <div class="col"> <div class="content"><span class="event">Fitness event</span> <a class="title" title="" href="#">Sed ut perspiciatis unde</a> <p>Voluptatem accusantium doloremque laudantium, totam rem aperiam, eaque ipsa quae ab illo inventore.</p> <ul class="info"> <li>2:00 PM</li> <li>26 JAN 2016</li> <li>New York</li> </ul> </div> </div> <div class="col"><a class="col-img-right" title="" href="#"><img src="images/content/bg/item-sp73.jpg" alt="" /></a></div> </div> </div> </div> |
4.4.11 Opening Hours – Bottom Position
Module Position – Module Suffix
Module Class Suffix: Not Use
Module Type: Custom HTML
Frontend Appearance

Backend Settings
To configure this module, please go to Extensions >> Module Manager >> Click “New” button to create a new module >> Select “Custom HTML” module.
- Module: backend settings
- Options: backend settings
- Advanced: backend settings
Copy and paste the Code into editor:
|
1 2 3 4 5 6 7 8 9 10 11 12 13 |
<div class="sj-openingour"> <div class="sj-openingour-time"> <h3 class="title">Opening Hours:</h3> <ul> <li>Monday - Friday: 8:00 AM - 20:00 PM</li> <li>Saturday: 10:00 AM - 17:00 PM</li> <li>Sunday: 10:00 AM - 2:00 PM</li> </ul> </div> <div class="sj-openingour-tel"> <div class="tel">+123 456 9870 / +123 456 9871</div> </div> </div> |
4.4.12 About Footer – Bottom1 Position
Module Position – Module Suffix
Module Class Suffix: Not use
Module Type: Custom HTML
Frontend Appearance
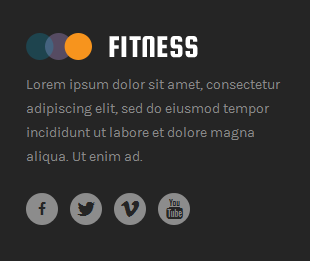
Backend Settings
To configure this module, please go to Extensions >> Module Manager >> Click “New” button to create a new module >> Select “Custom HTML” module.
- Module: backend settings
- Options: backend settings
- Advanced: backend settings
Copy and paste the Code into editor:
|
1 2 3 4 5 6 7 8 9 10 |
<div class="about_footer"> <p><img src="images/logo_fitness.png" alt="" /></p> <p>Lorem ipsum dolor sit amet, consectetur adipiscing elit, sed do eiusmod tempor incididunt ut labore et dolore magna aliqua. Ut enim ad.</p> <ul class="list_social"> <li>[yt_icon icon="icon: facebook" url="#" size="20" background="transparent" color="#252525" radius="" padding="" margin="" border="none" ]</li> <li>[yt_icon icon="icon: twitter" url="#" size="20" background="transparent" color="#252525" radius="" padding="" margin="" border="none" ]</li> <li>[yt_icon icon="icon: vimeo" url="#" size="20" background="transparent" color="#252525" radius="" padding="" margin="" border="none" ]</li> <li>[yt_icon icon="icon: youtube" url="#" size="20" background="transparent" color="#252525" radius="" padding="" margin="" border="none" ]</li> </ul> </div> |
4.4.13 Recent Posts – Bottom2 Position
Module Position – Module Suffix
Module Class Suffix: sj-recentpost
Module Type: K2 Content
Frontend Appearance
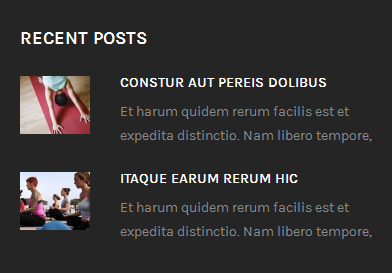
Backend Settings
To configure this module, please go to Extensions >> Module Manager >> Click “New” button to create a new module >> Select “K2 Content” module.
- Module: backend settings
- Advanced: backend settings
4.4.14 Support – Bottom3 Position
Module Position – Module Suffix
Module Class Suffix: Not use
Module Type: Custom HTML
Frontend Appearance
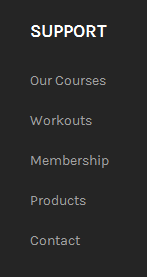
Backend Settings
To configure this module, please go to Extensions >> Module Manager >> Click “New” button to create a new module >> Select “Custom HTML” module.
- Module: backend settings
- Options: backend settings
- Advanced: backend settings
Copy and paste the Code into editor:
|
1 2 3 4 5 6 7 |
<ul class="menu"> <li><a href="#" rel="alternate">Our Courses</a></li> <li><a href="#" rel="alternate">Workouts</a></li> <li><a href="#" rel="alternate">Membership</a></li> <li><a href="#" rel="alternate">Products</a></li> <li><a href="#" rel="alternate">Contact</a></li> </ul> |
4.4.15 1 Day Free Trial – Bottom4 Position
Module Position – Module Suffix
Module Class Suffix: contact_home
Module Type: SJ Contact Ajax
Frontend Appearance
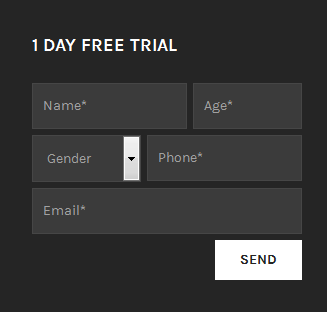
Backend Settings
To configure this module, please go to Extensions >> Module Manager >> Click “New” button to create a new module >> Select “SJ Contact Ajax” module.
- Module: backend settings
- Captcha Options: backend settings
- Maps Options: backend settings
- Advanced: backend settings
5COPYRIGHT – Back to top
To remove Designed by SmartAddons.Com at the footer of template, please purchase our Copyright Removal here
6SUPPORT – Back to top
Thank you so much for purchasing this template. If you have any questions that are beyond the scope of this help file, please send us via: Submit a Ticket
Thanks so much!
