Items filtered by date: December 2012
SJ Royal Template Userguide
This guide will help you install SJ Royal and extensions included in the template step by step. This provides for only membeships in SmartAddons Joomla Template Clubs.
Table of content as following:
1. REQUIREMENT - Back to top
At the basic level, this template will require the following conditions:
- Compatible with version Joomla: Joomla 3.x
- Installation Packages include:
- Quickstart Package
- Template package only
- Extensions package from our store
- Third Party Extensions package (if have)
2. HOW TO DOWNLOAD - Back to top
Download Packages from our store:
Step 1 Login your account

Step 2 Go to Joomla > Download > Joomla Templates Club

Step 3 Under Premium Joomla Templates --> click to download template as you want

Step 4 Under name of template --> Download packages as you want

3. HOW TO INSTALLATION - Back to top
There are two ways to install a Joomla Template:
- Install quickstart: By using this package, you will set the template exactly as our Demo with sample data. This is applied when you need a fresh Joomla with our template.
- Install Template and Extensions: This is applied when you have already installed a Joomla instance on your server. You will need only be using the zipped files in "Extensions" and "Template" folders mentioned above.
3.1 Installation with Quickstart Package
Before installing the Quickstart package, we recommend you back up your site first. You click to learn how to back up a Joomla site. The following steps will guide to install a quickstart package of SmartAddons Joomla Template: Click here
3.2 Installation with Template and Extensions
Log in your Administrator, go to Extensions > Extension Manager

Then install Template and Extensions as bellow.
3.2.1. Install Template:
Step 1: Click Choose File/Browse button, select our template file you have downloaded > Upload & Install. Click here for getting Template package
Step 2: Go to Extensions > Template Manager and set SJ Royal to become the default template as bellow

3.2.2. Install Extensions:
Here is list of extensions that are used in the template.

Step 1: Install Extensions that are developed by SmartAddons. Please Unzip First the Extension package for getting SmartAddons extensions then install each of them as install template above. Click here for getting Extension packages
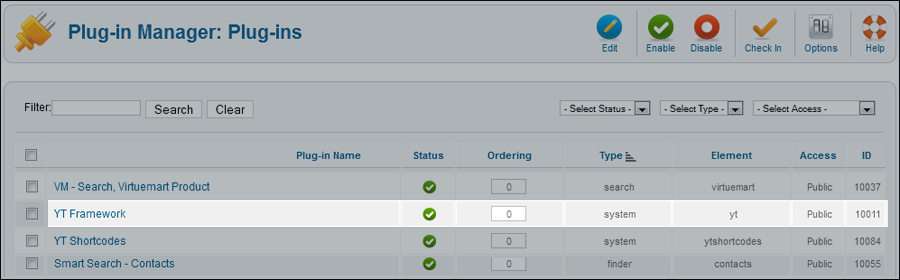
Step 2: Enable/Public plugins. Note: all plugins listed are imperative.
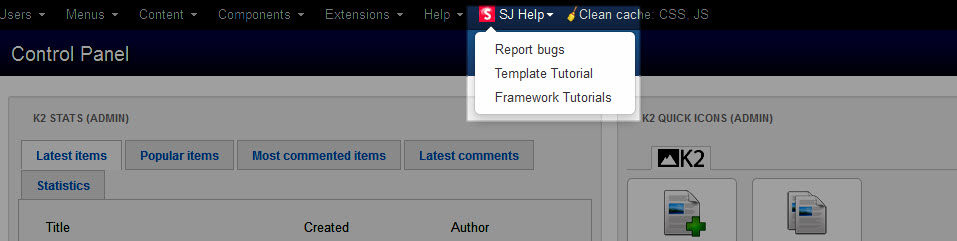
- YT Framework Plugin supports to add extra parameters used with Mega Menu and to compress CSS/JS/HTML when optimizing code. Besides, configure Yt Framework to show SJ Help with Report Bugs, Template Tutorials and YT Framework Tutorials or include jQuery into template. You can go here for getting more information of this plugin.
- YT Shortcodes supports users to make content for web pages. In Joomla administrator, YT Shortcodes button will be appeared below the text-area, you can choose shortcodes for the text-area to make content. Click here for viewing the screenshot of backend
- SJ Content Related News is used for showing other related articles in the same category. For more info about this module, please go here. Click here for viewing the screenshot of backend.
You need to install and activate them when using this template. Let's start from 1 - 2 - 3 to active plugins as bellow:

After install template/extensions, please go to next step - Configuration of template as 4. Part bellow
4. HOW TO CONFIGURATION - Back to top
The following part we will guide how to configure the template becomes the same with our home page - Demo
4.1 Modules Positions

4.2 Template Configuration
Go to Extensions > Template Manager > SJ Royal. All of parameters of this template are divided into the following groups, in which they are explained themselves:


4.3 Menu Configuration
4.3.1. Megamenu Configuration

To configure Mega Menu, go to: Extensions --> Template manager --> open SJ Royal template, in the Menu setting, you can configure Mega Menu. Do as this for setting Menu.
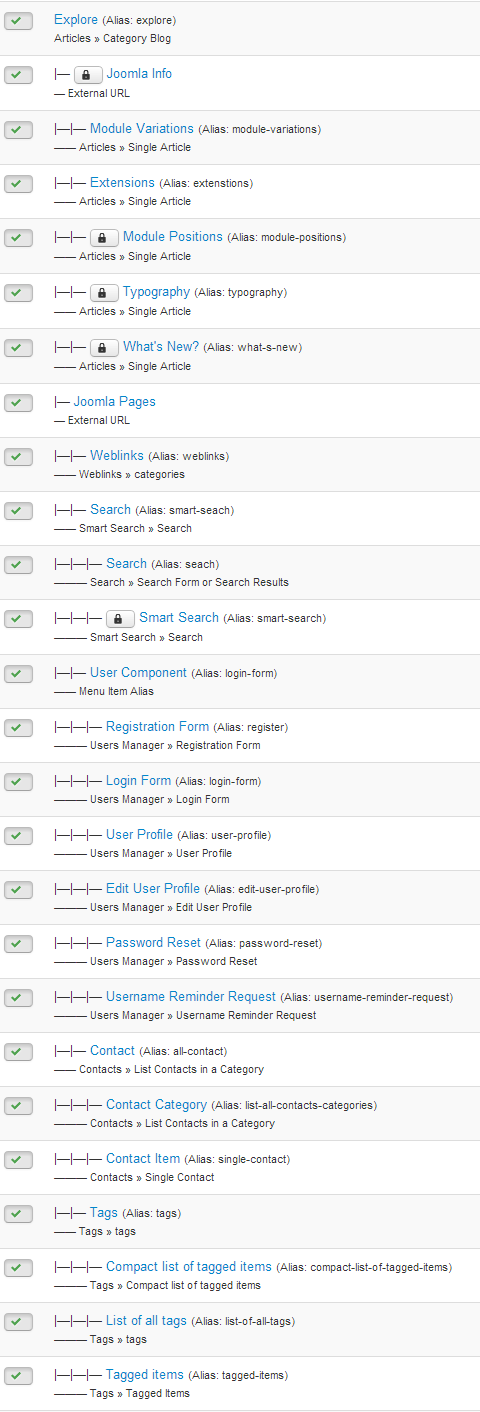
4.3.2. Menu Item Frontend & Backend Configuration
- EXPLORE MENU: TREE OF MENU - MENU PARAM
Frontend

Backend
- Joomla Info: Backend
- Joomla Pages: Backend
- OUR MENU: TREE OF MENU - MENU PARAM
Frontend

Backend
Categories Menu Explaination:
+ "Hot Menu" is SJ Basic News Module type
+ "Slide Photo" is Custom HTML Module type
- Hot Menu: Backend
- Slide Photo: Backend
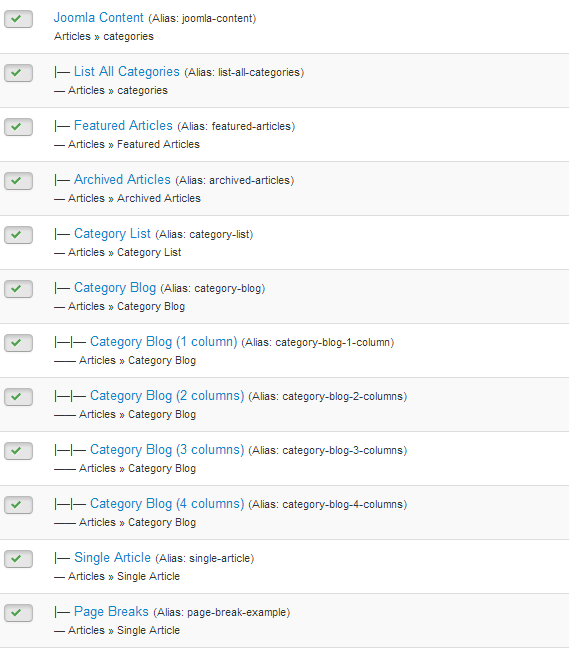
- JOOMLA CONTENT MENU: TREE OF MENU - MENU PARAM
Frontend

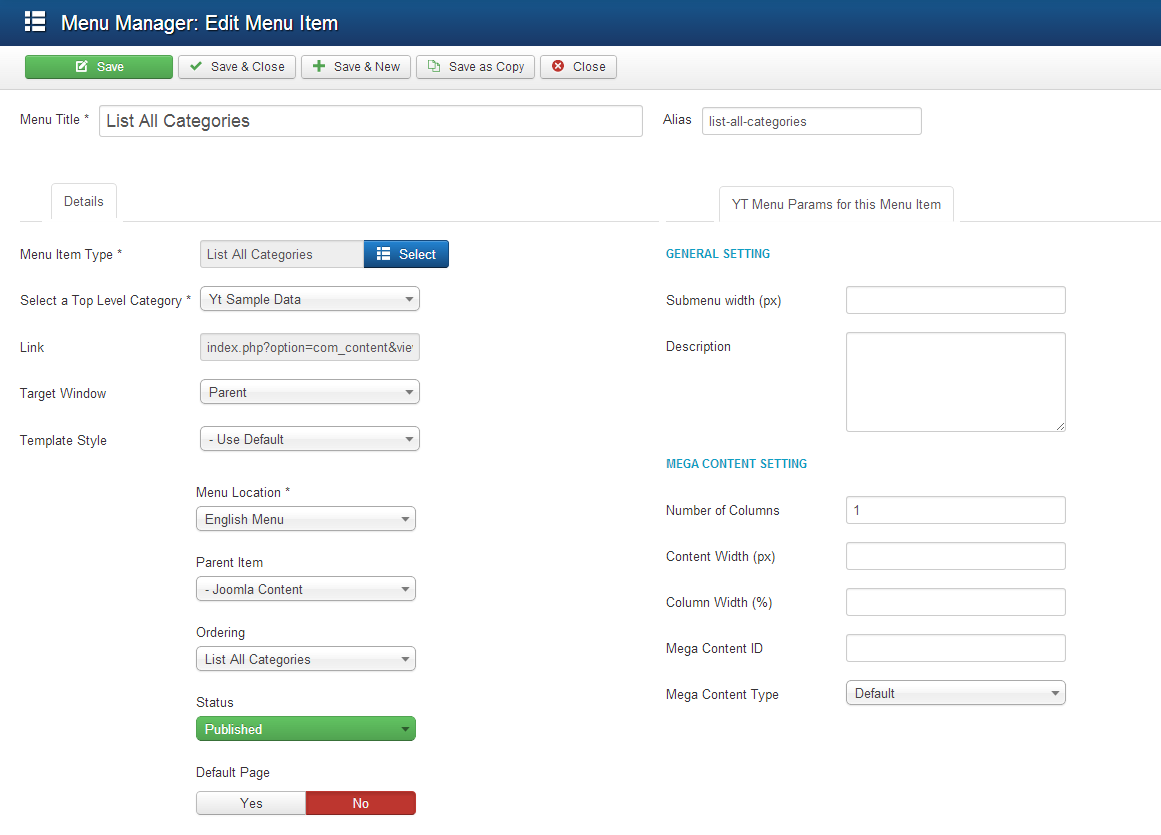
Backend
- List All Categories: Backend
- Notes: JOOMLA CONTENT MENU configures the same to BONUS PAGES MENU
Frontend

4.4 Extension Configuration
4.4.1. Smart search - Smart search Module
- Module Position - Module Suffix
Position: notice
Suffix: - Frontend - Backend

4.4.1.1. Social Networking - Custom HTML Module
- Module Position - Module Suffix
Position: notice
Suffix: - Frontend - Backend

4.4.1.2. Language - Language Switcher Module
- Module Position - Module Suffix
Position: notice
Suffix: - Frontend - Backend

4.4.1.3. Login Form - Login Module
- Module Position - Module Suffix
Position: notice
Suffix: - Frontend - Backend

4.4.2. Special Offers - SJ Article Slider Module
- Module Position - Module Suffix
Position: top1
Suffix: big-title - Frontend - Backend

4.4.3. Menu categories - SJ Content Categories Module
- Module Position - Module Suffix
Position: top2
Suffix: box-clear - Frontend - Backend

4.4.4. Our Menu - SJ Content Responsive Listing Module
- Module Position - Module Suffix
Position: top3
Suffix: box-clear big-title our-menu - Frontend - Backend

4.4.5. Philosophy - Custom HTML Module
- Module Position - Module Suffix
Position: bottom1
Suffix: bg-content1 - Frontend - Backend

4.4.6. What's New? - SJ Basic News Module
- Module Position - Module Suffix
Position: bottom2
Suffix: bg-content2 - Frontend - Backend

4.4.7. Testimonials - Custom HTML Module
- Module Position - Module Suffix
Position: bottom3
Suffix: bg-content3 - Frontend - Backend

4.4.8. Recent Tweets - SJ Twitter Module
- Module Position - Module Suffix
Position: bottom4
Suffix: box-clear twitter - Frontend - Backend

4.4.9. Footer - Menu Module
- Module Position - Module Suffix
Position: footer
Suffix: - Frontend - Backend

That's homepage. For other advanced and customized configurations, please submit ticket OR purchase our installation services.
How to install Joomla Quickstart
SJ Onepage Template Userguide
SJ Vinda Template Userguide
This guide will help you install SJ Vinda and extensions included in the template step by step. This provides for only membeships in SmartAddons Joomla Template Clubs.
Table of content as following:
1. REQUIREMENT - Back to top
At the basic level, this template will require the following conditions:
- Compatible with version Joomla: Joomla! 2.5.x, Joomla 3.x
- Compatible with version K2: 2.6.x
- Installation Packages include:
- Quickstart Package
- Template package only
- Extensions package from our store
- Third Party Extensions package (if have)
2. HOW TO DOWNLOAD - Back to top
2.1 Download Packages from our store:
Step 1 Login your account
Step 2 Go to Joomla > Download > Joomla Templates Club
Step 3 Under Premium Joomla Templates --> click to download template as you want
Step 4 Under name of template --> Download packages as you want

2.2 Download packages from Third Party:
This is the component from Third Party which is used in this template:
3. HOW TO INSTALLATION - Back to top
There are two ways to install a Joomla Template:
- Install quickstart: By using this package, you will set the template exactly as our Demo with sample data. This is applied when you need a fresh Joomla with our template.
- Install Template and Extensions: This is applied when you have already installed a Joomla instance on your server. You will need only be using the zipped files in "Extensions" and "Template" folders mentioned above.
3.1 Installation with Quickstart Package
Before installing the Quickstart package, we recommend you back up your site first. You click to learn how to back up a Joomla site. The following steps will guide to install a quickstart package of SmartAddons Joomla Template: Click here
3.2 Installation with Template and Extensions
Log in your Administrator, go to Extensions > Extension Manager
Then install Template and Extensions as bellow.
3.2.1. Install Template:
Step 1: Click Choose File/Browse button, select our template file you have downloaded > Upload & Install. Click here for getting Template package.
Step 2: Go to Extensions > Template Manager and set SJ Vinda to become the default template as bellow

3.2.2. Install Extensions:
Here is list of extensions that are used in the template.

Step 1: Install Extensions that are developed by SmartAddons. Please Unzip First the Extension package for getting SmartAddons extensions then install each of them as install template above. Click here for getting Extension packages.
Step 2: Install K2 Component as extensions above. Click here for getting package of K2 Component.
Step 3: Enable/Public plugins. Note: all plugins listed are imperative.
- Yt Framework Plugin supports to add extra parameters used with Mega Menu and to compress CSS/JS/HTML when optimizing code. Besides, configure Yt Framework to show SJ Help with Report Bugs, Template Tutorials and YT Framework Tutorials or include jQuery into template. You can go here for getting more information of this plugin.
- YT Shortcodes supports users to make content for web pages. In Joomla administrator, YT Shortcodes button will be appeared below the text-area, you can choose shortcodes for the text-area to make content. Click here for viewing the screenshot of backend
- SJ Content Related News is used for showing other related articles in the same category. For more info about this module, please go here. Click here for viewing the screenshot of backend.
You need to install and activate them when using this template. Let's start from 1 - 2 - 3 to active plugins as bellow:
After install template/extensions, please go to next step - Configuration of template as 4. Part bellow
4. HOW TO CONFIGURATION - Back to top
The following part we will guide how to configure the template becomes the same with our home page - Demo
4.1 Modules Positions

4.2 Template Configuration
Go to Extensions > Template Manager > SJ Vinda. All of parameters of this template are divided into the following groups, in which they are explained themselves:


4.3 Menu Configuration
4.3.1. Megamenu Configuration

To configure Mega Menu, go to: Extensions --> Template manager --> open SJ Vinda template, in the Menu setting, you can configure Mega Menu. To view more guide about how to install, set up and configure SJ Mega Menu as you want, please click here
4.3.2. Menu Item Frontend & Backend Configuration
- EXPLORE MENU: TREE OF MENU - MENU PARAM
Frontend

Backend
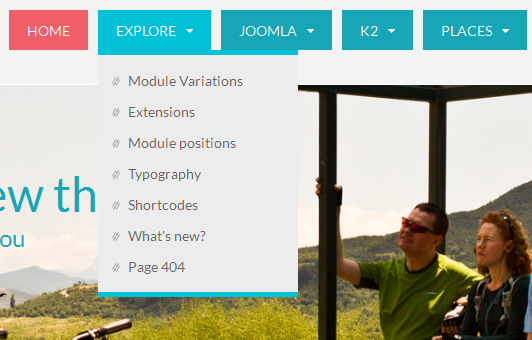
- Module Variation: Backend
Notes: Menus below configure the same "Module Variation". And "EXPLORE MENU" configure the same to "BONUS PAGES MENU"
- JOOMLA MENU: TREE OF MENU - MENU PARAM
Frontend

Backend: Menus configure the same above. However with child menu, you should remember to select its "Parent Item" parameter. For example: Parent menu "Joomla Content" has child menu "Single Article".
- K2 MENU: TREE OF MENU - MENU PARAM
Frontend

Backend
- K2 Category: Backend
Notes: Menus below configure the same " K2 Category".
- CATEGORIES MENU: TREE OF MENU - MENU PARAM
Frontend

Backend
Categories Menu Explaination:- "Categories" is Menu Module type
- "Video Day" and "Top Comment" are K2 Content Module type
- "Recent Post" is SJ Basic News Module type
- Categories: Backend
- Video Day: Backend
- Top Comment: Backend
- Recent Post: Backend
- EVENT MENU: TREE OF MENU - MENU PARAM
Frontend

Backend
Event Menu Explaination:- "Categories"; "Quick Link"; "ADS"; "Vinda - Magazine" are Custom HTML module type. They're linked to custom html modules
- Quick Link: Backend
Code-Custom Output
Notes: "Categories"; "Vinda - Magazine" below configure the same "Quick Link".
- ADS: Backend
Code-Custom Output
4.4 Extension Configuration
4.4.1. Top Banner - Custom HTML Module
- Module Position - Module Suffix
Position: notice
Suffix: - Frontend - Backend

4.4.2. SJ K2 Splash - SJ K2 Splash Module
- Module Position - Module Suffix
Position: top1
Suffix: - Frontend - Backend

4.4.3. Custom(Rss); Smart Search; Login Form; Custom(Share); Language
- Module Position - Module Suffix
Position: top2
Suffix: - Frontend - Backend

4.4.4. Slideshow - Sj K2 Slider Module
- Module Position - Module Suffix
Position: Slideshow
Suffix: slideshow - Frontend - Backend

4.4.5. Adv-top - Custom HTML Module
- Module Position - Module Suffix
Position: maintop1
Suffix: - Frontend - Backend

4.4.6. SJ Social Media Counts - SJ Social Media Counts Module
- Module Position - Module Suffix
Position: right
Suffix: - Frontend - Backend

4.4.7. Latest news - K2 Content Module
- Module Position - Module Suffix
Position: right
Suffix: _menu - Frontend - Backend

4.4.8. Popular Articles - SJ Module Tab
- Module Position - Module Suffix
Position: right
Suffix: - Frontend - Backend

4.4.9. sponsored - SJ News Extra Slider Module
- Module Position - Module Suffix
Position: right
Suffix: sponsored - Frontend - Backend

4.4.10. Outfit - Custom HTML Module
- Module Position - Module Suffix
Position: right
Suffix: - Frontend - Backend

4.4.11. mega_news - Sj K2 Mega News Module
- Module Position - Module Suffix
Position: position-h1
Class Suffix: - Frontend - Backend

4.4.12. More... - SJ Categories for K2
- Module Position - Module Suffix
Position: bottom1
Class Suffix: sj-categories - Frontend - Backend

4.4.13. Banner bottom2 - Custom HTML Module
- Module Position - Module Suffix
Position: bottom2
Class Suffix: - Frontend - Backend

4.4.14. Vinda - Custom HTML Module
- Module Position - Module Suffix
Position: bottom3
Class Suffix: - Frontend - Backend

4.4.15. Exhibitions - Module Menu
- Module Position - Module Suffix
Position: bottom4
Class Suffix: menu_footer - Frontend - Backend

Notes: "bottom5" and "bottom6" configure the same
4.4.16. Follow us - Custom HTML Module
- Module Position - Module Suffix
Position: bottom7
Class Suffix: menu_footer - Frontend - Backend

4.4.17. Brand - Custom HTML Module
- Module Position - Module Suffix
Position: footer
Class Suffix: - Frontend - Backend

That's homepage. For other advanced and customized configurations, please submit ticket OR purchase our installation services.
SJ AppStore Userguide
SJ Flat News Template Userguide
SJ Muzik Template Userguide
SJ Atom Userguide
|
This guide will help you install SJ Atom and extensions included in the template step by step. This provides for only membeships in SmartAddons Joomla Template Clubs.
1. REQUIREMENT
At the basic level, this template will require the following conditions:
- Compatible with version Joomla: Joomla! 2.5.x, Joomla 3.3
- Compatible with version K2: 2.6.x
- Installation Packages include:
- Quickstart Package
- Template package only
- Extensions package from our store
- Extensions packge from 3rd Parties (if have)
2. HOW TO DOWNLOAD
2.1 Download Packages from our store:
Step 1 Login your account
Step 2 Go to Joomla > Download > Joomla Templates Club
Step 3 Under Premium Joomla Templates --> click to download template as you want
Step 4 Under name of template --> Download packages as you want

2.2 Download packages from 3rd Parties:
This is the component from 3rd party which is used in this template:;
3. HOW TO INSTALLATION
There are two ways to install a Joomla Template:
- Install quickstart: By using this package, you will set the template exactly as our Demo with sample data. This is applied when you need a fresh Joomla with our template. For understanding more information about Quickstart, you should read this article: Quickstart package for Joomla templates - what is this and how to install it?
- Install Template and Extensions: This is applied when you have already installed a Joomla instance on your server. You will need only be using the zipped files in "Extensions" and "Template" folders mentioned above.
3.1 Installation with Quickstart Package
Let see step by step for quickstart installation in the article - How to install a Joomla Quickstart
In the end of 3.1 Installation with Quickstart Package, you will be got a new website as our demo.
3.2 Installation without Quickstart Package
Log in your Administrator, go to Extensions > Extension Manager
Then install Template and Extensions as bellow.
3.2.1. Install Template:
Step 1: Click Choose File/Browse button, select our template file you have downloaded > Upload & Install. Do as this for getting Template package.
Step 2: Go to Extensions > Template Manager and set SJ Atom to become the default template as bellow

3.2.2. Install Extensions:
Here is list of extensions that are used in the template.

Step 1: Install Extensions that are developed by SmartAddons. Please Unzip First the Extension package for getting SmartAddons extensions then install each of them as install template above. Do as this for getting SmartAddons packages.
Step 2: Install K2 Component as extensions above. Do as this for getting package of K2 Component.
Step 3: Enable/Public plugins. Note: all plugins listed are imperative.
- Yt Framework Plugin supports to add extra parameters used with Mega Menu and to compress CSS/JS/HTML when optimizing code. Besides, configure Yt Framework to show SJ Help with Report Bugs, Template Tutorials and YT Framework Tutorials or include jQuery into template. You can go here for getting more information of this plugin.
- YT Shortcodes supports users to make content for web pages. In Joomla administrator, YT Shortcodes button will be appeared below the text-area, you can choose shortcodes for the text-area to make content. Click here for viewing the screenshot of backend
- SJ Content Related News is used for showing other related articles in the same category. For more info about this module, please go here. Click here for viewing the screenshot of backend.
- SJ Contact Ajax and SJ Content Responsive Listing Ajax plugins are using for loading ajax in SJ Contact Ajax module (in pos-blog position) and SJ Content Responsive Listing module (in pos-contact position)
You need to install and activate them when using this template. Let's start from 1 - 2 - 3 to active plugins as bellow:
After install template/extensions, please go to next step - Configuration of template as 4. Part bellow
4. HOW TO CONFIGURATION
The following part we will guide how to configure the template becomes the same with our home page - Demo
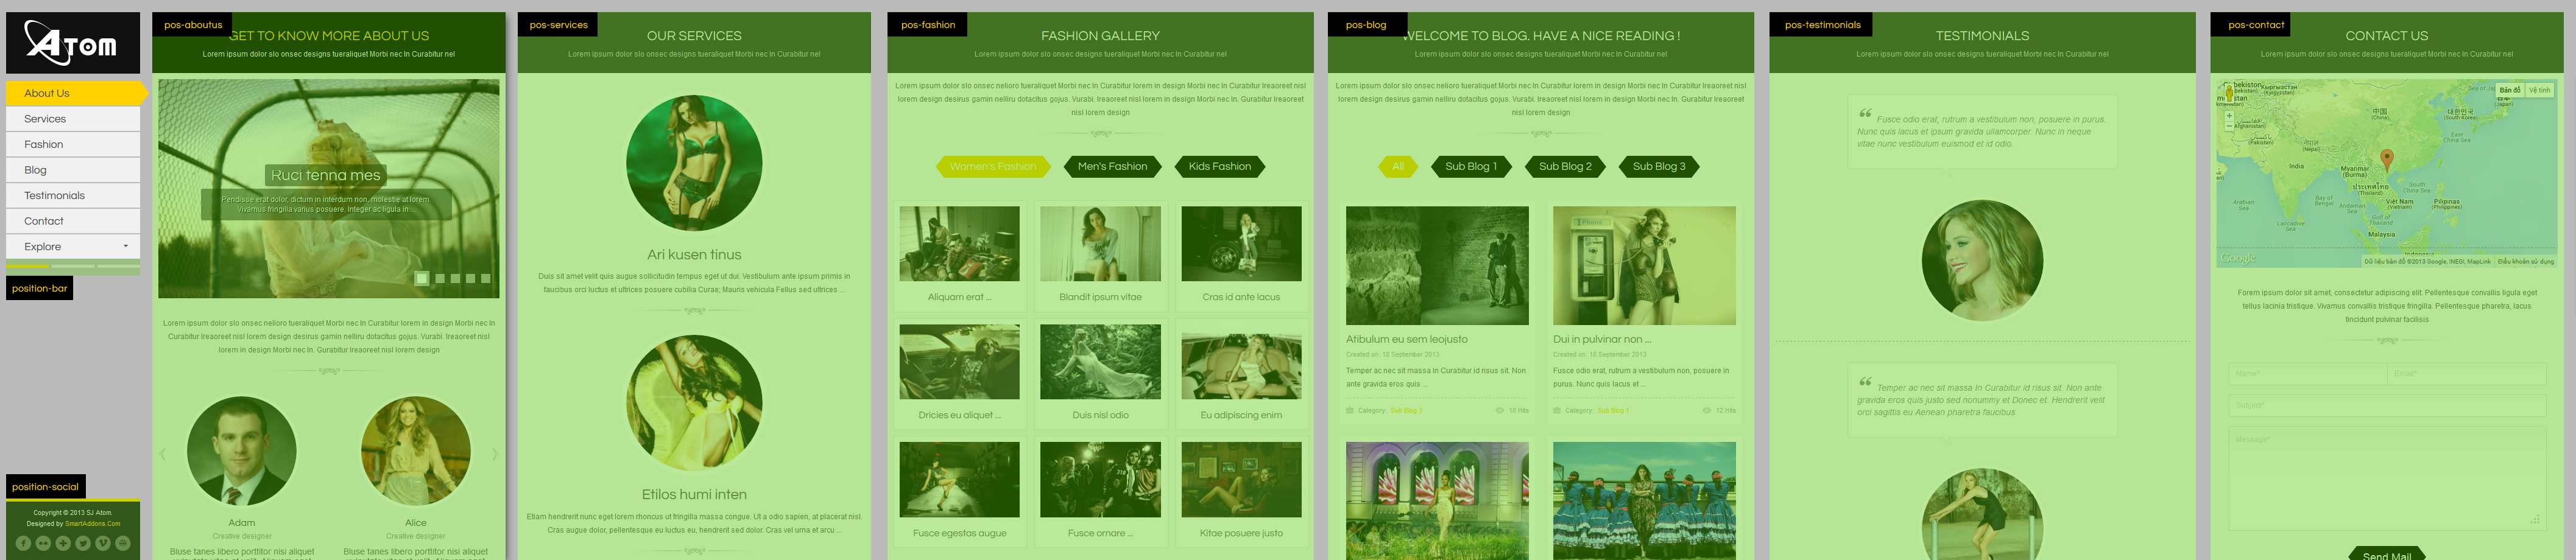
4.1 Modules Positions
Please click on the image for viewing full Module Positions
4.2 Template Configuration
Go to Extensions > Template Manager > SJ Atom. All parameters of this template are divided into the following groups, in which they are explained themselves. Please click here for seeing more
4.3 Menu Configuration
4.3.1. Megamenu Configuration
To configure Mega Menu, go to: Extensions --> Template manager --> open SJ Atom template, in the Menu setting, you can configure Menu as in this screenshot
4.3.2. Menu Items of Default Menu Type - Main Menu
Firstly, let check the menu item tree of Main Menu in the bellow image (click on image for viewing more detail)
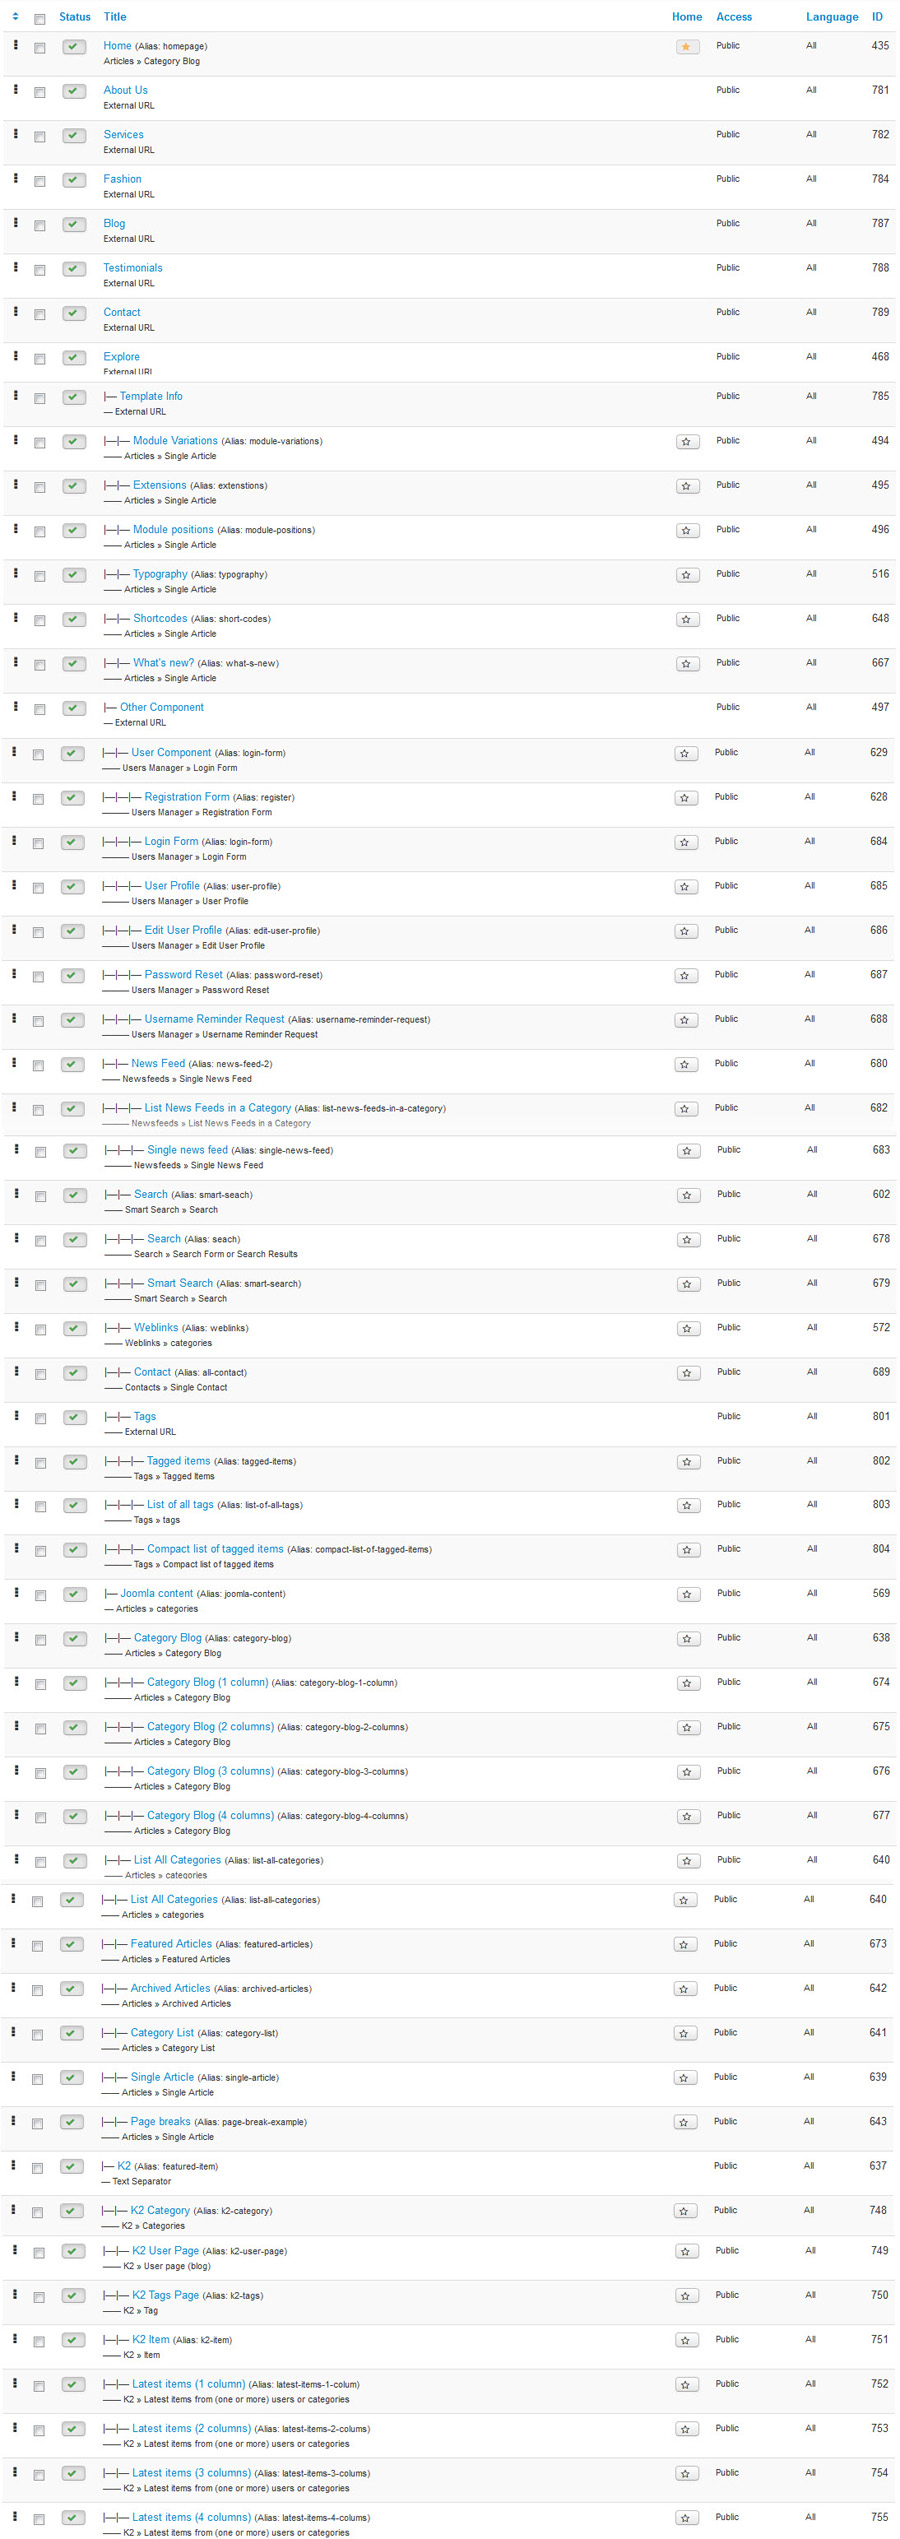
4.3.2.1. About Us - Services - Fashion - Blog - Testimonial - Contact
All menus above are external URLs and link to module positions. They are the same configuration of menu so we will guide About Us menu for example. Please see in the bellow image:

4.3.2.2. Explore

Setting of Template Info, Other Component, Joomla Content and K2 menus are the same so we will guide backend of Template Info for expample
4.4 Extensions Configuration
We will guide to configure extensions follow the Module Position above
4.4.1. Module HTML Custom - Bars for switching backgrounds
- Module Position - Module Suffix
Position: postition-bar
Suffix: change-bg - Frontend - Backend

4.4.2. Module HTML Custom - Social
- Module Position - Module Suffix
Position: position-social
Suffix: social - Frontend - Backend

4.4.3. Module HTML Custom - About Us Text
- Module Position - Module Suffix
Position: pos-aboutus
Suffix: block-title blank - Frontend - Backend

4.4.4. Module SJ News Scroller
- Module Position - Module Suffix
Position: pos-aboutus
Suffix: scroller no-modal - Frontend - Backend

Please refer here for getting how to configure params SJ News Scroller module
4.4.5. Module SJ News Extra Slider
- Module Position - Module Suffix
Position: pos-aboutus
Suffix: our-member no-modal - Frontend - Backend

Please refer here for getting how to configure params of SJ News Extra Slider module
4.4.6. Module HTML Custom - Our Services
- Module Position - Module Suffix
Position: pos-services
Suffix: block-title blank - Frontend - Backend

4.4.7. Module SJ Basic News
- Module Position - Module Suffix
Position: pos-services
Suffix: services no-modal - Frontend - Backend

4.4.8. Module HTML Custom - Fashion Gallery
- Module Position - Module Suffix
Position: pos-fashion
Suffix: block-title blank - Frontend - Backend

4.4.9. Module SJ News Ajax Tabs
- Module Position - Module Suffix
Position: pos-fashion
Suffix: fashion no-modal - Frontend - Backend

Please refer here for getting how to configure params of SJ News Ajax Tabs module
4.4.10. Module HTML Custom - Welcome to blog
- Module Position - Module Suffix
Position: pos-blog
Suffix: block-title blank - Frontend - Backend

4.4.11. Module SJ Content Responsive Listing
- Module Position - Module Suffix
Position: pos-blog
Suffix: mod-blog no-modal - Frontend - Backend

Please refer here for getting how to configure params SJ Content Responsive Listing module
4.4.12. Module HTML Custom - Testimonials
- Module Position - Module Suffix
Position: pos-testimonials
Suffix: block-title blank - Frontend - Backend

4.4.13. Module SJ News Extra Slider - Testimonials
- Module Position - Module Suffix
Position: pos-testimonials
Suffix: testimonials - Frontend - Backend

4.4.14. Module HTML Custom - Contact Us
- Module Position - Module Suffix
Position: pos-contact
Suffix: block-title blank - Frontend - Backend

4.4.15. Module SJ Contact Ajax - Contact Us
- Module Position - Module Suffix
Position: pos-contact
Suffix: mod-contact - Frontend - Backend

Please refer here for getting how to configure params SJ Contact Ajax module
That's homepage. For other advanced and customized configurations, please submit ticket OR purchase our installation services.
SJ Decou Template Userguide
This guide will help you install SJ Decou and extensions included in the template step by step. This provides for only membeships in SmartAddons Joomla Template Clubs.
Table of content as following:
1. REQUIREMENT - Back to top
At the basic level, this template will require the following conditions:
- Compatible with version Joomla: Joomla! 2.5.x, Joomla 3.x
- Compatible with version K2: 2.6.x
- Installation Packages include:
- Quickstart Package
- Template package only
- Extensions package from our store
- Extensions packge from 3rd Parties (if have)
2. HOW TO DOWNLOAD - Back to top
2.1 Download Packages from our store:
Step 1 Login your account
Step 2 Go to Joomla > Download > Joomla Templates Club
Step 3 Under Premium Joomla Templates --> click to download template as you want
Step 4 Under name of template --> Download packages as you want
2.2 Download packages from 3rd Parties:
This is the component from 3rd party which is used in this template:;
3. HOW TO INSTALLATION - Back to top
There are two ways to install a Joomla Template:
- Install quickstart: By using this package, you will set the template exactly as our Demo with sample data. This is applied when you need a fresh Joomla with our template. For understanding more information about Quickstart, you should read this article: Quickstart package for Joomla templates - what is this and how to install it?
- Install Template and Extensions: This is applied when you have already installed a Joomla instance on your server. You will need only be using the zipped files in "Extensions" and "Template" folders mentioned above.
3.1 Installation with Quickstart Package
Before installing the Quickstart package, we recommend you back up your site first. You click to learn how to back up a Joomla site. The following steps will guide to install a quickstart package of SmartAddons Joomla Template
Step 1 Upload folder quickstart:
If you are using SSH, simply upload your zip file (via FTP) and then 'unzip' the file. If you are using FTP, unzip the file on your computer and then upload those files as bellow. Though some webhosts have a different structure, in MOST cases, the folder that is used for uploading will be called "public_html." This will take a while to upload all those files and folders. Please keep your patience.

Step 2 Start installation procedure:
After uploading is completed, open the browser and type your URL in the address bar. The first screen will appear as follow
Sellect Language

Main Configuration:
Enter the required information of your site: sitename, email, admin username and password

Step 3 Configure Database:
Create Database: Following guide is used for creating database on the localhost. Go to your phpmyadmin (http://localhost/phpmyadmin/) then type of desired database name. You should refer document for creating database on Cpanel.

Database Installation: After the step 2, Click Next and go to this step. You will need to fillup database name, username and password in here.

Step 4: Install Sample Data
If you install sample data, you will have a site like our demo. If you select default sample data, you will get a fresh Joomla site.

Step 5: Remove or Rename the Installation folder:
The final step is removing or renaming the Installation folder

In the end of 3.1 Installation with Quickstart Package, you will be got a new website as our demo.
3.2 Installation without Quickstart Package
Log in your Administrator, go to Extensions > Extension Manager
Then install Template and Extensions as bellow.
3.2.1. Install Template:
Step 1: Click Choose File/Browse button, select our template file you have downloaded > Upload & Install. Do as this for getting Template package.
Step 2: Go to Extensions > Template Manager and set SJ Decou to become the default template as bellow

3.2.2. Install Extensions:
Here is list of extensions that are used in the template.

Step 1: Install Extensions that are developed by SmartAddons. Please Unzip First the Extension package for getting SmartAddons extensions then install each of them as install template above. Do as this for getting SmartAddons packages.
Step 2: Install K2 Component as extensions above. Do as this for getting package of K2 Component.
Step 3: Enable/Public plugins. Note: all plugins listed are imperative.
- Yt Framework Plugin supports to add extra parameters used with Mega Menu and to compress CSS/JS/HTML when optimizing code. Besides, configure Yt Framework to show SJ Help with Report Bugs, Template Tutorials and YT Framework Tutorials or include jQuery into template. You can go here for getting more information of this plugin.
- YT Shortcodes supports users to make content for web pages. In Joomla administrator, YT Shortcodes button will be appeared below the text-area, you can choose shortcodes for the text-area to make content. Click here for viewing the screenshot of backend
- SJ Content Related News is used for showing other related articles in the same category. For more info about this module, please go here. Click here for viewing the screenshot of backend.
You need to install and activate them when using this template. Let's start from 1 - 2 - 3 to active plugins as bellow:
After install template/extensions, please go to next step - Configuration of template as 4. Part bellow
4. HOW TO CONFIGURATION - Back to top
The following part we will guide how to configure the template becomes the same with our home page - Demo
4.1 Modules Positions

4.2 Template Configuration
Go to Extensions > Template Manager > SJ Decou. All of parameters of this template are divided into the following groups, in which they are explained themselves:


4.3 Menu Configuration
4.3.1. Megamenu Configuration
To configure Mega Menu, go to: Extensions --> Template manager --> open SJ Decou template, in the Menu setting, you can configure Mega Menu. Do as this for setting Menu.
4.3.2. Menu Item Backend Settings
- Frontend - Backend
FRONTEND
 HOME MENU: TREE OF MENU - MENU PARAMSERVICES MENU: TREE OF MENU - MENU PARAMBLOG MENU: TREE OF MENU - MENU PARAMPHOTO MENU: TREE OF MENU - MENU PARAM
4.4 Extension Configuration
4.4.1. Program - Custom HTML Module
- Module Position - Module Suffix
Position: postition-0
Suffix: blank block_program - Frontend - Backend

4.4.2. Flight Schedules - Custom HTML Module
- Module Position - Module Suffix
Position: position-1
Suffix: blank block_schedules - Frontend - Backend

4.4.3. Place of the Month - SJ K2 Extra Slider Module
- Module Position - Module Suffix
Position: position-2
Suffix: blank extra-theme2 - Frontend - Backend

4.4.4. Video- SJ Video Box Module
- Module Position - Module Suffix
Position: position-3
Suffix: blank sj-video-theme1 - Frontend - Backend

4.4.5. Decou Stories - SJ K2 Extra Slider Module
- Module Position - Module Suffix
Position: position-4
Suffix: @photo extra-theme1 - Frontend - Backend

4.4.6. Decou Blog - SJ K2 Extra Slider Module
- Module Position - Module Suffix
Position: position-4
Suffix: - Frontend - Backend

4.4.7. Search - SJ Smart Search Module
- Module Position - Module Suffix
Position: postition-8
Suffix: blank - Frontend - Backend

4.4.8. Contact us - Custom HTML Module
- Module Position - Module Suffix
Position: position-1
Suffix: contact-us blank - Frontend - Backend

4.4.9. Connect with us - Custom HTML Module
- Module Position - Module Suffix
Position: position-1
Suffix: connect-with-us blank - Frontend - Backend

4.4.10. About us - Custom HTML Module
- Module Position - Module Suffix
Position: position-1
Suffix: block-about blank - Frontend - Backend

4.4.11. Easy Access - Custom HTML Module
- Module Position - Module Suffix
Position: position-12
Suffix: easy-access blank - Frontend - Backend

4.4.12. Book Menu - Menu Module
There are several positions that use Menu module. There are: position-13, position-14, position-15, position-16, position-17, position-18 Here we will configure an example. Let take "Book" at position position-13, others will be the same.
- Module Position - Module Suffix
Position: position-13
Suffix: _menufooter blank - Frontend - Backend

4.4.13. Connect - Custom HTML Module
- Module Position - Module Suffix
Position: position-19
Suffix: connect blank - Frontend - Backend

That's homepage. For other advanced and customized configurations, please submit ticket OR purchase our installation services.
SJ Viste Template Userguide
This guide will help you install SJ Viste and extensions included in the template step by step. This provides for only membeships in SmartAddons Joomla Template Clubs.
Table of content as following:
1. REQUIREMENT - Back to top
At the basic level, this template will require the following conditions:
- Compatible with version Joomla: Joomla! 2.5.x
- Compatible with version Virtuemart: v2.0.22c
- Installation Packages include:
- Quickstart Package
- Template package only
- Extensions package from our store
- Extensions packge from 3rd Parties (if have)
2. HOW TO DOWNLOAD - Back to top
2.1 Download Packages from our store:
Step 1 Login your account
Step 2 Go to Joomla > Download > Joomla Templates Club
Step 3 Under Premium Joomla Templates --> click to download template as you want
Step 4 Under name of template --> Download packages as you want

2.2 Download packages from 3rd Parties:
This is the component from 3rd party which is used in this template:;
3. HOW TO INSTALLATION - Back to top
There are two ways to install a Joomla Template:
- Install quickstart: By using this package, you will set the template exactly as our Demo with sample data. This is applied when you need a fresh Joomla with our template. For understanding more information about Quickstart, you should read this article: Quickstart package for Joomla templates - what is this and how to install it?
- Install Template and Extensions: This is applied when you have already installed a Joomla instance on your server. You will need only be using the zipped files in "Extensions" and "Template" folders mentioned above.
3.1 Installation with Quickstart Package
Before installing the Quickstart package, we recommend you back up your site first. You click to learn how to back up a Joomla site. The following steps will guide to install a quickstart package of SmartAddons Joomla Template
Step 1 Upload folder quickstart:
If you are using SSH, simply upload your zip file (via FTP) and then 'unzip' the file. If you are using FTP, unzip the file on your computer and then upload those files as bellow. Though some webhosts have a different structure, in MOST cases, the folder that is used for uploading will be called "public_html." This will take a while to upload all those files and folders. Please keep your patience.
Step 2 Start installation procedure:
After uploading is completed, open the browser and type your URL in the address bar. The first screen will appear as follow
Sellect Language
Main Configuration:
Enter the required information of your site: sitename, email, admin username and password
Step 3 Configure Database:
Create Database: Following guide is used for creating database on the localhost. Go to your phpmyadmin (http://localhost/phpmyadmin/) then type of desired database name. You should refer document for creating database on Cpanel.
Database Installation: After the step 2, Click Next and go to this step. You will need to fillup database name, username and password in here.
Step 4: Install Sample Data
If you install sample data, you will have a site like our demo. If you select default sample data, you will get a fresh Joomla site.
Step 5: Remove or Rename the Installation folder:
The final step is removing or renaming the Installation folder
In the end of 3.1 Installation with Quickstart Package, you will be got a new website as our demo.
3.2 Installation without Quickstart Package
Log in your Administrator, go to Extensions > Extension Manager
Then install Template and Extensions as bellow.
3.2.1. Install Template:
Step 1: Click Choose File/Browse button, select our template file you have downloaded > Upload & Install. Do as this for getting Template package.
Step 2: Go to Extensions > Template Manager and set SJ Viste to become the default template as bellow

3.2.2. Install Extensions:
Here is list of extensions that are used in the template.

Step 1: Install Extensions that are developed by SmartAddons. Please Unzip First the Extension package for getting SmartAddons extensions then install each of them as install template above. Do as this for getting SmartAddons packages.
Step 2: Install Virtuemart Component as extensions above. Do as this for getting package of Virtuemart Component.
Step 3: Enable/Public plugins. Note: all plugins listed are imperative.
- Yt Framework Plugin supports to add extra parameters used with Mega Menu and to compress CSS/JS/HTML when optimizing code. Besides, configure Yt Framework to show SJ Help with Report Bugs, Template Tutorials and YT Framework Tutorials or include jQuery into template. You can go here for getting more information of this plugin.
- YT Shortcodes supports users to make content for web pages. In Joomla administrator, YT Shortcodes button will be appeared below the text-area, you can choose shortcodes for the text-area to make content. Click here for viewing the screenshot of backend
- SJ Content Related News is used for showing other related articles in the same category. For more info about this module, please go here. Click here for viewing the screenshot of backend.
You need to install and activate them when using this template. Let's start from 1 - 2 - 3 to active plugins as bellow:
After install template/extensions, please go to next step - Configuration of template as 4. Part bellow
4. HOW TO CONFIGURATION - Back to top
The following part we will guide how to configure the template becomes the same with our home page - Demo
4.1 Modules Positions

4.2 Template Configuration
Go to Extensions > Template Manager > SJ Viste. All of parameters of this template are divided into the following groups, in which they are explained themselves:

4.3 Extension Configuration
1. My Account - Custom HTML Module
- Module Position - Module Suffix
Position: topmenu
Suffix: Not Used - Frontend - Backend

2. Login Form - Login Module
- Module Position - Module Suffix
Position: topmenu
Suffix: Not Used - Frontend - Backend

3. Your Cart - SJ Minicart Pro Module
Note: Please activate Ajax Minicart Pro plugin before setting this module. You can go to Extensions > Plugin Manager > System type and find System - Ajax Minicart Pro plugin to enable
- Module Position - Module Suffix
Position: topmenu
Suffix: Not Used - Frontend - Backend

4. Search - VirtueMart Search Product Module
- Module Position - Module Suffix
Position: topmenu
Suffix: Not Used - Frontend - Backend

5. Mobile Menu - Menu Module for only mobile
Note: The module is only showed on small screens as tablet (768x1024) and mobiles.
- Module Position - Module Suffix
Position: topmenu
Suffix: Not Used - Frontend - Backend

6. Freeshipping - Custom HTML Module
- Module Position - Module Suffix
Position: maintop1
Suffix: nomarginbottom border-bottom clear - Frontend - Backend

7. SJ Matrix Slider for VirtueMart
Note: The module is only showed on small screens as tablet (768x1024) and mobiles.
- Module Position - Module Suffix
Position: maintop1
Suffix: clear nomarginbottom - Frontend - Backend

8. SJ Responsive Listing for Virtuemart
Note: Please activate SJ Vm Responsive Listing Ajax plugin before setting this module. You can go to Extensions > Plugin Manager > System type and find System - Sj Vm Responsive Listing Ajax to enable
- Module Position - Module Suffix
Position: maintop2
Suffix: Not Supported - Frontend - Backend

9. Bottom Menu - Menu Module
- Module Position - Module Suffix
Position: mainbottom1
Suffix: listline_solid - Frontend - Backend

10. Store Location - Custom HTML Module
- Module Position - Module Suffix
Position: bottom1
Suffix: clear - Frontend - Backend

11. Customer Services - Module Menu
- Module Position - Module Suffix
Position: bottom2
Suffix: clear - Frontend - Backend

12. Why Choose Us - Module Menu
- Module Position - Module Suffix
Position: bottom3
Suffix: clear - Frontend - Backend

13. Social Networking - Custom HTML Module
- Module Position - Module Suffix
Position: left
Suffix: clear - Frontend - Backend

14. Main Menu - SJ Flat Menu Module
- Module Position - Module Suffix
Position: left
Suffix: clear - Frontend - Backend

15. Call Us - Custom HTML Module
- Module Position - Module Suffix
Position: left
Suffix: box5 - Frontend - Backend

16. Newsletter - 'TinyLetter Subscribe' Module
- Module Position - Module Suffix
Position: left
Suffix: blank border-bottom - Frontend - Backend

17. Pay Mode - Custom HTML Module
- Module Position - Module Suffix
Position: left
Suffix: border-bottom - Frontend - Backend

That's homepage. For other advanced and customized configurations, please submit ticket OR purchase our installation services.