SJ Contact Ajax Responsive Userguide

This guide will help you install SJ Contact Ajax module step by step.

When you buy the module the first time, you will have the latest version. After the first release, we will update this module regularly, then please check newer versions when informed


1REQUIREMENT – Back to top

At the basic level, this module will require the following conditions:

  • Compatible with version Joomla: Joomla! 2.5, Joomla! 3.x

2INSTALLATION – Back to top

Prepare your module package

  • Firstly, you need to UNZIP file that you have downloaded. Please note that you should choose module package that are suitable with each Joomla version which you have just downloaded
  • Secondly, install main module (extracted mod_ file):
  • In your Administrator page, go to Extensions -> Extension Manager. In this page, click Browse, select module package.
  • Then click Upload & Install

  • Please wait for module being installed, usually within several seconds.
  • Now go to Extensions -> Module Manager, click Select Type box and choose the module you have installed
  • Prepare to perform Module Configuration

3MODULE CONFIGURATION – Back to top

3.1 Below is module layout

3.2 Module Configuration

Note:We used the images of module’s installation on Joomla 3.x to illustrate

After installing, go to Extensions -> Module Manager and find SJ Contact Ajax to configure

SJ Contact Ajax module is configured in 4 main groups of parameters as following:

  • Basic Options
  • Display Options
  • Map Options
  • Advanced Options

Let’s look at the parameters in detail:

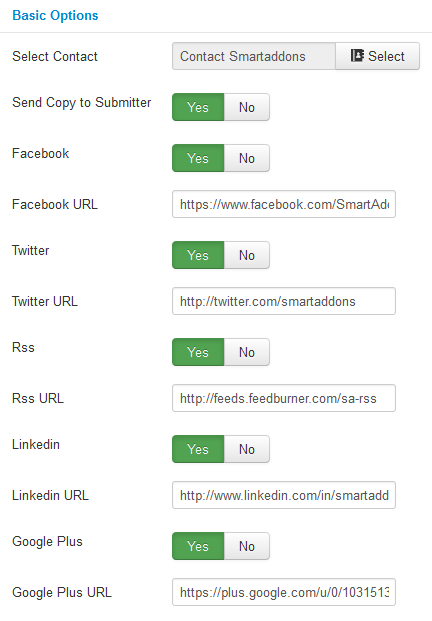
Basic Options

    • Select Contact – Allow to select contact to be assigned.
    • Send copy to Submmitter – Allow to send a copy of form content to sender OR not.
    • Facebook – Allow to show Facebook button OR not.
    • Facebook URL – Allow to input Facebook URL here if in use.
    • Twitter – Allow to show Twitter button OR not.
    • Twitter URL – Allow to input Twitter URL here if in use
    • RSS – Allow to show RSS button OR not.
    • RSS URL – Allow to input RSS URL here if in use.
    • LinkedIn – Allow to show LinkedIn button OR not.
    • LinkedIn URL – Allow to input LinkedIn URL here if in use.
    • Google Plus – Allow to show Google Plus button OR not.
    • Google Plus URL – Allow to input Google Plus URL here if in use.

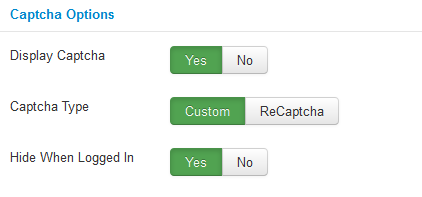
Captcha Options

  • Display Captcha – Allow to show captcha to protect from spam OR not.
  • Captcha Type – Allow to set Custom catcha or ReCaptcha to be used.
  • Hide when Logged in – Allow to hide catcha for logged in user.

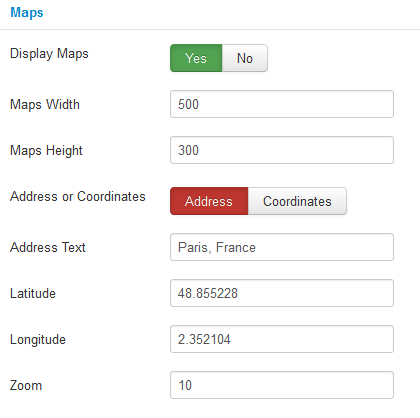
Maps Options

    • Display Maps – Allow to show map OR not.
    • Maps Width – Allow you to set the width of map area.
    • Maps Height – Allow you to set the height of map area.
    • Address or coordinates – Allow to use address by text or coordinates by number.
    • Address Text – Allow to set address text here.
    • Latitude – Allow to set latitude by number.
    • Longitude – Allow to set longitude by number.
    • Zoom – Allow to input zoom ratio for map.

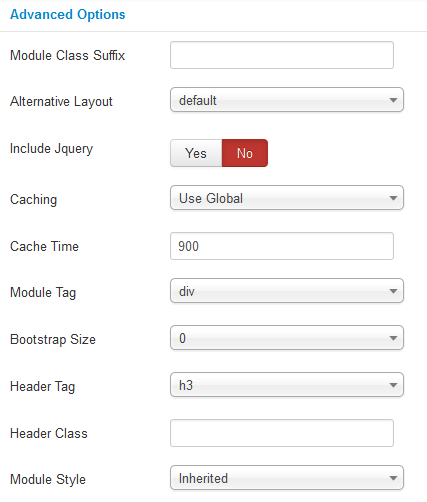
Advanced Options

  • Module Class Suffix – Allow you to style module with specific CSS suffix.
  • Alternative Layout – Allow to choose one custom layout for module.
  • Include jQuery – Use jQuery from this module OR not.
  • Caching
    • Use Global: Turn on caching
    • No Caching: Turn off caching
  • Cache Times – The time to cache.
  • Module Tag – Set wrapper tag for module.
  • Bootstrap Size – Set width based on bootstrap for wrapper of module.
  • Header Tag – Set tag for module title.
  • Header Class – Set class for module title.
  • Module Style – Override module style.

4SUPPORT – Back to top

Thank you so much for purchasing this plugin. If you have any questions that are beyond the scope of this help file, please send us via: Submit a Ticket

Thanks so much!