1SYSTEM REQUIREMENTS – Back to top
SO Furnicom is compatible with Opencart 2.3.x. Please make sure your system meets the following requirements:
1.1 System Requirements
Software
- Software: PHP 5.2.4+ (5.4+ recommended)
- MySQL: 5.0.4+
Web Sever
- Apache: 2.x+
- Microsoft: IIS 7
- Nginx: 1.0 (1.1 recommended)
1.3 Browser Requirements
The requirements are the same with Opencart 2.3.x
- Firefox 4+
- IE (Internet Explorer) 9+
- Google Chrome 10+
- Opera 10+
- Safari 5+
1.4 Development Environment
The requirements are the same with Opencart 2.3.x
During the development process, Localhost is preferred. You can use the following servers on your PC to develop your site.
Windows
- WAMPSEVER
- XAMPP for Windows
Linux
- LAMP Bubdle
- XAMPP for Linux
Mac OS
- MAMP & MAMP Pro
- XAMPP for Mac OS
1.5 Note: You can read more document below
- Opencart Installation:
- OPencart Help
2INSTALLATION – Back to top
There are two ways to install a SO Theme:
- Install Quickstart: By using this package, you will set the template exactly as our Demo with sample data.
- Install Template : If you exist a opencart website you can install only template.
2.1 Install with Quickstart Package:
Step 1: Open your Browser and type : localhost/phpmyadmin or yourdomain/phpmyadmin
Step 2: Then create database
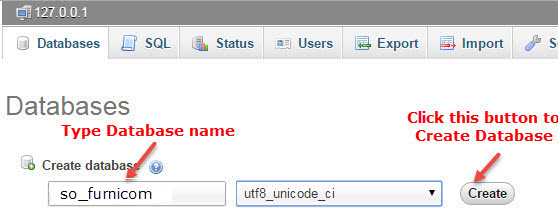
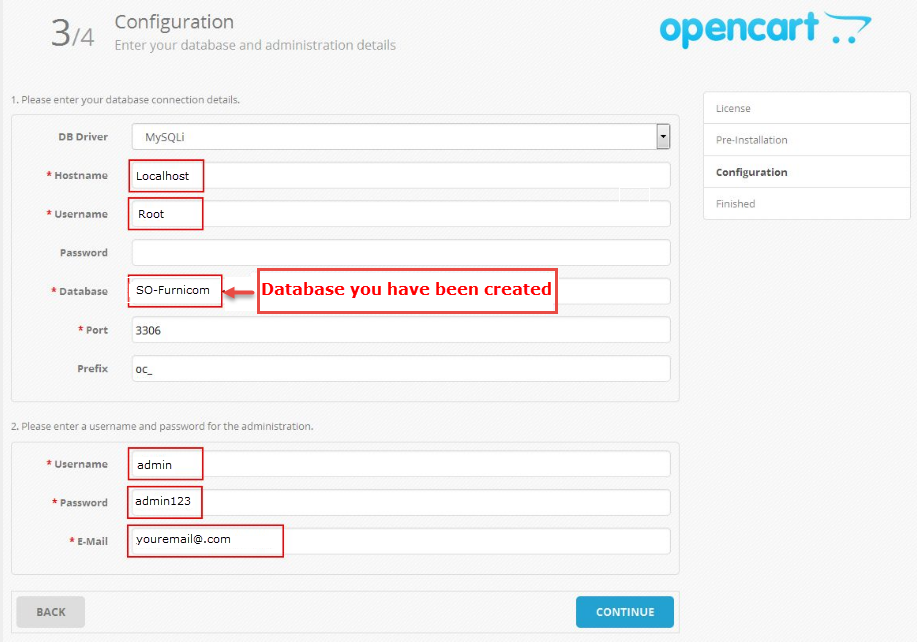
As an example, name of opencart is SO-Furnicom: Https://Opencart/SO-Furnicom/upload/install/index.php then click “install” button
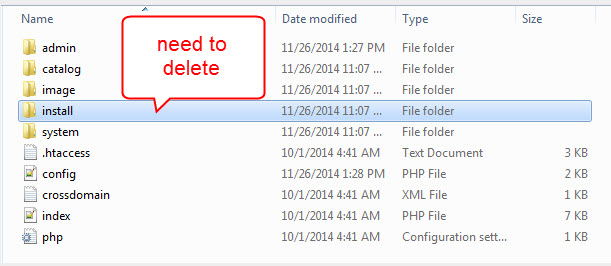
You need to delete install folder
Note:
After installing quickstart package and choosing Layout you want. To retrieve sample data for theme default, please go to Theme Control Panel >> Choose Sample Data >> Click “Install data” button

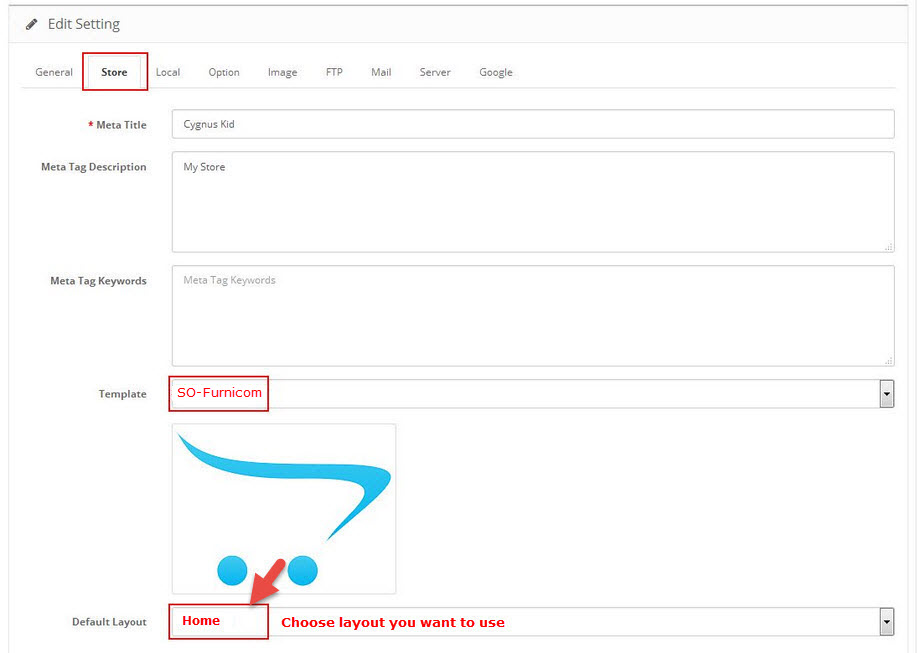
- Go to System -> Settings
- At tab Store Name , choose your default store, click Edit button
- Choose tab Store
2.2 Install Theme
You can download Opencart here.
You can install default Opencart the same as part 2.1 Install with Quickstart Package
Feel free to check the detailed VIDEO TUTORIAL
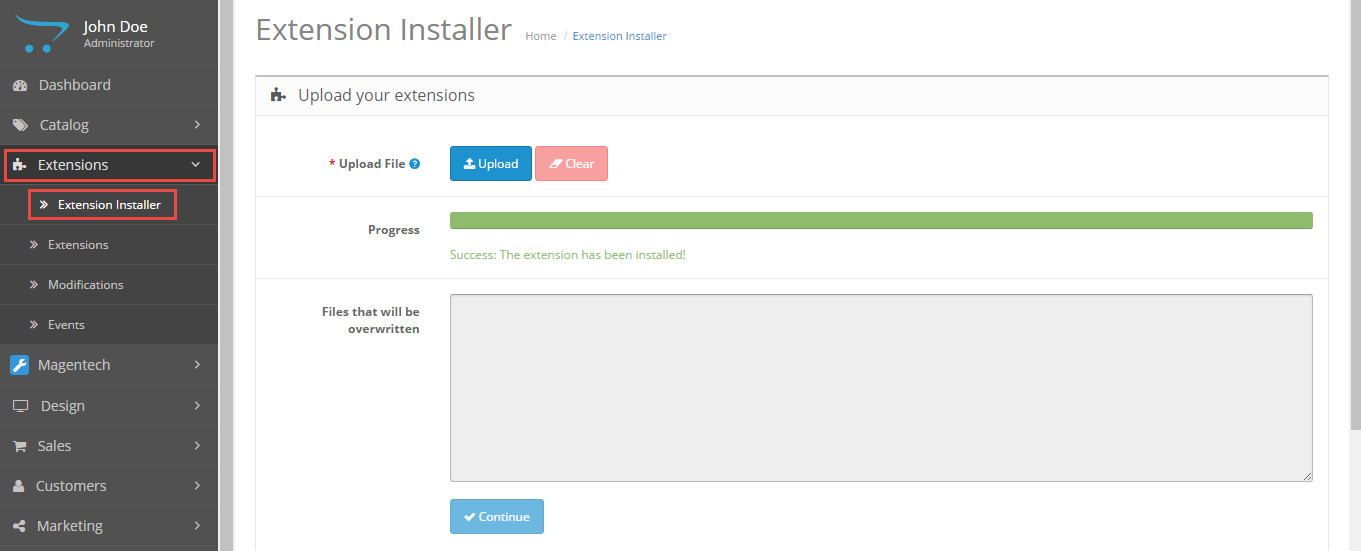
Option1: you to use the new Extension Installer featured in OpenCart 2.0
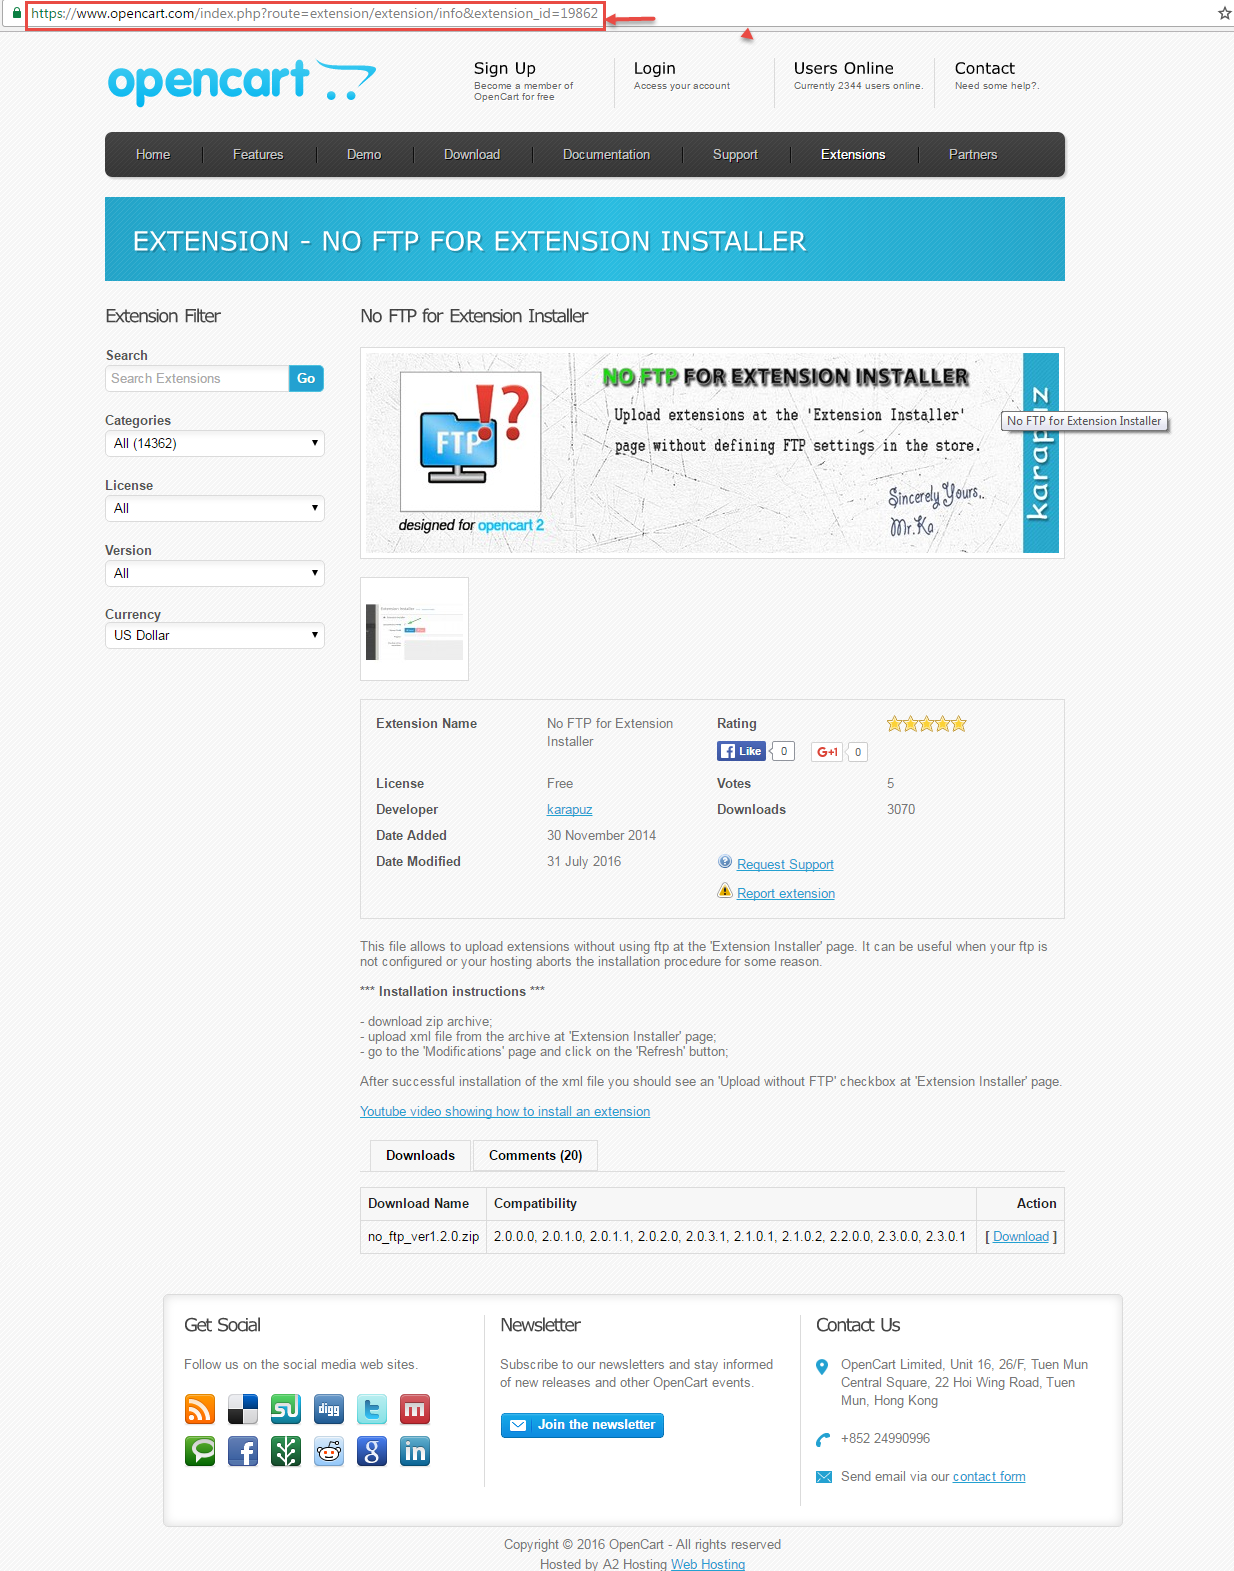
- Step 1 : Please type the following link: https://www.opencart.com/index.php?route=extension/extension/info&extension_id=19862. Extension allows to upload extensions without using FTP
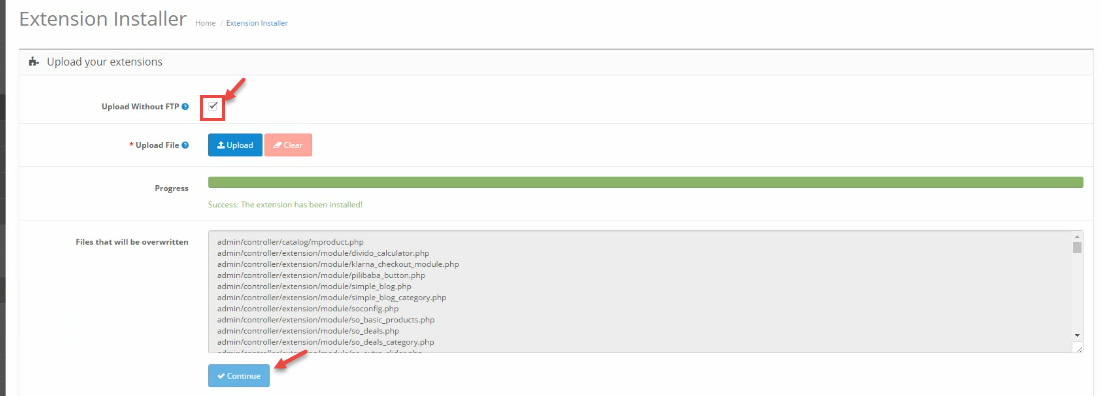
- Step 2: Go to Extensions > Extension Installer > Click Upload and select the “no_ftp.ocmod.XML” file to upload. Then You should see the message Success: You have installed your extension!
- Step 3: Go to Extensions > Extension Installer > Click Upload and select the “so23_furnicom_template_oc2.3.0_v1.2.0.zip” file to upload. Then You should see the message Success: You have installed your extension!
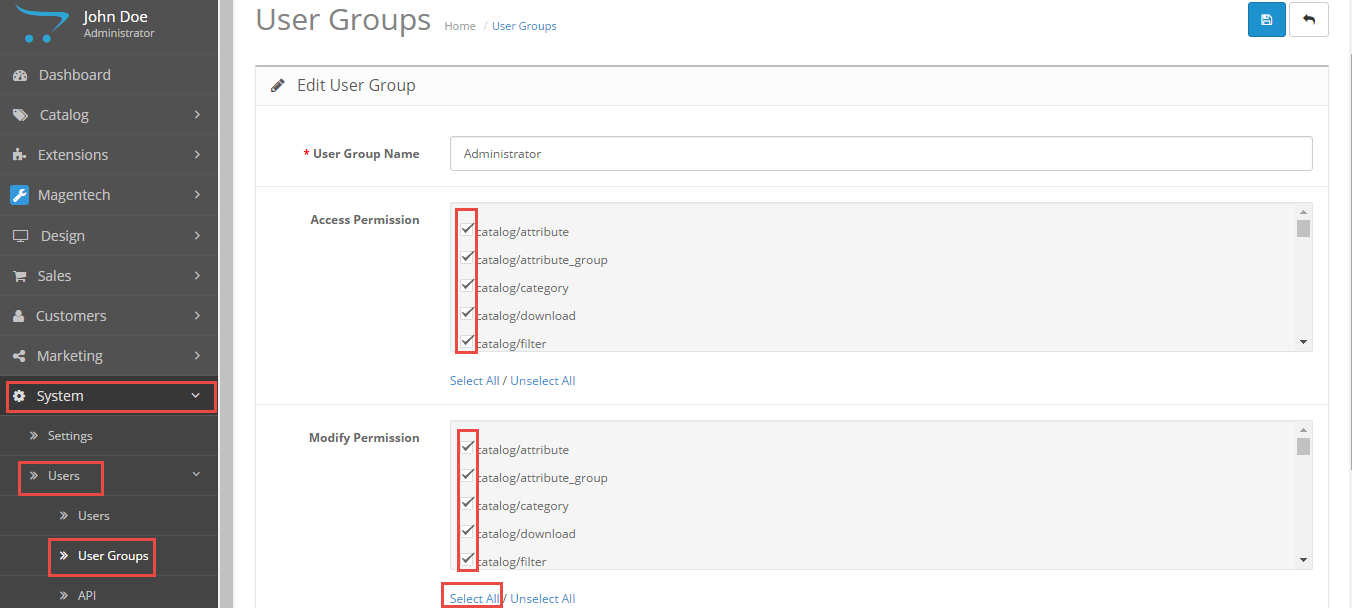
- Step 4: Go to System > User > User-Group > Click “Edit” button > Then you click “Select All” button
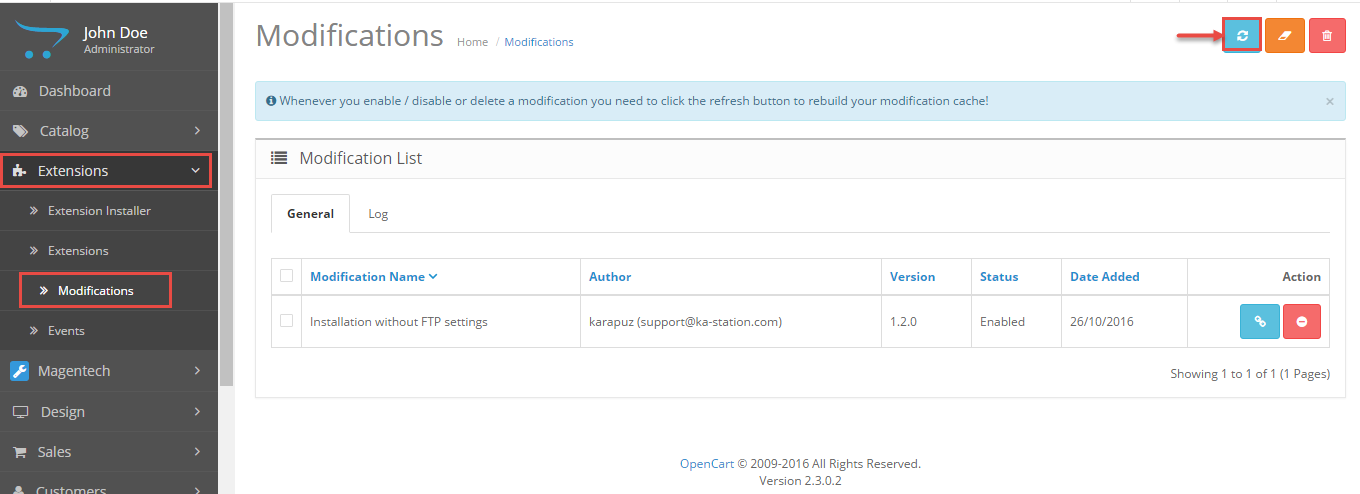
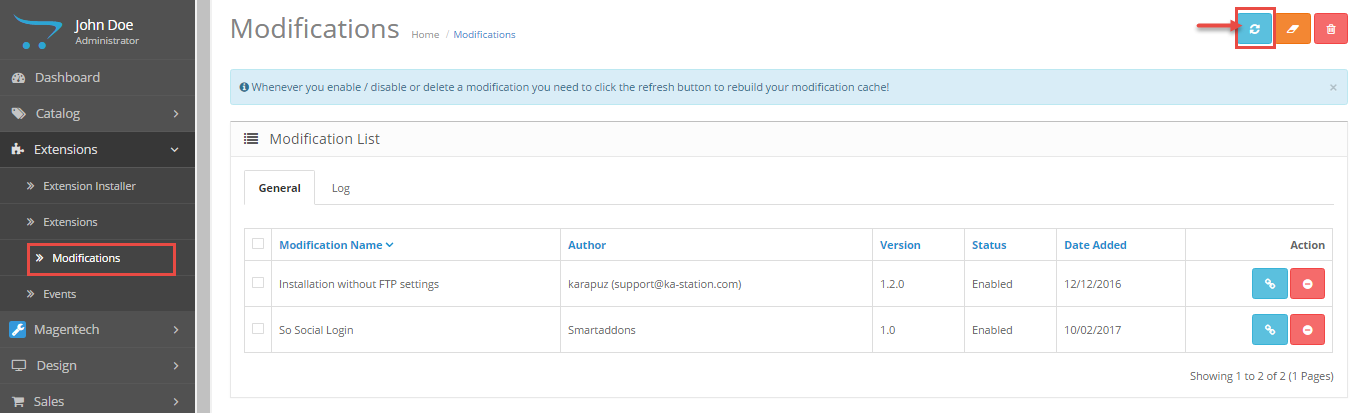
- Step 6: Go to Extensions > Modifications > Click “Refresh” button to run “ocmod.xml” file
- Step 7: Go to Extensions > Theme Control Panel and edit your store: General Tab, Layout Tab, Page Tab…
- Step 8: Go to Extensions >> Modifications >> Click “Refresh” button
- Step 9: Refresh your site and you got it
2.3 Select Layout
Feel free to check the detailed VIDEO TUTORIAL
2.4 CreateColor Theme Control
Feel free to check the detailed VIDEO TUTORIAL
2.5 Install Language and Override Language
You can read more information: Here
Step1: Extracting
Extract the archive file of the language pack you have downloaded into your PC: “patch_language_v2.3.x”
Step 2: Renaming
The folders are need to be changed:
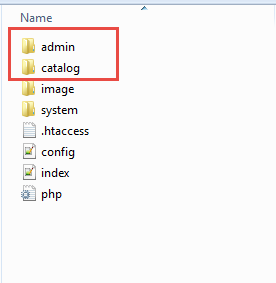
patch_language_v.2.3.x\admin\language\%locale%
patch_language_v.2.3.x\catalog\language\%locale%
patch_language_v.2.3.x\admin\language\%locale%\%locale%.php
patch_language_v.2.3.x\catalog\language\%locale%\%locale%.php
Rename both of these folders to the language of your choice: replace “%locale%” with the name of the language (English, German…).
Step3:Uploading
Upload the admin and catalog folders you have replaced into your folder upload theme
Step4: Translating
Then please go to Catalog > language > extension > choose 1 of 5 files PHP >> translate the text to your preference
3CONFIGURATION – Back to top
3.1 Layout Position
3.1.1 Layout1
3.1.2 Layout2
3.2 Template Configuration
3.2.1. Template Configuration
Go to Extensions > Modules > Theme Control Panel >> Click “Edit” Button. All of parameters of this theme are divided into the following groups, in which they are explained themselves:
General
Layout
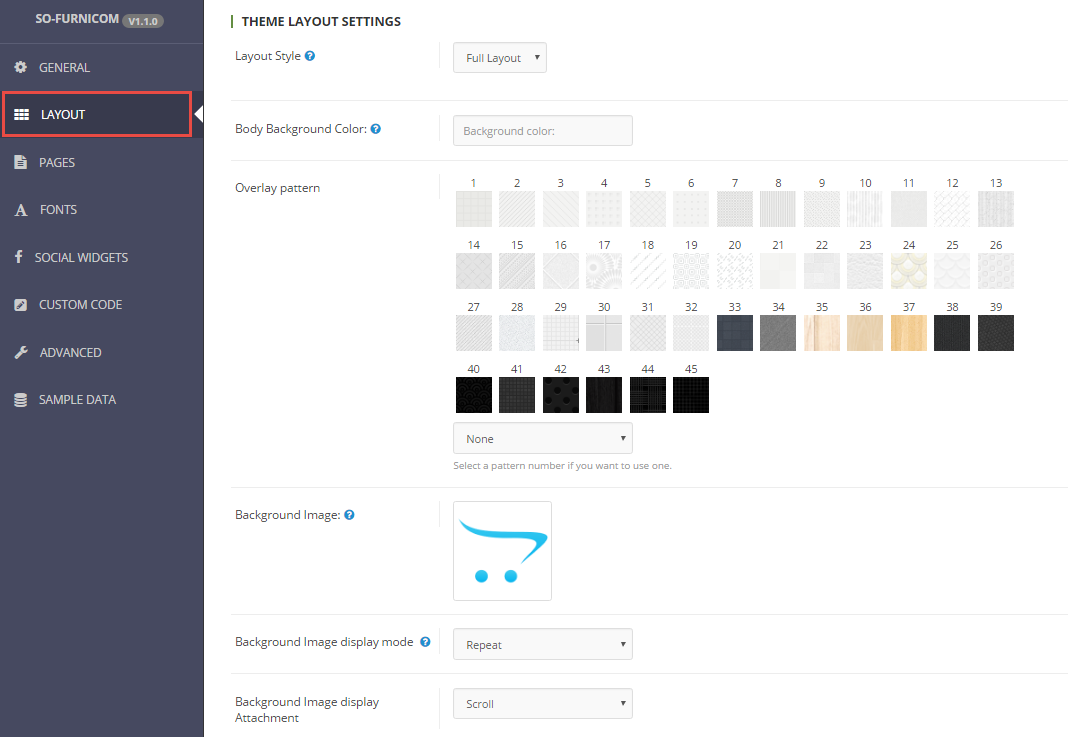
Pages
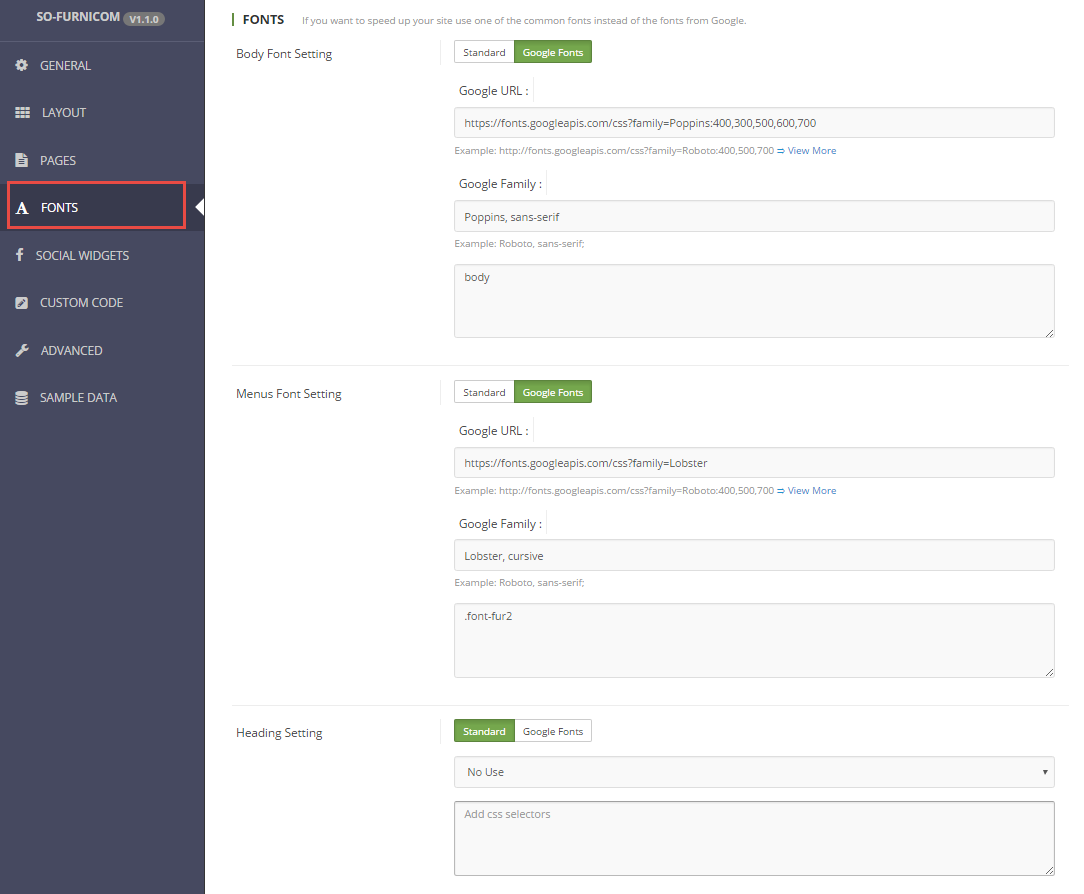
Fonts
Social Widgets Accounts

Custom Code
3.3 Menu Configuration
Frontend Appearance

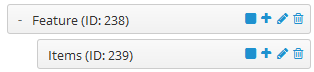
3.3.1.1 Create New Megamenu
Go to Extensions >> Modules >> Find module “SO Mega Menu” >> Click “Edit” button >> Enter a menu’s name: “SO Mega Menu” >> Then Click “Save” button >> Create New Megamenu Here
3.3.1.2 Features Menu Configuration
Frontend Appearance
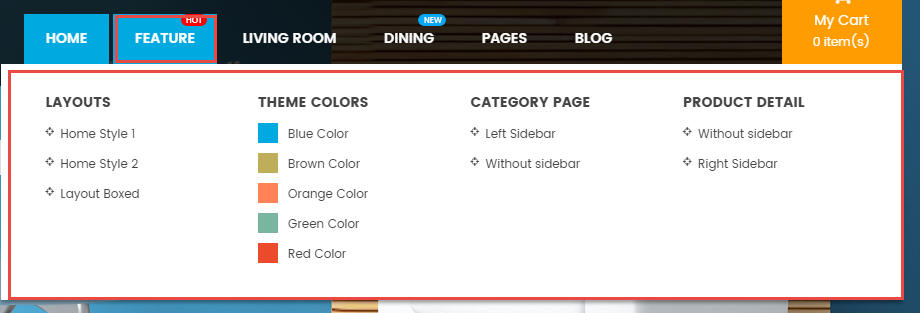
To create this menu, please go to Extensions >> Modules >> ” SO Megamenu > SO Megamenu” >> Click “Edit” button >> Click “Creat new Item” >> Creat new item Here
Check the menu item in the boxes in the left column, click “Creat new Item” to add Submenus to the menu and drag/drop to arrange them.
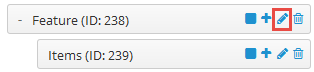
To configure Features Menu, click on “pencil” symbol to configure its backend settings
Copy and paste the Code into editor:
|
1 2 3 4 5 6 7 8 9 10 11 12 13 14 15 16 17 18 19 20 21 22 23 24 25 26 27 28 29 30 31 32 33 34 35 36 37 38 39 40 41 42 43 44 45 46 47 48 49 50 51 52 53 54 55 56 57 58 59 60 61 62 63 64 |
<div class="featured" style="width: 850px;"> <div class="column col-lg-3 col-md-3 col-sm-6"> <h2>Layouts</h2> <div> <ul class="row-list"> <li><a href="http://dev.ytcvn.com/ytc_templates/opencart/so_furnicom/index.php?layoutbox=full">Home Style 1</a></li> <li><a href="http://dev.ytcvn.com/ytc_templates/opencart/so_furnicom/layout2/index.php?layoutbox=full">Home Style 2</a></li> <li><a href="http://dev.ytcvn.com/ytc_templates/opencart/so_furnicom/index.php?layoutbox=boxed&pattern=12">Layout Boxed</a></li> </ul> </div> </div> <div class="column col-lg-3 col-md-3 col-sm-6 layout-color"> <h2>Theme Colors</h2> <div> <ul class="row-list"> <li class="color blue"><a href="index.php?scheme=blue">Blue Color</a></li> <li class="color brown"><a href="index.php?scheme=brown">Brown Color</a></li> <li class="color orange"><a href="index.php?scheme=orange">Orange Color</a></li> <li class="color green"><a href="index.php?scheme=green">Green Color</a></li> <li class="color red"><a href="index.php?scheme=red">Red Color</a></li> </ul> </div> </div> <div class="column col-lg-3 col-md-4 col-sm-6"> <h2>Category Page</h2> <div> <ul class="row-list"> <li><a href="index.php?route=product/category&path=34" target="_blank">Left Sidebar</a></li> <li><a href="layout2/index.php?route=product/category&path=34" target="_blank">Without sidebar</a></li> </ul> </div> </div> <div class="column col-lg-3 col-md-2 col-sm-6"> <h2>Product Detail</h2> <div> <ul class="row-list"> <li><a href="index.php?route=product/product&product_id=47" target="_blank">Without sidebar</a></li> <li><a href="layout2/index.php?route=product/product&product_id=47" target="_blank">Right Sidebar</a></li> </ul> </div> </div> </div> |
To configure Feature – Submenu, click on “pencil” symbol to configure its backend settings
Copy and paste the Code into editor:
|
1 2 3 4 5 6 7 8 9 10 11 12 13 14 15 16 17 18 19 20 21 22 23 24 25 26 27 28 29 30 31 32 33 34 35 36 37 38 39 40 41 42 43 44 45 46 47 48 49 50 51 52 53 54 55 56 57 58 59 60 61 62 63 64 |
<div class="featured" style="width: 850px;"> <div class="column col-lg-3 col-md-3 col-sm-6"> <h2>Layouts</h2> <div> <ul class="row-list"> <li><a href="http://dev.ytcvn.com/ytc_templates/opencart/so_furnicom/index.php?layoutbox=full">Home Style 1</a></li> <li><a href="http://dev.ytcvn.com/ytc_templates/opencart/so_furnicom/layout2/index.php?layoutbox=full">Home Style 2</a></li> <li><a href="http://dev.ytcvn.com/ytc_templates/opencart/so_furnicom/index.php?layoutbox=boxed&pattern=12">Layout Boxed</a></li> </ul> </div> </div> <div class="column col-lg-3 col-md-3 col-sm-6 layout-color"> <h2>Theme Colors</h2> <div> <ul class="row-list"> <li class="color blue"><a href="index.php?scheme=blue">Blue Color</a></li> <li class="color brown"><a href="index.php?scheme=brown">Brown Color</a></li> <li class="color orange"><a href="index.php?scheme=orange">Orange Color</a></li> <li class="color green"><a href="index.php?scheme=green">Green Color</a></li> <li class="color red"><a href="index.php?scheme=red">Red Color</a></li> </ul> </div> </div> <div class="column col-lg-3 col-md-4 col-sm-6"> <h2>Category Page</h2> <div> <ul class="row-list"> <li><a href="index.php?route=product/category&path=34" target="_blank">Left Sidebar</a></li> <li><a href="layout2/index.php?route=product/category&path=34" target="_blank">Without sidebar</a></li> </ul> </div> </div> <div class="column col-lg-3 col-md-2 col-sm-6"> <h2>Product Detail</h2> <div> <ul class="row-list"> <li><a href="index.php?route=product/product&product_id=47" target="_blank">Without sidebar</a></li> <li><a href="layout2/index.php?route=product/product&product_id=47" target="_blank">Right Sidebar</a></li> </ul> </div> </div> </div> |
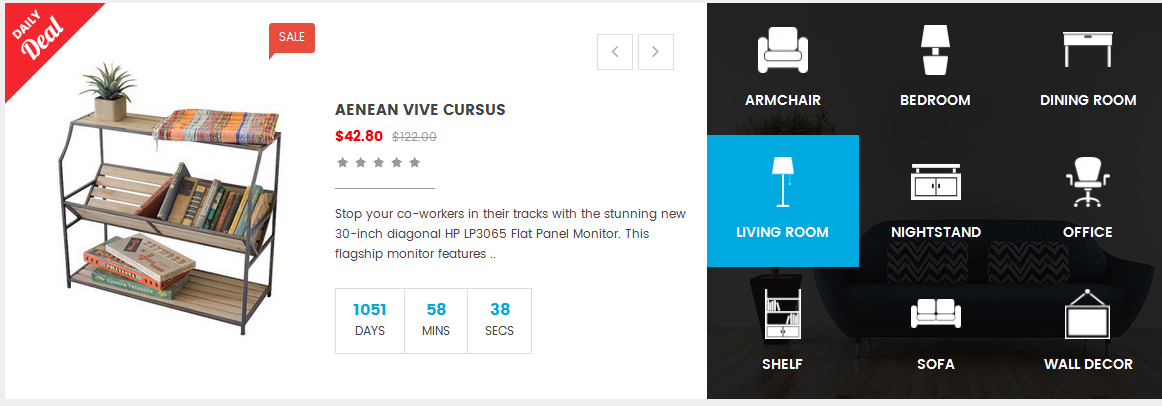
3.3.1.3 Living Room Menu Configuration
Frontend Appearance
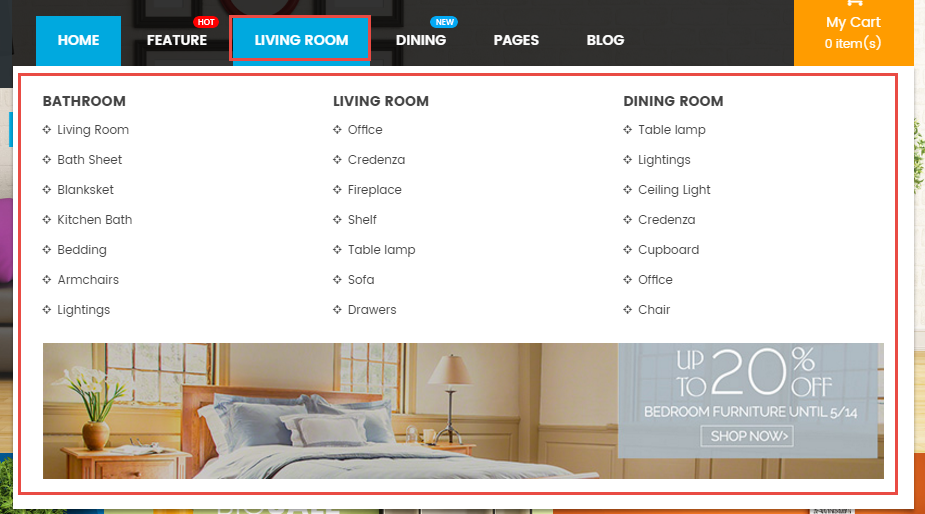
To create this menu, please go to Extensions >> Modules >> ” SO Megamenu > SO Megamenu” >> Click “Edit” button >> Click “Creat new Item” >> Creat new item Here
Check the menu item in the boxes in the left column, click “Creat new Item” to add Submenus to the menu and drag/drop to arrange them.
Copy and paste the Code into editor:
|
1 |
<h3 style="margin: 10px 0px; font-family: 'Open Sans'; font-weight: 600; line-height: 24px; color: rgb(78, 205, 196); text-rendering: optimizelegibility; font-size: 24px;">Responsive Theme for you!</h3><p style="margin: 0px 0px 10px; color: rgb(102, 114, 128); font-family: 'Open Sans'; font-size: 13px; line-height: 20px; padding: 15px 0px 0px 0px;">Lorem Ipsum is simply dummy text of the printing and typesetting industry. Lorem Ipsum has been the industry's standard dummy text ever since the 1500s, when an unknown printer took a galley of type and scrambled it to make a type specimen book. It has survived not only five centuries</p> |
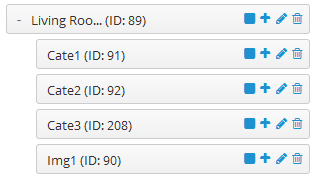
To configure Cate1 – Submenu, click on “pencil” symbol to configure its backend settings
To configure Img1 – Submenu, click on “pencil” symbol to configure its backend settings
3.3.1.4 Pages Menu Configuration
Frontend Appearance
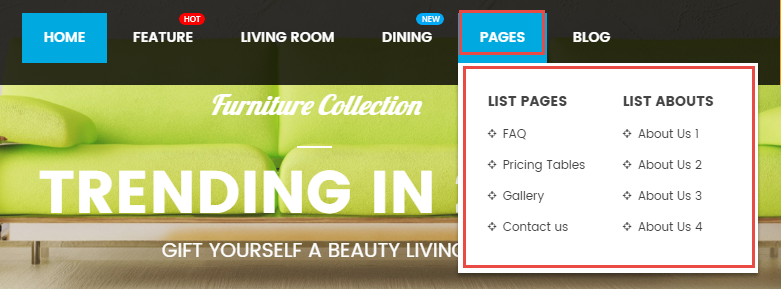
To create this menu, please go to Extensions >> Modules >> ” SO Megamenu > SO Megamenu” >> Click “Edit” button >> Click “Creat new Item” >> Creat new item Here
Check the menu item in the boxes in the left column, click “Creat new Item” to add Submenus to the menu and drag/drop to arrange them.
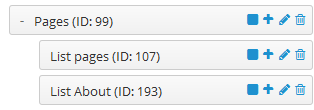
To configure Pages Menu, click on “pencil” symbol to configure its backend settings
To configure List pages – Submenu, click on “pencil” symbol to configure its backend settings
Copy and paste the Code into editor:
|
1 2 3 4 5 6 7 8 9 10 11 12 |
<h2>List Pages</h2> <ul class="row-list"> <li><a class="subcategory_item" href="index.php?route=information/information&information_id=6">FAQ</a></li> <li><a class="subcategory_item" href="index.php?route=information/information&information_id=3">Pricing Tables</a></li> <li><a class="subcategory_item" href="index.php?route=information/information&information_id=11">Gallery</a></li> <li><a class="subcategory_item" href="index.php?route=information/contact">Contact us</a></li> </ul> |
3.4 Extension Configuration – Layout1
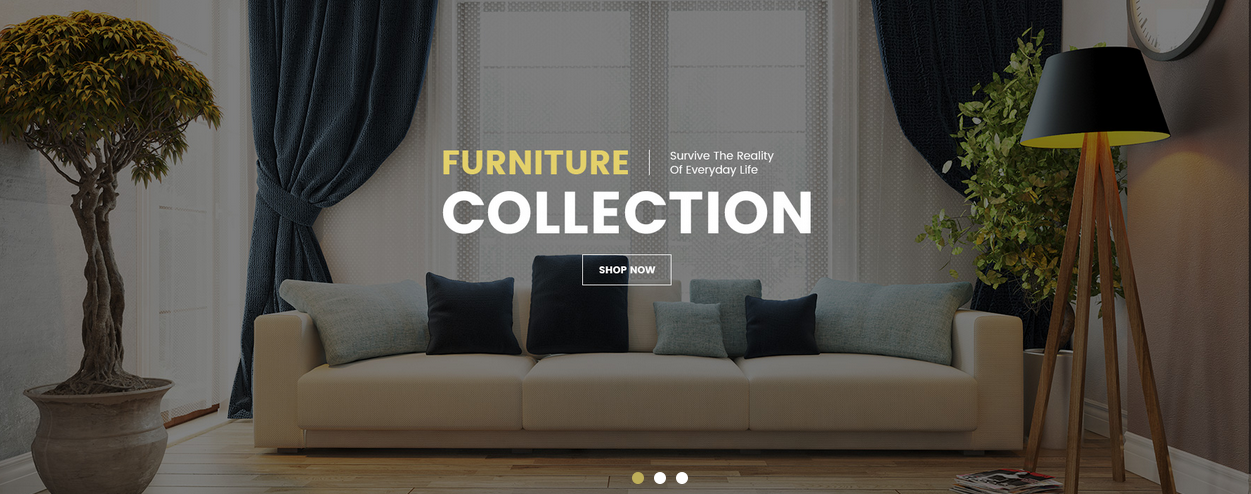
The SO Furnicom front-page has been integrated with extensions in the Theme as following list:
- SO-SearchPro
- SO-mega-menu
- SO-Home-Slider
- SO-HTML-Content – Content-top
- SO-Extra-Slider – Content-block1
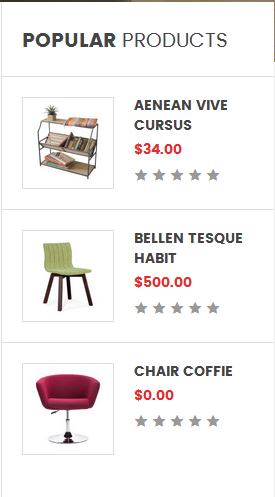
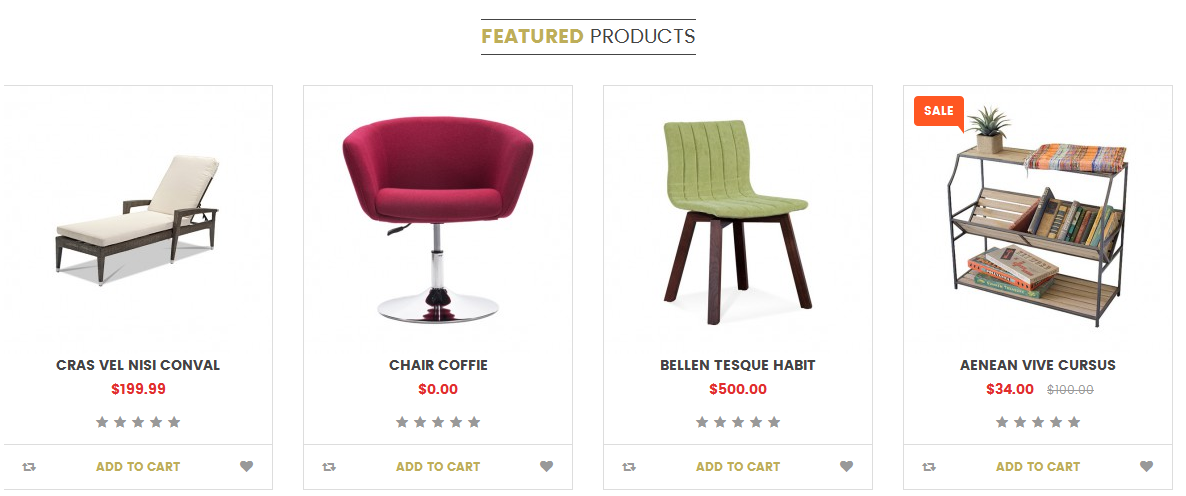
- SO-Basic-Product – Content-block2
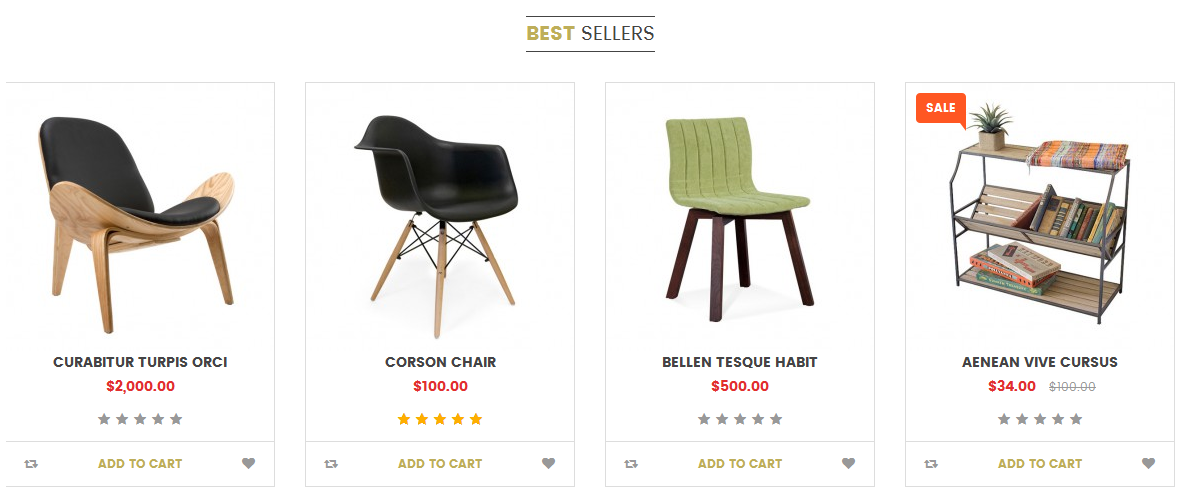
- SO-Listing-Tabs – Content-block
- SO-HTML-Content – Content-block3
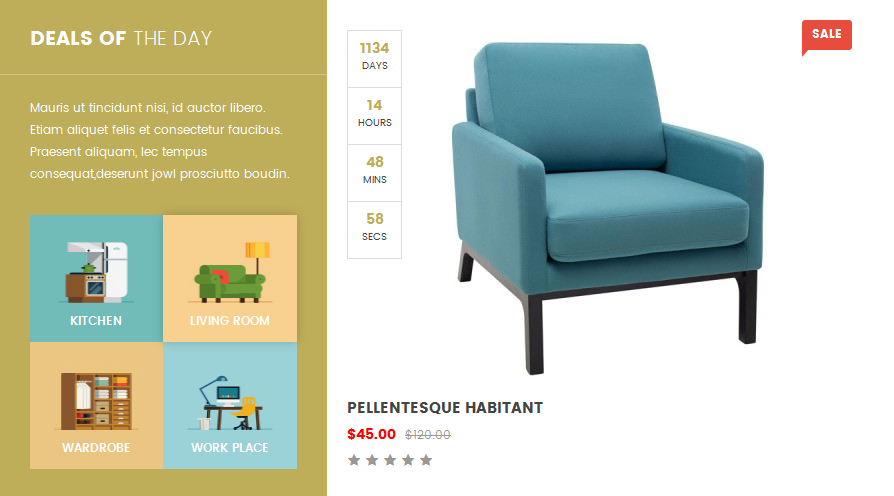
- SO-Deals-Category – Content-block3
- SO-Latest-Blog – Content-block3
- SO-Newsletter – Footer-top1
- SO-Theme-Confic
- Position: Header-top1
- Frontend Appearance

- Backend of SO-SearchPro: Click Here
- Position: Header-top3
- Frontend Appearance
- Backend of SO-mega-menu: Click Here
- Position: Contentop
- Frontend Appearance
Backend of SO-Home-Slider:
- Position: Content-top
- Frontend Appearance

- Backend of SO-HTML-Content – Content-top: Click Here
- Position: Content-block1
- Frontend Appearance
- Backend of General Options: Click Here
- Backend of Source Options: Click Here
- Backend of Products Options: Click Here
- Backend of Image Options: Click Here
- Backend of Effect Options: Click Here
- Backend of Advanced Options: Click Here
Backend of SO-Extra-Slider – Content-block1: Click Here
- Position: Content-block2
- Frontend Appearance
- Backend of General Options: Click Here
- Backend of Source Options: Click Here
- Backend of Products Options: Click Here
- Backend of Image Options: Click Here
- Backend of Advanced Options: Click Here
Backend of SO-Extra-Slider – Content-block2: Click Here
- Position: Content-block
- Frontend Appearance
- Backend of General Options: Click Here
- Backend of Source Options: Click Here
- Backend of Items Options: Click Here
- Backend of Tabs Options: Click Here
- Backend of Image Options: Click Here
- Backend of Effect Options: Click Here
- Backend of Advanced Options: Click Here
Backend of SO-Listing-Tabs – Content-block: Click Here
- Position: Content-block3
- Frontend Appearance

- SO-HTML-Content – Content-block3: Click Here
Copy and paste the Code into editor:
|
1 2 3 4 5 |
<div class="block-img-bottom"> <div class="img-1"> <a class="img-ef2" href="#" title="img"><img src="image/catalog/cms/home1/bottom-1.jpg" alt="Image Client"></a> </div> </div> |
- Position: Content-block3
- Frontend Appearance
- Backend of General Options: Click Here
- Backend of Source Options: Click Here
- Backend of Products Options: Click Here
- Backend of Category Options: Click Here
- Backend of Image Options: Click Here
- Backend of Effect Options: Click Here
- Backend of Advanced Options: Click Here
Backend of SO-Deals-Category – Content-block3 : Click Here
- Position: Content-block3
- Frontend Appearance
- Position: Footer-top1
- Frontend Appearance

- Backend of General Options: Click Here
- Backend of Content Options: Click Here
- Backend of HTML Email Template: Click Here
- Backend of Newletter Subscribers : Click Here
- Backend of Advanced Options: Click Here
Backend of SO-Newsletter – Footer-top1: Click Here
- Frontend Appearance

- Backend of SO-Theme-Confic: Click Here
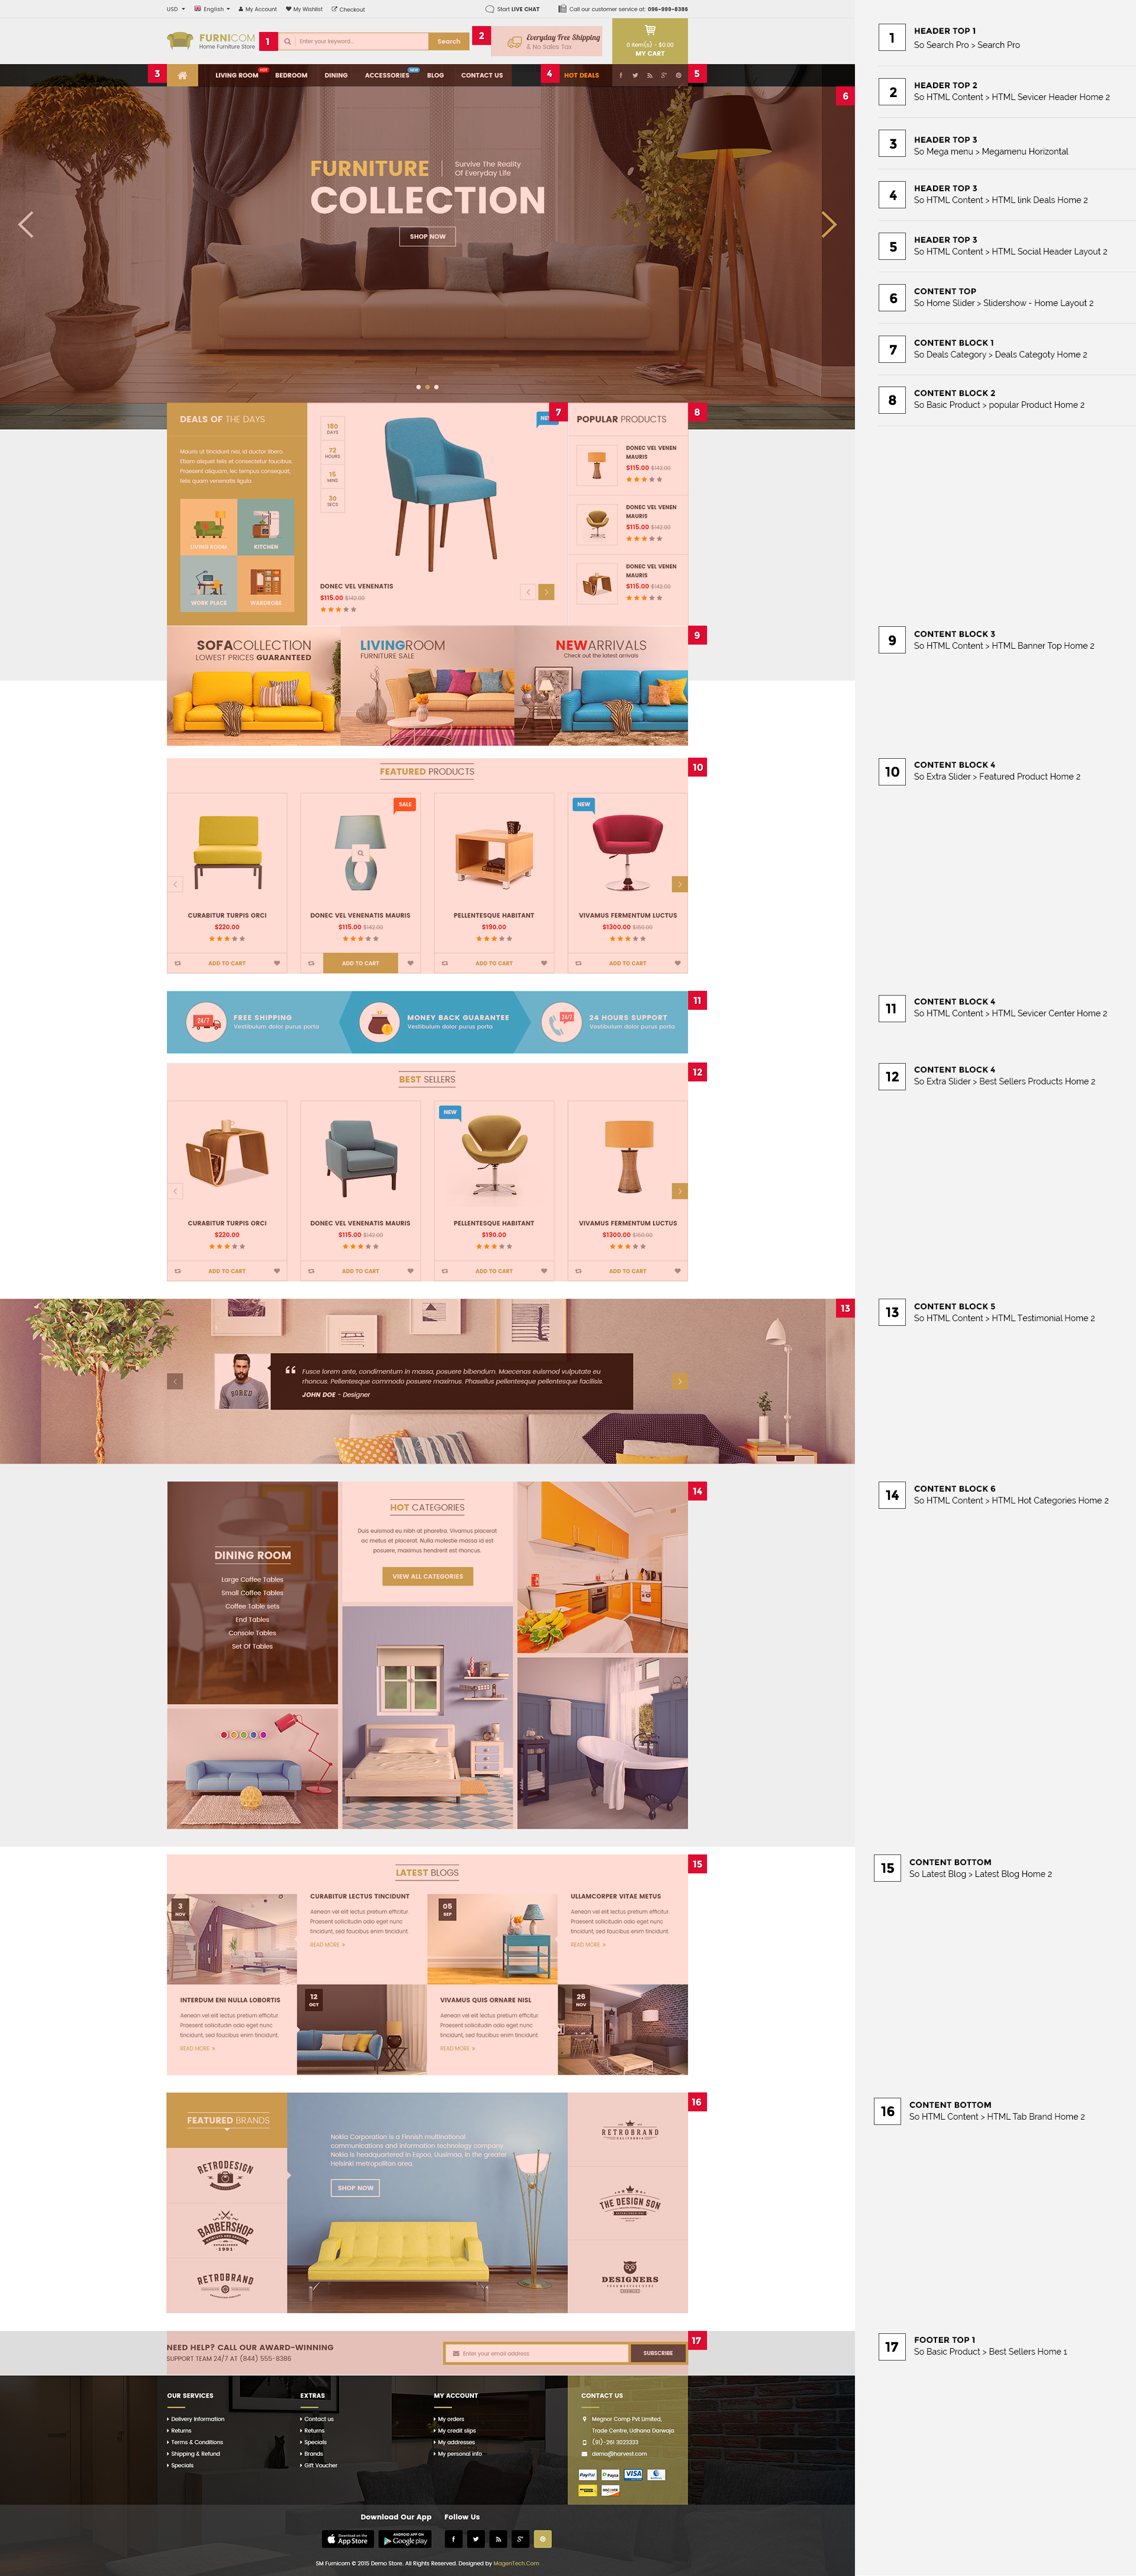
3.5 Extension Configuration – Layout2
The SO Furnicom front-page has been integrated with extensions in the Theme as following list:
- SO-SearchPro
- SO-HTML-Content – Header-top2
- SO-mega-menu
- SO-HTML-Content(HTML-Link-Deals-Home2) – Header-top3
- SO-HTML-Content(HTML-Social-header-layout2) – Header-top3
- SO-Home-Slider – Content-top
- SO-Deals-Category – Content-block1
- SO-Basic-Product – Content-block2
- HTML-Content – Content-Block3
- SO-Extraslider-Featured-Product-Home2 – Content-Block4
- HTML-Content – Content-Block4
- SO-Extraslider-Bellers-Product-Home2 – Content-Block4
- HTML-Content – Content-Block5
- HTML-Content – Content-Block6
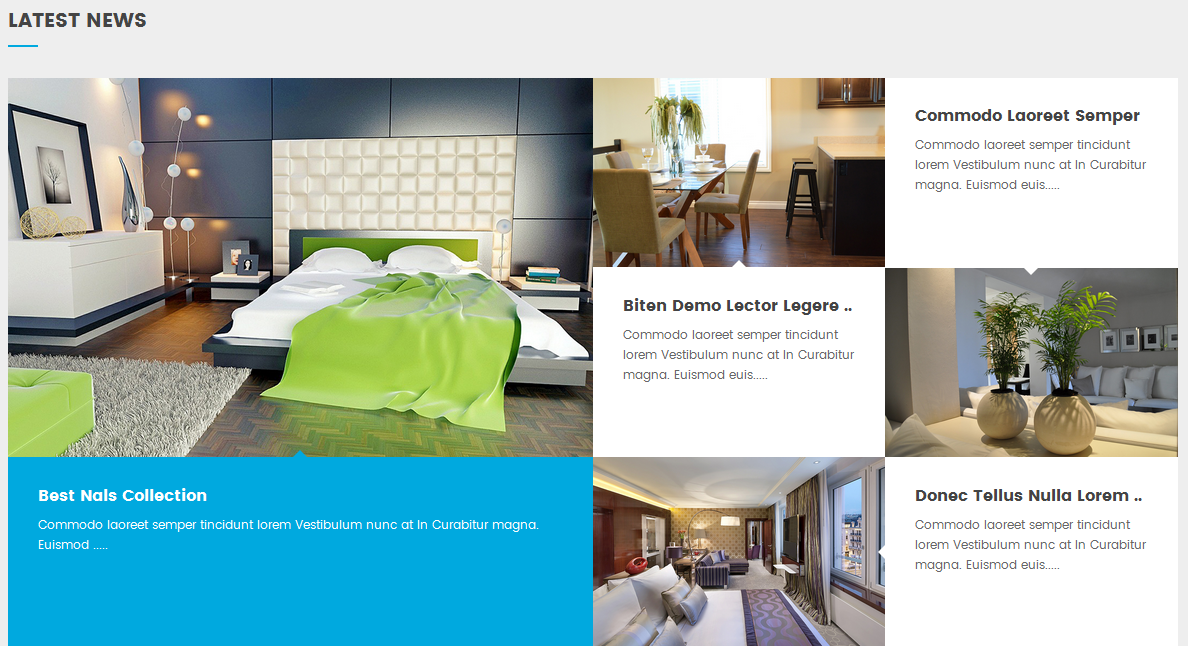
- SO-Latest-Blog – Content-Bottom
- HTML-Content – Content-Bottom
- SO-Basic-Product – Footer-top1
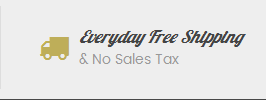
- Position: Headertop2
- Frontend Appearance
-
Backend of SO-HTML-Content – Header-top2: Click Here
Copy and paste the Code into editor:
|
1 2 3 4 5 6 7 |
<div class="shipping"> <i class="fa fa-truck"></i> <div class="inner"> <p class="font-fu">Everyday Free Shipping</p> & No Sales Tax </div> </div> |
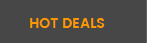
- Position: Header-top3
- Frontend Appearance
-
Backend of SO-HTML-Content(HTML-Link-Deals-Home2) – Header-top3: Click Here
Copy and paste the Code into editor:
|
1 |
<a href="index.php?route=product/special" target="_blank">HOT DEALS</a> |
- Position: Header-top3
- Frontend Appearance
-
Backend of SO-HTML-Content(HTML-Social-header-layout2) – Header-top3: Click Here
Copy and paste the Code into editor:
|
1 2 3 4 5 6 7 8 9 10 11 12 13 14 15 16 17 18 19 20 21 22 23 24 25 26 27 28 29 30 |
<div class="socials-header"> <div class="socials-wrap"> <ul> <li class="li-social facebook-social"> <a title="Facebook" href="https://www.facebook.com/MagenTech" target="_blank"> <span class="fa fa-facebook icon-social"></span> </a> </li> <li class="li-social twitter-social"> <a title="Twitter" href="https://twitter.com/smartaddons" target="_blank"> <span class="fa fa-twitter icon-social"></span> </a> </li> <li class="li-social linkedin-social"> <a title="Linkedin" href="#" target="_blank"> <span class="fa fa-linkedin icon-social"></span> </a> </li> <li class="li-social google-social"> <a title="Google" href="#" target="_blank"> <span class="fa fa-google-plus icon-social"></span> </a> </li> <li class="li-social pinterest-social"> <a title="Pinterest" href="#" target="_blank"> <span class="fa fa-pinterest icon-social"></span> </a> </li> </ul> </div> </div> |
- Position: Content-top
- Frontend Appearance
- Position: Content-block1
- Frontend Appearance
-
Backend of SO-Deals-Category – Content-block1: Click Here
- Position: Content-block2
- Frontend Appearance
- Position: Content-Block3
- Frontend Appearance

Backend of HTML-Content – Content-Block3: Click Here
Copy and paste the Code into editor:
|
1 2 3 4 5 6 7 8 9 10 11 |
<div class="block-img"> <div class="img-1 banner1-1"> <a class="img-ef2" href="#" title="img"><img src="image/catalog/cms/home2/1.jpg" alt="Image Client"></a> </div> <div class="img-1 banner1-2"> <a class="img-ef2" href="#" title="img"><img src="image/catalog/cms/home2/2.jpg" alt="Image Client"></a> </div> <div class="img-1 banner1-3"> <a class="img-ef2" href="#" title="img"><img src="image/catalog/cms/home2/3.jpg" alt="Image Client"></a> </div> </div> |
- Position: Content-block4
- Frontend Appearance
- Position: Content-Block4
- Frontend Appearance

- Position: Content-block4
- Frontend Appearance
- Backend of General Options: Click Here
- Backend of Source Options: Click Here
- Backend of Products Options: Click Here
- Backend of Image Options: Click Here
- Backend of Effect Options: Click Here
- Backend of Advanced Options: Click Here
- Position: Content-Block5
- Frontend Appearance
- Position: Content-Block6
- Frontend Appearance
- Position: Content-Bottom
- Frontend Appearance
- Backend of General Options: Click Here
- Backend of Category Options: Click Here
- Backend of Blogs Options: Click Here
- Backend of Image Options: Click Here
- Backend of Effect Options: Click Here
- Backend of Advanced Options: Click Here
- Position: Content-Bottom
- Frontend Appearance
- Position: Footer-top1
- Frontend Appearance
- Backend of General Options: Click Here
- Backend of Category Options: Click Here
- Backend of Products Options: Click Here
- Backend of Image Options: Click Here
- Backend of Advanced Options: Click Here
- Other extensions in Layout2 are configured the same as above extensions in Layout1.
Backend of HTML-Content – Content-Block4: Click Here
Copy and paste the Code into editor:
|
1 2 3 4 5 6 7 8 9 10 11 12 13 14 15 16 17 18 19 20 21 22 23 24 25 26 27 |
<div class="content-box hm"> <div class="banner-infos"> <div class="banner-info banner-info1"> <img src="image/catalog/cms/home2/icon1.png" alt="Image Client"> <div class="banner-cont"> <a href="#">FREE SHIPPING</a> <p>Vestibulum dolor purus porta</p> </div> </div> <div class="banner-info banner-info2"> <div class="inner"> <img src="image/catalog/cms/home2/icon2.png" alt="Image Client"> <div class="banner-cont"> <a href="#">MONEY BACK GUARANTEE</a> <p>Vestibulum dolor purus porta</p> </div> </div> </div> <div class="banner-info banner-info3"> <img src="image/catalog/cms/home2/icon3.png" alt="Image Client"> <div class="banner-cont"> <a href="#">24 HOURS SUPPORT</a> <p>Vestibulum dolor purus porta</p> </div> </div> </div> </div> |
Backend of SO-Extraslider-Bellers-Product-Home2 – Content-Block4: Click Here
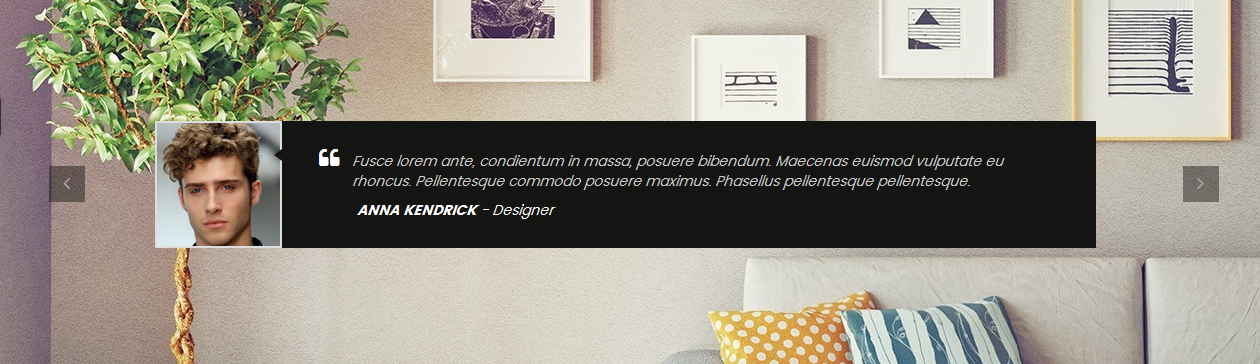
Backend of HTML-Content – Content-Block5: Click Here
Copy and paste the Code into editor:
|
1 2 3 4 5 6 7 8 9 10 11 12 13 14 15 16 17 18 19 20 21 22 23 24 25 26 27 28 29 30 31 32 33 34 35 36 37 38 39 40 41 42 43 44 45 46 47 48 49 50 51 52 53 54 55 56 57 58 59 60 61 62 63 |
<div class="testimonials"> <div class="testimonial-slider"> <div class="item"> <img src="image/catalog/cms/home2/client1.png" alt="Image Client"> <div class="item-inner"> <p class="client-des">Fusce lorem ante, condientum in massa, posuere bibendum. Maecenas euismod vulputate eu rhoncus. Pellentesque commodo posuere maximus. Phasellus pellentesque pellentesque.</p> <p class="client-name"><strong>Anna Kendrick</strong> - Designer</p> </div> </div> <div class="item"> <img src="image/catalog/cms/home2/client2.png" alt="Image Client"> <div class="item-inner"> <p class="client-des">Consectetur adipisicing elit, lorem ipsum dolor sit amet, sed do eiusmod tempor incididunt ut labore et dolore magna. Sed do eiusmod tempor incididunt ut labore et dolore magna.</p> <p class="client-name"><strong>Abraham</strong> - Marketing</p> </div> </div> <div class="item"> <img src="image/catalog/cms/home2/client3.png" alt="Image Client"> <div class="item-inner"> <p class="client-des">Sed do eiusmod tempor incididunt ut labore et dolore magna, lorem ipsum dolor sit amet, consectetur adipisicing elit. Sed do eiusmod tempor incididunt ut labore et dolore magna.</p> <p class="client-name"><strong>Anna Kendrick</strong> - CEO</p> </div> </div> </div> <script> jQuery(document).ready(function($) { var owl_testimonial = $(".testimonial-slider"); owl_testimonial.owlCarousel2({ responsive:{ 0:{ items:1 }, 480:{ items:1 }, 768:{ items:1 }, 992:{ items:1 }, 1200:{ items:1 } }, autoplay:false, loop:true, nav : true, // Show next and prev buttons dots: false, navText: ["", ""], autoplaySpeed : 500, navSpeed : 500, dotsSpeed : 500, autoplayHoverPause: true, margin:30, }); }); </script> </div> |
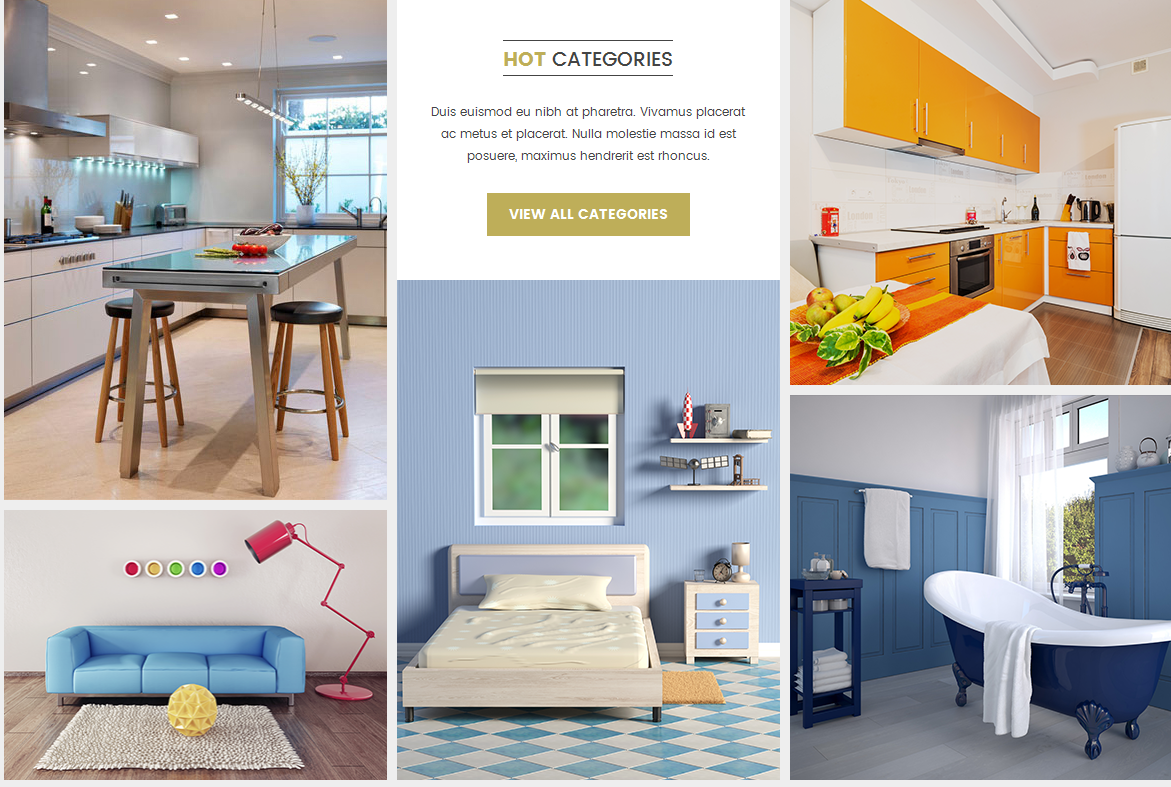
Backend of HTML-Content – Content-Block6: Click Here
Copy and paste the Code into editor:
|
1 2 3 4 5 6 7 8 9 10 11 12 13 14 15 16 17 18 19 20 21 22 23 24 25 26 27 28 29 30 31 32 33 34 35 36 37 38 39 40 41 42 43 44 45 46 47 48 49 50 51 52 53 54 55 56 57 58 59 60 61 62 63 64 65 66 67 68 69 70 71 72 73 74 75 76 77 78 79 80 81 82 83 84 85 86 87 88 89 90 91 92 93 94 95 96 97 98 |
<div class="block-hot-cate"> <div class="static-content static-content1"> <div class="h-cont content1-1 h-margin"> <img src="image/catalog/cms/home2/cate-1.jpg" alt="Image Client"> <div class="inner"> <div class="title-cate"> <h2>Dining room</h2> </div> <ul> <li><a href="#">Large Coffee Tables</a></li> <li><a href="#">Small Coffee Tables</a></li> <li><a href="#">Coffee Table sets</a></li> <li><a href="#">End Tables</a></li> <li><a href="#">Console Tables</a></li> <li><a href="#">Set Of Tables</a></li> </ul> </div> </div> <div class="h-cont content1-2"> <img src="image/catalog/cms/home2/cate-2.png" alt="Image Client"> <div class="inner"> <div class="title-cate"> <h2>Living room</h2> </div> <ul> <li><a href="#">Coffee Table sets</a></li> <li><a href="#">End Tables</a></li> <li><a href="#">Console Tables</a></li> <li><a href="#">Set Of Tables</a></li> </ul> </div> </div> </div> <div class="static-content static-content2"> <div class="content2-1 h-margin"> <div class="title-cate"> <div class="title-cate"> <h2><strong>Hot</strong> Categories</h2> </div> <div class="desc"> Duis euismod eu nibh at pharetra. Vivamus placerat ac metus et placerat. Nulla molestie massa id est posuere, maximus hendrerit est rhoncus. </div> <a href="#" class="button btn-viewall"> View all categories </a> </div> </div> <div class="h-cont content2-2"> <img src="image/catalog/cms/home2/cate-3.png" alt="Image Client"> <div class="inner"> <div class="title-cate"> <h2>Bed room</h2> </div> <ul> <li><a href="#">Nightstands</a></li> <li><a href="#">Beds</a></li> <li><a href="#">Headboards</a></li> <li><a href="#">Chests & Dressers</a></li> <li><a href="#">Nightstands</a></li> <li><a href="#">Bedroom Sets</a></li> </ul> </div> </div> </div> <div class="static-content static-content3"> <div class="h-cont content3-1 h-margin"> <img src="image/catalog/cms/home2/cate-4.png" alt="Image Client"> <div class="inner"> <div class="title-cate"> <h2>Reading room</h2> </div> <ul> <li><a href="#">Small Coffee Tables</a></li> <li><a href="#">Coffee Table sets</a></li> <li><a href="#">End Tables</a></li> <li><a href="#">Console Tables</a></li> <li><a href="#">Set Of Tables</a></li> </ul> </div> </div> <div class="h-cont content3-2"> <img src="image/catalog/cms/home2/cate-5.png" alt="Image Client"> <div class="inner"> <div class="title-cate"> <h2>Bathroom</h2> </div> <ul> <li><a href="#">Bathroom Faucets</a></li> <li><a href="#">Bathroom Mirrors</a></li> <li><a href="#">Bathroom Sinks</a></li> <li><a href="#">Bathroom Vanities</a></li> <li><a href="#">Showers</a></li> </ul> </div> </div> </div> </div> |

Backend of SO-Extraslider-Bellers-Product-Home2 – Content-Block4: Click Here
Backend of HTML-Content – Content-Bottom: Click Here
Copy and paste the Code into editor:
|
1 2 3 4 5 6 7 8 9 10 11 12 13 14 15 16 17 18 19 20 21 22 23 24 25 26 |
<div class="brands-tab"> <!-- Nav tabs --> <ul class="nav-brand-tabs" role="tablist"> <li class="brands-title"> <h2><strong>Featured</strong> Brands</h2> </li> <li class="br1 active-fix active"><a href="#brand1" data-toggle="tab"><img src="image/catalog/cms/home2/tab-1.jpg" alt="Image Client"></a></li> <li class="br2"><a href="#brand2" data-toggle="tab"><img src="image/catalog/cms/home2/tab-2.jpg" alt="Image Client"></a></li> <li class="br3"><a href="#brand3" data-toggle="tab"><img src="image/catalog/cms/home2/tab-3.jpg" alt="Image Client"></a></li> </ul> <!-- Tab panes --> <div class="tab-content"> <div class="tab-pane fade in active" id="brand1"><a class="img-ef2" href="#" title="img"><img src="image/catalog/cms/home2/ct-1.jpg" alt="Image Client"></a></div> <div class="tab-pane fade" id="brand2"><a class="img-ef2" href="#" title="img"><img src="image/catalog/cms/home2/ct-2.jpg" alt="Image Client"></a></div> <div class="tab-pane fade" id="brand3"><a class="img-ef2" href="#" title="img"><img src="image/catalog/cms/home2/ct-3.jpg" alt="Image Client"></a></div> <div class="tab-pane fade" id="brand4"><a class="img-ef2" href="#" title="img"><img src="image/catalog/cms/home2/ct-4.jpg" alt="Image Client"></a></div> <div class="tab-pane fade" id="brand5"><a class="img-ef2" href="#" title="img"><img src="image/catalog/cms/home2/ct-5.jpg" alt="Image Client"></a></div> <div class="tab-pane fade" id="brand6"><a class="img-ef2" href="#" title="img"><img src="image/catalog/cms/home2/ct-6.jpg" alt="Image Client"></a></div> </div> <!-- Nav tabs --> <ul class="nav-brand-tabs"> <li class="br4"><a href="#brand4" data-toggle="tab"><img src="image/catalog/cms/home2/tab-4.jpg" alt="Image Client"></a></li> <li class="br5"><a href="#brand5" data-toggle="tab"><img src="image/catalog/cms/home2/tab-5.jpg" alt="Image Client"></a></li> <li class="br6"><a href="#brand6" data-toggle="tab"><img src="image/catalog/cms/home2/tab-6.jpg" alt="Image Client"></a></li> </ul> </div> |

Backend of SO-Basic-Product – Footer-top1: Click Here
Note: You can read other extensions here:
4SUPPORT – Back to top
Thank you so much for purchasing this template. If you have any questions that are beyond the scope of this help file, please send us via: Submit a Ticket
Thanks so much!
